
Don’t be scared of this Paper Plate Scarecrow idea! Part of the fun of the fall season is all the crafts you can do! Keep scrolling to see how we made this adorable scarecrow come to life with simple supplies and steps!

Paper Plate Scarecrow – Awesome Craft Idea For Fall Break
Hi friends! I’m so glad you landed on today’s Paper Plate Scarecrow craft tutorial!
I sure hope you all have been enjoying all the fall and Thanksgiving kid crafts I’ve been sharing on the Glued To My Crafts blog the past few days. We have been busy crafting around here and I have a TON more tutorials to share with you all in the coming days. Several of which have a turkey theme to them {so stay tuned!}
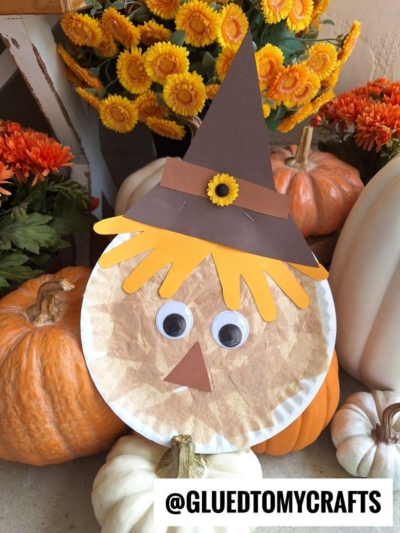
But first – I want to focus on today’s kid friendly craft titled the lovely Paper Plate and Handprint Scarecrow.
Although scarecrows were originally intended to scare away creatures in the fields – this cute guy isn’t scaring ANYONE today. He’s super easy to pull together, adorable and guess what? It in-cooperates those little handprints too!
Ready to learn how to make your own paper scarecrow friend? Let’s grab our craft supplies, find the full tutorial below and get to work on building him today!
Happy crafting, my friends! Don’t forget to share pictures of your creations on our Facebook community wall! #gluedtomycrafts
RELATED —> Wooden Spoon Scarecrow

Get into the fall spirit with this easy-to-make scarecrow paper plate craft! Perfect for children of all ages, this is one craft idea they’ll never forget.
Craft Supplies:
- Large Paper Plate – 1 per craft
- Tan Tissue Paper
- Orange Cardstock Paper
- Brown Cardstock Paper
- Yellow Cardstock Paper
- White Cardstock Paper
- School Glue
- Craft Scissors
- Stapler
- Black Marker
Directions:
- First cut your tan tissue paper into small squares.
- Put a good amount of glue all over the paper plate.
- Have your child cover it completely, with the tan tissue paper squares.
- While they are doing that, cut out of cardstock the scarecrow face embellishments. Think hat, eyes, nose, mouth etc.
- Don’t forget to trace your child’s hands, so the cutouts and can become the hair of the scarecrow.
- Once they are done with the tissue paper step, staple/glue on all the scarecrow features to finish off the paper plate fall scarecrow. I suggest starting at the top of the paper plate and working down from there.
- Then display it proudly for all to see! #gluedtomycrafts
Our Favorite Fall Books:
Here are some recommended books that beautifully complement our craft idea. You can conveniently purchase them through our affiliate links on Amazon.
- Goodbye Summer, Hello Autumn by Kenard Pak
- The Scarecrow: A Fall Book for Kids by Beth Ferry
- It’s Fall! by Renée Kurilla
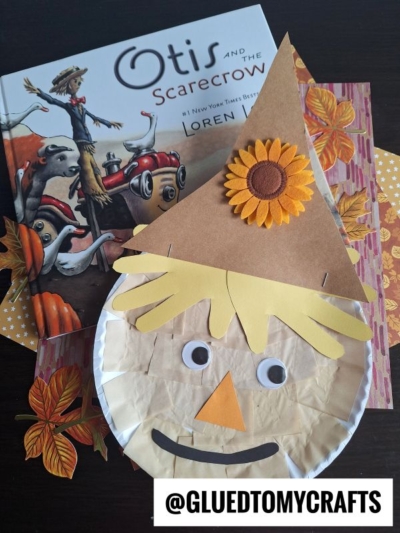
- Otis and the Scarecrow by Loren Long
- There Was an Old Lady Who Swallowed Some Leaves! by Lucille Colandro
- Halloween in the Orchard by Phyllis Alsdurf
- Pete the Cat Falling for Autumn: A Fall Book for Kids by James Dean
RELATED —> Popsicle Stick Scarecrow
If you are looking for even more kid friendly fall crafts like today’s paper plate scarecrow post, be sure to check out these past blog posts from us:
- Paper Bag Crow
- Handprint Scarecrow Hair
- Coffee Filter Pumpkin
- Stained Glass Fall Trees
- Popsicle Stick Scarecrow House
- Paper Bag Scarecrow
- Jack-O-Lantern Scarecrow
- Paper Scrap Scarecrow
- Scoop Stick Scarecrow
- Scarecrow Pumpkin Gnome
- Scarecrow Gnome Keepsake

Paper Plate Scarecrow w/Handprint Hair Craft Idea
Here’s your checklist of supplies to bring this craft to life:
Prepare your creative haven by laying down a protective cover before the crafting magic begins!
Directions:
- First cut your tan tissue paper into small squares.
- Put a good amount of glue all over the paper plate.
- Have your child cover it completely, with the tan tissue paper squares.
- While they are doing that, cut out of cardstock the scarecrow embellishments. Think hat, eyes, nose, mouth etc.
- Don't forget to trace your child's hands, so the cutouts and can become the hair of the scarecrow.
- Once they are done with the tissue paper step, staple/glue on all the scarecrow features to finish off the paper plate scarecrow.

