Create a beautiful torn paper rose card using simple materials from home. Perfect for kids and craft enthusiasts!
Valentine’s Day is the perfect time to share a little love and creativity! What better way to show someone you care than with a handmade card?
This Torn Paper Rose Card Craft is a fun and easy project that’s perfect for kids and adults alike. With just a few simple materials, you can create a beautiful red rose that will never wilt – just like your love and appreciation for the special people in your life.
Let’s gather those supplies, get crafting and make something truly heartfelt this Valentine’s Day!
Craft Supplies:
One of the great things about this craft is that it requires only simple and affordable materials, most of which you might already have at home or in the classroom.
- Red Construction Paper
- Green Construction Paper
- White Cardstock Paper
- Valentine’s Day Rose Printable – on our landing page
- School Glue
- Glitter Glue
- Embellishments
Directions:
Start by preparing a clean and organized workspace. Lay out all the materials so the kids can easily access them. This makes our torn paper poppy flower activity more manageable, especially if you’re working with a group.
- Start by downloading and printing the FREE Valentine’s Day rose printable (linked above) onto a single sheet of white cardstock. This will serve as the base for your craft and make it easy for kids to follow along.
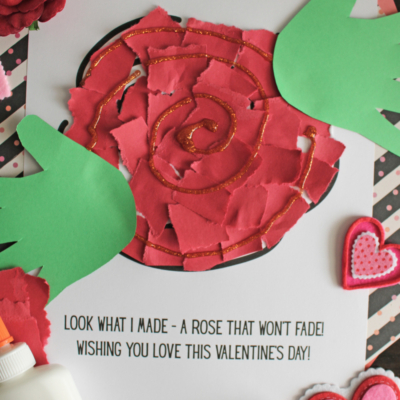
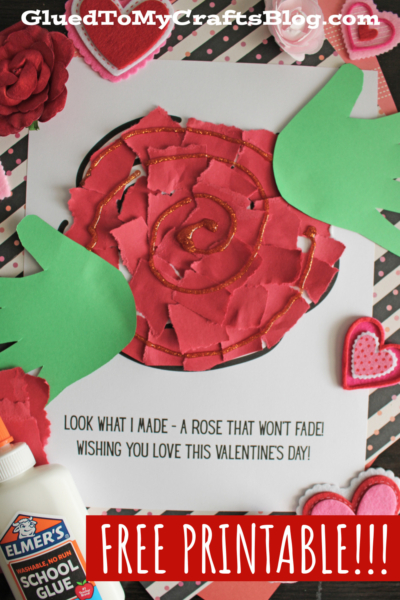
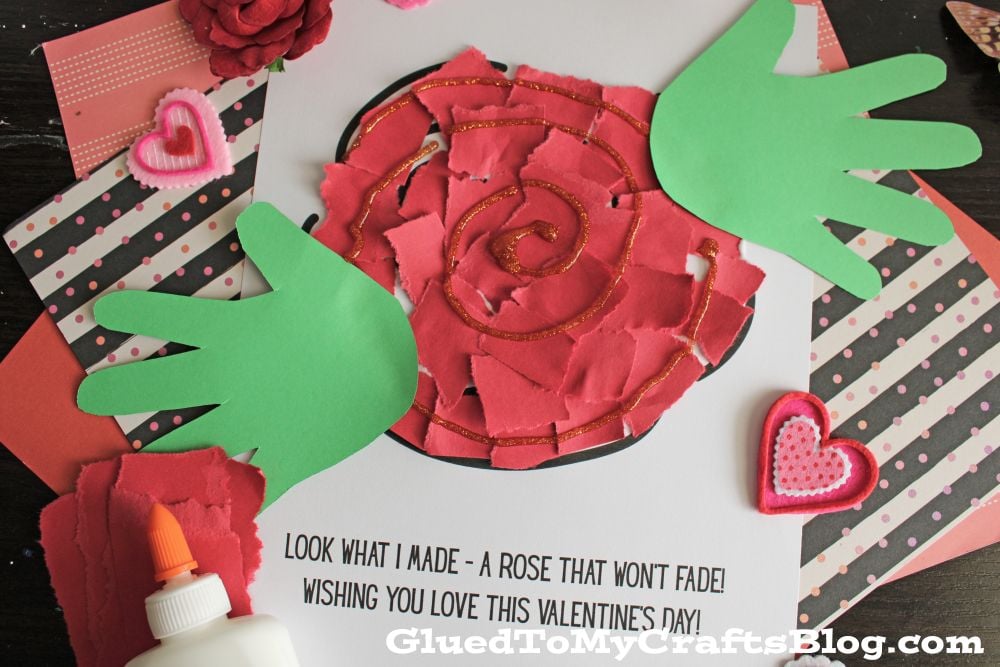
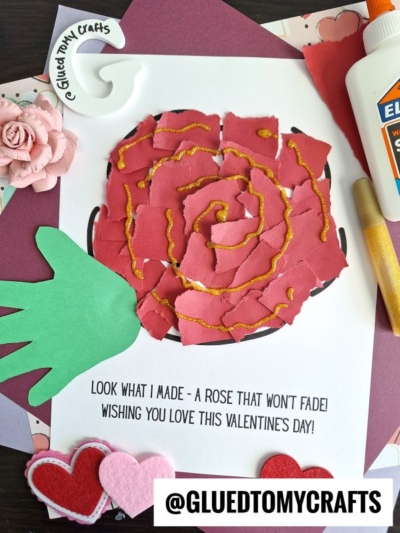
- Help your child tear or cut red construction paper into small pieces. The pieces don’t need to be perfect – uneven edges add charm and character to the rose! This step is great for building fine motor skills and letting kids get hands-on.
- Using school glue, have your child carefully glue the torn red paper pieces inside the rose outline on the printable. Encourage them to take their time and enjoy the process. Remind them that the goal isn’t perfection – it’s about having fun and creating something uniquely their own!
- For a personal touch, trace your child’s hands on green construction paper and cut them out to use as leaves. Glue the handprints on the paper, one on each side of the rose design. Then, use glitter glue to add some sparkle and dimension to the flower. This step makes the craft extra special and eye-catching!
- Allow the glue and glitter to dry completely before handling the craft. This ensures everything stays in place and looks its best.
- Once the roses are finished, it’s time to show them off! If you’re in a classroom, dedicate a space on your bulletin board or wall to display the students’ beautiful creations. At home, you can frame the craft or place it somewhere special to admire.
- Be sure to also snap a photo and share it with the hashtag #GluedToMyCrafts or tag us to showcase their blooming artwork. We’d love to see what you create!
RELATED —> Torn Paper Reindeer Craft Idea For Kids
And there you have it – a beautiful, handmade Torn Paper Red Rose card that’s as unique as the person receiving it! This craft is not only a wonderful way to express your creativity, but it’s also a heartfelt gesture that will brighten someone’s Valentine’s Day.
Whether you’re making one card or a whole batch, each one is sure to bring a smile. So grab your paper, tear into the fun, and let your love bloom! Happy Valentine’s Day!

Torn Paper Valentine's Day Rose Card Craft Idea
Create a beautiful torn paper rose card using simple materials from home. Perfect for kids and craft enthusiasts!
Here’s your checklist of supplies to bring this craft to life:
- School Glue
- Glitter Glue
Prepare your creative haven by laying down a protective cover before the crafting magic begins!
Directions:
- Start by downloading and printing the FREE Valentine’s Day rose printable (linked above) onto a single sheet of white cardstock. This will serve as the base for your craft and make it easy for kids to follow along.
- Help your child tear or cut red construction paper into small pieces. The pieces don’t need to be perfect - uneven edges add charm and character to the rose! This step is great for building fine motor skills and letting kids get hands-on.
- Using school glue, have your child carefully glue the torn red paper pieces inside the rose outline on the printable. Encourage them to take their time and enjoy the process. Remind them that the goal isn’t perfection - it’s about having fun and creating something uniquely their own!
- For a personal touch, trace your child’s hands on green construction paper and cut them out to use as leaves. Glue the handprints on the paper, one on each side of the rose design. Then, use glitter glue to add some sparkle and dimension to the flower. This step makes the craft extra special and eye-catching!
- Allow the glue and glitter to dry completely before handling the craft. This ensures everything stays in place and looks its best.
- Once the roses are finished, it’s time to show them off! If you’re in a classroom, dedicate a space on your bulletin board or wall to display the students’ beautiful creations. At home, you can frame the craft or place it somewhere special to admire.
- Be sure to also snap a photo and share it with the hashtag #GluedToMyCrafts or tag us to showcase their blooming artwork. We’d love to see what you create!

NEED MORE HELP DOWNLOADING OUR FREE PRINTABLES? PLEASE REFER TO OUR FAQ PAGE
If you've enjoyed our content or have any thoughts to share, we'd love to hear from you! Mention @gluedtomycrafts or tag #gluedtomycrafts on Instagram!