
Are you looking for a creative way to get your little ones engaged this fall? Then look no further than this adorable cupcake liner scarecrow craft!

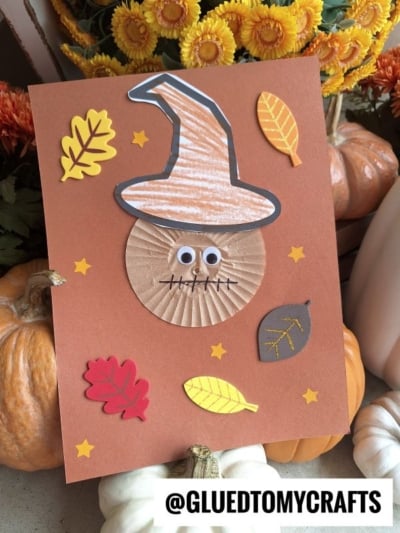
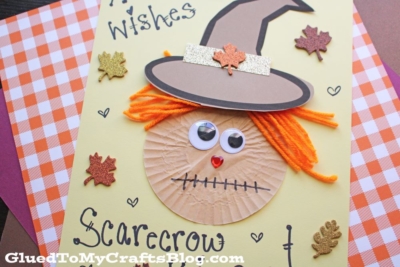
Scarecrow Card Made From A Cupcake Liner
Are you looking for a unique and engaging craft idea to do this fall with your kids? Why not try making a cupcake liner scarecrow card!
This easy-to-make craft is perfect for children of all ages. With just a few simple supplies, some creative imagination, and this tutorial as your guide, your kids will be delighted to have their very own homemade scarecrows that can make autumn just that much more fun.
So what are you waiting for? Celebrate fall with all your friends, family and coworkers by recreating this paper scarecrow craft idea today. It’s perfect for adults and kids to conquer, so don’t fear it! We made it simple with our tutorial below. Keep scrolling for that!
Happy crafting, my friends! Don’t forget to share pictures with us on our Facebook page wall! It would be simply amazing to see those DIY cupcake liner scarecrow cards of yours! #gluedtomycrafts
RELATED —> Paper Plate Scarecrow

Get creative this fall with this fun fall craft idea! Make your own cupcake liner scarecrow card with just a few simple supplies. So much fun for both kids and adults alike!
Craft Supplies:
- Hat Printable – on our landing page
- Cardstock Paper
- Tan Cupcake Liners
- Glue Stick
- Scissors
- Orange Craft Yarn
- Googly Eyes
- Markers, Crayons or Coloring Pencils
- Embellishments
Directions:
- First things first – download and print out the provided “mini scarecrow hat” file on a single sheet of BROWN cardstock paper.
- Trim out one hat shape.
- Save the remaining printable to repeat the craft, while setting aside the finished hat cutout for now.
- Now grab your remaining cardstock paper and one tan cupcake liner.
- Flatten it out with your hands and glue it to the center of your cardstock paper.
- Next grab your orange yarn.
- Cut and tie together strands of yarn to create hair for your scarecrow. Secure it on top of your tan cupcake liner.
- The last step, is to glue the hat cutout on, as well as the wiggle eyes on and drawing on a hand-drawn smile with a marker.
- Finally add any other embellishments you see fit {and writing a message around the completed design.}
- Then display {and/or gift} your cupcake liner scarecrow piece proudly for ALL to see!
Our Favorite Fall Books:
Here are some recommended books that beautifully complement our craft idea. You can conveniently purchase them through our affiliate links on Amazon.
- Goodbye Summer, Hello Autumn by Kenard Pak
- The Scarecrow: A Fall Book for Kids by Beth Ferry
- It’s Fall! by Renée Kurilla
- Otis and the Scarecrow by Loren Long
- There Was an Old Lady Who Swallowed Some Leaves! by Lucille Colandro
- Halloween in the Orchard by Phyllis Alsdurf
- Pete the Cat Falling for Autumn: A Fall Book for Kids by James Dean
RELATED —> Spoon Scarecrow Puppet
We LOVE handmade card ideas on our website!!! Continue the fun AFTER you make our fun scarecrow craft by checking out our creative Sloth, Tough Cookie and Taco cupcake liner card craft posts!
BTW – if ANY of our tutorials inspire you {and we hope today’s paper scarecrow post did!} please be sure to tag your pictures with “Glued To My Crafts” on your various social media sites or use our special hashtag #gluedtomycrafts so we can see!

Cupcake Liner Scarecrow Craft Idea For Fall
Here’s your checklist of supplies to bring this craft to life:
Prepare your creative haven by laying down a protective cover before the crafting magic begins!
Directions:
- First things first - download and print out the provided "mini scarecrow hat" file on a single sheet of BROWN cardstock paper.
- Trim out one hat shape.
- Save the remaining printable to repeat the craft, while setting aside the finished hat cutout for now.
- Now grab your remaining cardstock paper and one tan cupcake liner.
- Flatten it out with your hands and glue it to the center of your cardstock paper.
- Next grab your orange yarn.
- Cut and tie together strands of yarn to create hair for your scarecrow. Secure it on top of your tan cupcake liner.
- The last step, is to glue the hat cutout on, as well as the wiggle eyes on and drawing on a hand-drawn smile with a marker.
- Finally add any other embellishments you see fit {and writing a message around the completed design.}
- Then display {and/or gift} your cupcake liner scarecrow piece proudly for ALL to see!


NEED MORE HELP DOWNLOADING OUR FREE PRINTABLES? PLEASE REFER TO OUR FAQ PAGE