
Falling leaves are a sign that summer is waving us goodbye. I’m so excited to be sharing this Stained Glass Fall Trees kid craft idea with you all today!
Keep scrolling to see how we did it with just contact paper, tissue paper and cardstock paper

How To Make A Stained Glass Tree From Paper
Looking for a fun and easy autumn craft to do with the kids? Why not try making a stained glass fall tree suncatcher! This pretty suncatcher is made with just a few simple materials, and it’s a great project for kids of all ages. Plus, it’s a perfect way to add a little bit of fall color to your window.
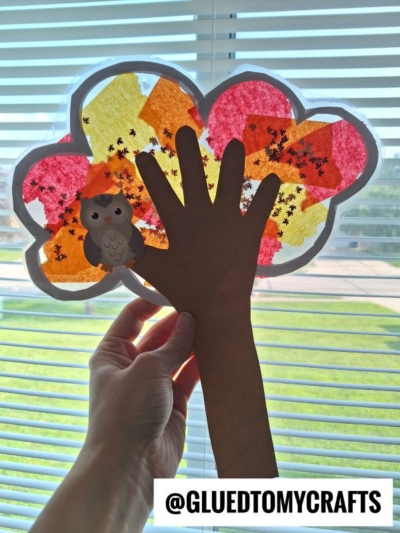
These decorative trees were the perfect addition to adorn our windows, especially when the sun is really bright outside. The colors are so vibrant, you wouldn’t know it was just tissue paper. I’m telling you – this kid friendly craft is super easy and fun for all ages!
What are you waiting for? Let’s grab our supplies and make this Suncatcher Fall Trees together!
Find all the crafty details below! Happy crafting, my friends and don’t forget to share pictures of your child’s tissue paper fall tree creations on our Facebook page! #gluedtomycrafts
RELATED —> Stained Glass Pumpkins

Get ready to fill your home with autumn vibes! Create a beautiful stained glass autumn tree craft during the month of October!
Craft Supplies:
- TREE Printable – on our landing page
- White Cardstock Paper
- Brown Cardstock Paper
- Clear Contact Paper
- Tissue Paper
- Scissors
- Adhesive or Glue
Directions:
- First download and print out the FREE tree shape printable on a sheet of single white cardstock paper.
- Using your scissors, go ahead and trim out the “cloud” shape, as well as the inners.
- Now grab your contact paper and cut two pieces the same length.
- Take off the protective paper off one and lay it on a flat surface.
- Lay your tree cutout on the contact paper.
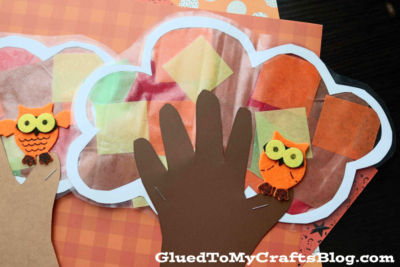
- Grab your tissue paper and cut it into small squares.
- Now have your child place it on the contact paper, to make a beautiful design.
- Once done, grab the other piece of contact paper and remove it’s protective sheet.
- Then lay it on top of the other piece and press firmly. Make sure every corner is stuck together.
- Now use your scissors to trim around the piece so no excess contact paper is visible.
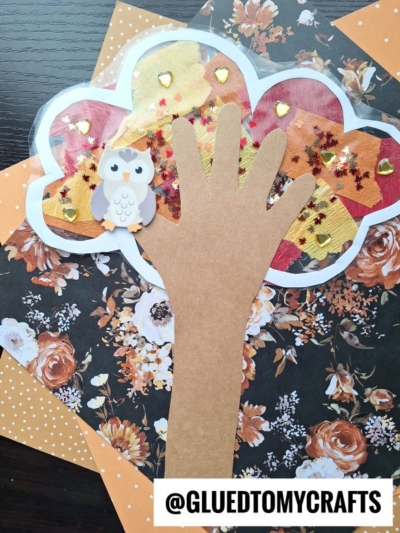
- To finish off the stained glass fall tree craft, trace/cut out a handprint tree trunk from the brown cardstock paper and attach it with some adhesive to the decorate suncatcher piece.
- Then display proudly on a window with some tape!
- Don’t forget to share pictures with us of your colorful trees! #gluedtomycrafts
Pair It With A Book:
Here are a few suggestions for books that complement our craft idea. You can purchase them via our affiliate links on Amazon.
- The Leaf Thief by Alice Hemming {my personal fav!}
- Goodbye Summer, Hello Autumn by Kenard Pak
- It’s Fall! by Renée Kurilla
- Sweep by Louise Greig
- Fletcher and the Falling Leaves by Julia Rawlinson
- Leaf Man by Lois Ehlert
- The Very Last Leaf by Stef Wade
- We’re Going on a Leaf Hunt by Steve Metzger
- The Very Big Fall by Emmy Kastner
- Pete the Cat Falling for Autumn: A Fall Book for Kids by James Dean
RELATED —> Popsicle Stick Apple
If you are looking for more fall themed crafts on Glued To My Crafts, be sure to check out these crafty posts from us:
Paper Plate Turkey
Handprint Turkey
Paper Plate Felt Apple
Potato Stamped Turkey
Potato Stamped Scarecrow
Clothespin Owl
Stained Glass Turkeys
Craft Stick Scarecrow Puppet

Stained Glass Fall Trees Craft Idea
Here’s your checklist of supplies to bring this craft to life:
Prepare your creative haven by laying down a protective cover before the crafting magic begins!
Directions:
- First download and print out the FREE tree shape printable on a sheet of single white cardstock paper.
- Using your scissors, go ahead and trim out the "cloud" shape, as well as the inners.
- Now grab your contact paper and cut two pieces the same length.
- Take off the protective paper off one and lay it on a flat surface.
- Lay your tree cutout on the contact paper.
- Grab your tissue paper and cut it into small squares.
- Now have your child place it on the contact paper, to make a beautiful design.
- Once done, grab the other piece of contact paper and remove it's protective sheet.
- Then lay it on top of the other piece and press firmly. Make sure every corner is stuck together.
- Now use your scissors to trim around the piece so no excess contact paper is visible.
- To finish off the stained glass fall tree craft, trace/cut out a handprint tree trunk from the brown cardstock paper and attach it with some adhesive to the decorate suncatcher piece.
- Then display proudly on a window with some tape!


NEED MORE HELP DOWNLOADING OUR FREE PRINTABLES? PLEASE REFER TO OUR FAQ PAGE