
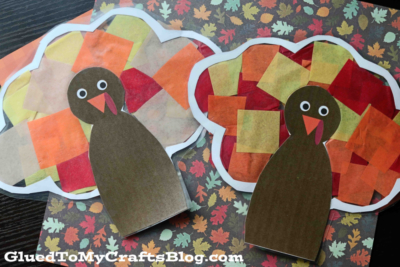
Need a crafty way to get into the Thanksgiving spirit? Try making this beautiful stained glass turkey suncatcher! You’ll be amazed at how easy and fun it is.

Suncatcher Turkeys – Thanksgiving Craft Idea For Kids
Happy Monday readers! I’m so excited you landed on today’s Window Art Turkey kids craft idea!
Boy do I have a TON of kid friendly Thanksgiving crafts to share with you all but till then – this is ONE to pay close attention too. Especially if you are looking for a different way to craft up a turkey with your child, in honor of the upcoming holiday {Gobble Gobble!}
These Tissue Paper Turkey Suncatchers are just as easy as my past tutorials on Glued To My Crafts. I’ve even made a few FREE printables to go along with this craft, so all you need to do is snag the provided freebies, print them out and craft away even faster! My goal was to make it super easy for you and I hope I did just that!
So my friends… there is no need to think out designs or wonder “what the heck did I just draw?” Simply grab up your supplies and make up these stained glass inspired beauties with the full tutorial and free file below!
Happy crafting my friends and don’t forget to share pictures of your tissue paper turkey suncatcher with us on our Facebook page! #gluedtomycrafts
RELATED —> Stained Glass Ornaments

Make this one-of-a-kind DIY stained glass turkey suncatcher to truly show off your Thanksgiving spirit! Make the process as creative and colorful as you’d like – you never know what breathtaking results you can come up with.
Craft Supplies:
- Turkey Printables – on our landing page
- White Cardstock Paper
- Clear Contact Paper
- Tissue Paper
- Scissors
Directions:
- First download and print the TWO FREE stained glass turkey printables {both pages} on white cardstock paper.
- Using your scissors, go ahead and trim out one of the turkey bodies from the first printable.
- For the feather printable, be sure to cut around AND the inside portion out.
- Now grab your contact paper and cut two pieces the same length.
- Take off the protective paper off one and lay it on a flat surface.
- Lay your turkey cutouts on the contact paper.
- Grab your tissue paper and cut it into small squares.
- Now have your child place it on the contact paper, to make a beautiful design.
- Once done, grab the other piece of contact paper and remove it’s protective sheet.
- Then lay it on top of the other piece and press firmly. Make sure every corner is stuck together.
- To finish off the stained glass turkey craft, use your scissors to trim around each piece.
- Then display proudly on a window with some tape!
- Don’t forget to share pictures with us of your colorful turkeys! #gluedtomycrafts
RELATED —> Stained Glass Fall Trees
I have a few more Thanksgiving kid crafts coming up on the Glued To My Crafts blog this week, but until then – enjoy these past blog posts from us:
- Paper Bag Crow
- Curling Ribbon Turkey
- Give Him A Hand Turkey
- Wood Slice Turkey
- Candy Corn Turkey
- Thumbprint Fall Cards
- Stained Glass Pumpkins

Stained Glass Turkey Craft Idea For Thanksgiving
Here’s your checklist of supplies to bring this craft to life:
Prepare your creative haven by laying down a protective cover before the crafting magic begins!
Directions:
- First print out our TWO provided printables, in color, on white cardstock paper.
- Using your scissors, trim out the turkey pieces {as well as the inner from the feather printable!}
- Now grab your contact paper and cut two pieces the same length.
- Take off the protective paper off one and lay it on a flat surface.
- Lay your turkey cutouts on the contact paper.
- Grab your tissue paper and cut it into small squares.
- Now have your child place it on the contact paper, to make a beautiful design.
- Once done, grab the other piece of contact paper and remove it's protective sheet.
- Then lay it on top of the other piece and press firmly. Make sure every corner is stuck together.
- To finish off the stained glass turkey craft, use your scissors to trim around each piece.
- Then display proudly on a window with some tape!


NEED MORE HELP DOWNLOADING OUR FREE PRINTABLES? PLEASE REFER TO OUR FAQ PAGE