
Looking for a fun, budget-friendly craft idea to keep the kids busy? Try this tissue paper stained glass egg activity! It’s easy, colorful, and provides hours of creative entertainment.

Easter Egg Suncatcher Craft
Happy Monday my crafty friends! Welcome! Does anyone else feel like Easter has really crept up on us super fast? {it’s even earlier next year – yikes!} If you are still looking for some last minute craft ideas to keep the kids busy or maybe some ideas to decorate your house with for the upcoming Easter holiday – look no further because today’s simple kid craft idea is calling your name!
Not only are these Stained Glass Egg Suncatchers super easy to make, fairly inexpensive and fun for all ages {even adults will enjoy making these} but this craft is also perfect to decorate windows with or even make a banner out of your finished pieces.
Plus with the FREE printable I’m offering today, you have NO excuse not to craft these Stained Glass Eggs up! All you need to do is download the file, print and get straight to work by customizing them with your child. No guess work or struggling on the perfect design because I’ve set up the basic frame work up for you.
So what are you waiting for? Grab those supplies and get the creative juices flowing! You can find EVERYTHING you need to know, in the full suncatcher craft tutorial below! Happy crafting {and decorating} my friends!
RELATED —> Popsicle Stick Garden Fairies

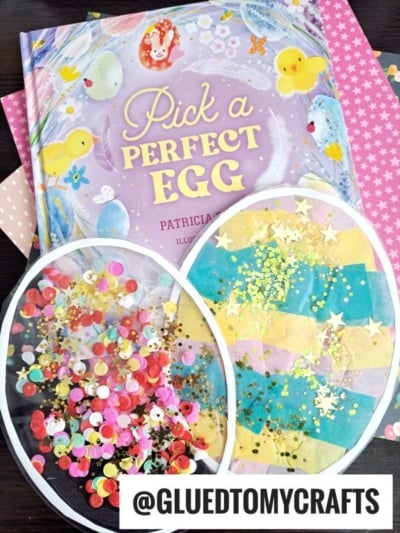
Get kids excited about creating something beautiful this spring with these easy-to-make tissue paper stained glass eggs! Perfect craft ideas for young artists and crafters.
Craft Supplies:
- Free Blank Egg Printable – from our landing page
- Clear Contact Paper
- White Cardstock Paper
- Paper Scissors
- Various Colors of Tissue Paper
- Loose Craft Glitter
Directions:
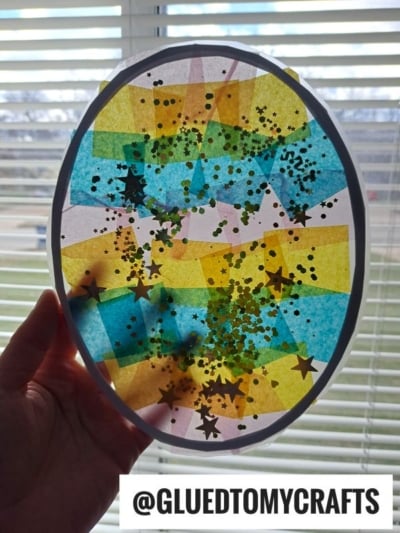
- First grab and print the FREE Easter egg printable on a single sheet of white cardstock paper. You need ONE egg print per craft.
- Using your scissors trim out the egg design, as well as the center of it.
- Now grab your contact paper and cut two pieces the same length.
- Take off the protective paper off one and lay it on a flat surface.
- Lay your egg cutout on the contact paper, face down.
- If desired, shake some loose craft glitter on top of the contact paper & egg design.
- Now grab your various colors of tissue paper and cut it into small squares.
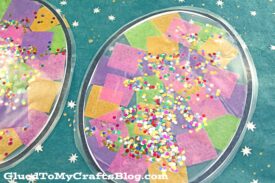
- Have your child place it on the contact paper, inside the egg design, to make a beautiful mosaic piece.
- Once done, grab the other piece of contact paper and remove it’s protective sheet.
- Then lay it on top of the other piece and press firmly, making sure every corner is stuck together.
- To finish off the Stained Glass Eggs, use your scissors to trim out each egg.
- Then display proudly on a window or on a fridge!
RELATED —> Popsicle Stick Easter Friends
If you are looking for even MORE easy Easter themed kid craft ideas, from Glued To My Crafts, be sure to check out these fun posts listed below!
- Tissue Paper Carrot
- Paper Plate Chick
- Popsicle Stick Easter Friends
- Easter Egg Gnome
- Cupcake Liner Bunnies
- Paper Bag Bunny
- Popsicle Stick Bunny Gnome

Tissue Paper Stained Glass Egg Craft Idea
Here’s your checklist of supplies to bring this craft to life:
Prepare your creative haven by laying down a protective cover before the crafting magic begins!
Directions:
- First print out our provided printable, in color, on a single sheet of white cardstock paper. You only need one print per craft.
- Using your scissors trim out the egg design, as well as the center of it.
- Now grab your contact paper and cut two pieces the same length.
- Take off the protective paper off one and lay it on a flat surface.
- Lay your egg cutout on the contact paper, face down.
- If desired, shake some loose craft glitter on top of the contact paper & egg design.
- Now grab your various colors of tissue paper and cut it into small squares.
- Have your child place it on the contact paper, inside the egg design, to make a beautiful mosaic piece.
- Once done, grab the other piece of contact paper and remove it’s protective sheet.
- Then lay it on top of the other piece and press firmly, making sure every corner is stuck together.
- To finish off the Stained Glass Eggs, use your scissors to trim out each egg.
- Then display proudly on a window or on a fridge!


NEED MORE HELP DOWNLOADING OUR FREE PRINTABLES? PLEASE REFER TO OUR FAQ PAGE