
Get ready to glue, cut and design your own popsicle stick bunny gnome today! This activity provides endless possibilities, as it can be enjoyed by moms, teachers, educators, crafters or anyone who enjoys spending quality time with their kiddos!

Easter Bunny Gnome Craft
It’s all about GNOMES on Glued To My Crafts! They are super cute, eye-catching and apparently can be made to fit ANY of the major holidays & seasons. It’s seems to be my new motto in my craft life!
I mean – hello?! I’ve done a Christmas gnome, reindeer gnome, love bug gnome, snowman gnome, leprechaun gnome and now I’m adding a spring version to the blog archives. I just can’t stop coming up with NEW ideas and I hope you love EACH one of them, as much as I enjoy sharing them with you all.
Out of ALL of the popsicle stick gnome craft ideas I’ve shared so far, I think I’m most excited for this one. So without further ado, I present to you how can make your own popsicle stick bunny gnome with your child today. All you need is a few wood craft sticks, paper and glue!
On that note, I bet you are going to have a blast recreating it and falling in love with your new Easter bunny gnome creation! Then make it stand out even more, by snapping a few pictures to tag us on Instagram with! I can’t wait to see what how you give your gnome bunny it’s own personality!
Well – enough chit chat from me! Find all the details you need to know, in the full gnome craft tutorial below! Happy crafting, my dear friends! #gluedtomycrafts
RELATED: Duck Truck and Easter Bunny House

If you are looking for a fun and creative way to entertain your kids, look no further. This popsicle stick bunny gnome craft tutorial is the perfect project to get your children involved in some imaginative and artistic play this spring season!
Craft Supplies:
- Jumbo Wood Sticks – 3 per craft
- School Glue
- Craft Paint
- Small Paper Plate
- Foam Paint Brush
- Craft Scissors
- Scrapbook Paper
- White Cardstock Paper
- Colored Cardstock Paper
- Glitter Cardstock Paper
Directions:
- The fun starts here! First things first – grab three popsicle sticks {three per bunny gnome} as well as your choice in color of craft paint supplies.
- Squirt your pastel colored craft paint on the paper plate.
- Grab your paint brush and go ahead & paint the THREE popsicle sticks completely.
- Next up – glue the three painted sticks together to look like a triangle with the school glue.
- Set aside the triangle piece to let it dry completely.
- Repeat for each spring inspired gnome you want to make today.
- While that is drying, grab all your paper sheets and scissors.
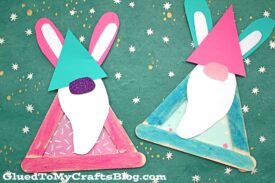
- Cut a triangular shape, from the spring patterned scrapbook paper paper, that will be placed within the popsicle stick design and be the body of the gnome.
- Out of the remaining cardstock, you want to cut out a long white beard, a triangle hat, long bunny ears, oval shaped glitter nose and anything else you can think of!
- To finish off y our Easter Bunny Gnome – go ahead and glue all your paper pieces in place, with some school glue on the painted popsicle stick shape. The large triangle will go on the back of the popsicle stick shape along with the bunny ear cutouts, while all the other pieces go on the front.
- Then add other embellishments they see fit to complete the look.
- Once done, set aside to let it dry completely before displaying proudly!
- Don’t forget to share pictures with us on your social media sites! #gluedtomycrafts
RELATED —> No Place Like Gnome Keepsake

AFFILIATE LINK – PAIR OUR CRAFT IDEA WITH THIS BOOK RECOMMENDATION
We got ALL the fun, crafty stuff you love and need! If you are looking for even MORE easy spring themed kid craft ideas, from Glued To My Crafts, be sure to check out these fun posts listed below.

Popsicle Stick Bunny Gnome Craft Idea For Spring
Here’s your checklist of supplies to bring this craft to life:
- School Glue
Prepare your creative haven by laying down a protective cover before the crafting magic begins!
Directions:
- First things first - grab three popsicle sticks {three per bunny gnome} as well as your choice in color of craft paint supplies.
- Squirt your pastel colored craft paint on the paper plate.
- Grab your paint brush and go ahead & paint the THREE popsicle sticks completely.
- Next up - glue the three painted sticks together to look like a triangle with the school glue.
- Set aside the triangle piece to let it dry completely.
- Repeat for each spring inspired gnome you want to make today.
- While that is drying, grab all your paper sheets and scissors.
- Cut a triangular shape, from the spring patterned scrapbook paper paper, that will be placed within the popsicle stick design and be the body of the gnome.
- Out of the remaining cardstock, you want to cut out a long white beard, a triangle hat, long bunny ears, oval shaped glitter nose and anything else you can think of!
- To finish off the Popsicle Stick Easter Bunny Gnome – go ahead and glue all your paper pieces in place, with some school glue on the painted popsicle stick shape. The large triangle will go on the back of the popsicle stick shape along with the bunny ear cutouts, while all the other pieces go on the front.
- Then add other embellishments they see fit to complete the look.
- Once done, set aside to let it dry completely before displaying proudly!

CLICK HERE TO PRINT THE DIRECTIONS FOR THIS CRAFT