These reindeer gnomes make adorable decorations and are perfect for kids who love crafting.

Are you looking for a simple and easy way to get into the holiday spirit? Check out this craft idea that is perfect for kids of all ages. All you need are some popsicle sticks, cardstock paper, and glue. Let the crafting begin!

The holiday season is the perfect time to get creative with festive projects, and nothing says cozy and whimsical quite like a handmade craft.
Whether you’re searching for an activity to do with kids, a decoration for your mantle, or a personalized gift, this popsicle stick reindeer gnome craft is a delightful option.
With simple materials and a bit of creative flair, you can create an adorable Christmas decoration that’s as fun to make as it is to display.

Today we’re going to create a fun and festive Christmas craft for kids—a reindeer gnome out of craft sticks! It’ll be easy enough for the littlest crafter, but pretty impressive looking. Let’s get started!
Craft Supplies:
Here’s a list of materials you’ll need to get started:
- Jumbo Popsicle Sticks – 3 per craft
- School Glue
- Brown Craft Paint
- Small Paper Plate
- Paint Brush
- Craft Scissors
- Brown Scrapbook Paper
- Green Scrapbook Paper
- Red Cardstock Paper
- White Cardstock Paper
- Gold Pipe Cleaner
- Tape or Washi Tape
- Embellishments
Directions:
Making your popsicle-stick reindeer gnome is easy if you take it step by step. Here’s how:
- Start by gathering three popsicle sticks per reindeer gnome, along with your craft paint supplies.
- Pour some brown paint onto a paper plate and paint all three popsicle sticks completely.
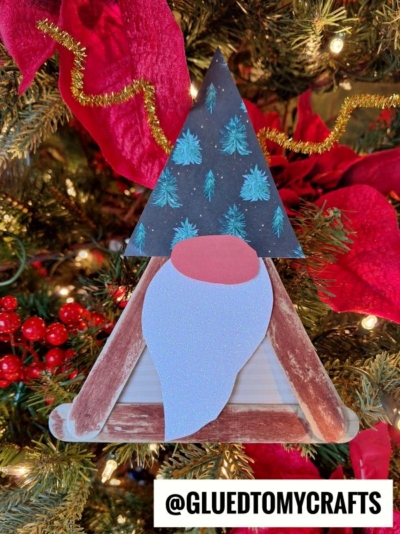
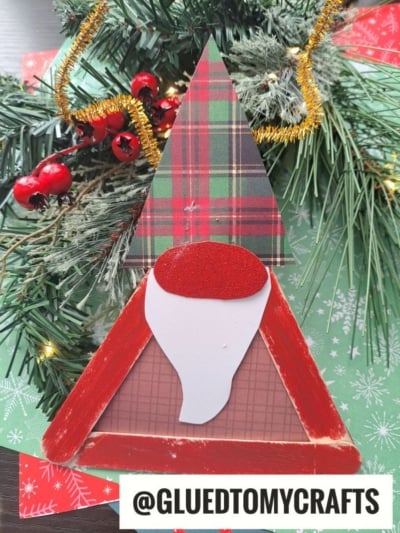
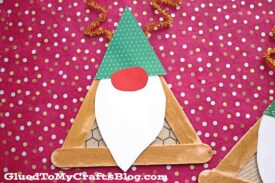
- Once painted, glue the sticks together in a triangular shape. Set the triangle aside to dry completely. Repeat this step for each gnome you plan to make.
- While the triangles are drying, grab your scrapbook paper and scissors.
- Cut a triangular piece from the brown scrapbook paper to fit inside the popsicle stick triangle—this will form the gnome’s body.
- Next, cut a festive hat for the gnome using green scrapbook paper.
- From the red cardstock, cut an oval shape for the nose, and from the white cardstock, cut out a fluffy beard.
- Assemble your gnome! Glue the brown triangle to the back of the popsicle stick frame. Then, attach the hat, nose, and beard to the front using school glue.
- To add the finishing touch, fold a gold pipe cleaner in half to create antlers. Secure the antlers to the back of the popsicle stick triangle using tape.
- Feel free to add any extra embellishments to personalize your reindeer gnome!
- Once complete, let everything dry fully before displaying your adorable creations.
- Don’t forget to share your finished gnomes with us on social media using #gluedtomycrafts! We can’t wait to see your festive masterpieces!
RELATED —> Paper Plate Christmas Camper
If you are looking for even MORE easy holiday themed kid craft ideas, be sure to check out these fun posts listed below.
And “if” you decide to make our Popsicle Stick Reindeer Gnome kid craft, please share a picture on our Facebook page or tag us on Instagram with #gluedtomycrafts for us to see. We love seeing our inspiration come to life!
Popsicle Stick Christmas Mail Truck

Popsicle Stick Reindeer Gnome Craft Idea For Christmas
These reindeer gnomes make adorable decorations and are perfect for kids who love crafting.
Here’s your checklist of supplies to bring this craft to life:
- School Glue
Prepare your creative haven by laying down a protective cover before the crafting magic begins!
Directions:
- Start by gathering three popsicle sticks per reindeer gnome, along with your craft paint supplies.
- Pour some brown paint onto a paper plate and paint all three popsicle sticks completely.
- Once painted, glue the sticks together in a triangular shape. Set the triangle aside to dry completely. Repeat this step for each gnome you plan to make.
- While the triangles are drying, grab your scrapbook paper and scissors.
- Cut a triangular piece from the brown scrapbook paper to fit inside the popsicle stick triangle—this will form the gnome's body.
- Next, cut a festive hat for the gnome using green scrapbook paper.
- From the red cardstock, cut an oval shape for the nose, and from the white cardstock, cut out a fluffy beard.
- Assemble your gnome! Glue the brown triangle to the back of the popsicle stick frame. Then, attach the hat, nose, and beard to the front using school glue.
- To add the finishing touch, fold a gold pipe cleaner in half to create antlers. Secure the antlers to the back of the popsicle stick triangle using tape.
- Feel free to add any extra embellishments to personalize your reindeer gnome!
- Once complete, let everything dry fully before displaying your adorable creations.
- Don’t forget to share your finished gnomes with us on social media using #gluedtomycrafts! We can’t wait to see your festive masterpieces!

CLICK HERE TO PRINT THE DIRECTIONS FOR THIS CRAFT
If you've enjoyed our content or have any thoughts to share, we'd love to hear from you! Mention @gluedtomycrafts or tag #gluedtomycrafts on Instagram!