Craft a festive Popsicle Stick Christmas Mail Truck with ease! A fun, creative activity kids will love - perfect for the holidays using simple materials.

Learn how to make a cute popsicle stick Christmas mail truck with our easy step-by-step guide. Perfect for kids, gifts, and festive decorations!

Christmas is all about joy, creativity, and bringing people together, and there’s nothing better than combining all three in a fun, easy DIY craft.
If you’re looking for a Christmas activity that’s perfect for all ages, this popsicle stick Christmas mail truck craft is a must-try. With just a few basic supplies, you can create an adorable keepsake or holiday decoration that celebrates the spirit of delivering holiday cheer!
This post will guide you through step-by-step instructions to create your own charming mail truck. Whether you’re entertaining kids at home, organizing a holiday family craft night, or looking for a unique classroom project, this craft is both engaging and festive.

Creating a popsicle stick Christmas mail truck is the perfect holiday craft for bringing people together and spreading cheer. Whether it’s bonding with your kids, hosting a DIY night with friends, or making personal gifts for loved ones, this fun and simple project is bound to bring smiles all around.
Craft Supplies:
Before starting your Christmas mail truck craft, gather the following materials. If you’re a crafting enthusiast, chances are you already have most of these items lying around. If not, a quick trip to your local craft store will do the trick.
- Jumbo Popsicle Sticks – 8 per craft
- White Craft Paint
- Red Craft Paint
- Blue Craft Paint
- Paint Brushes
- Small Paper Plate
- School Glue
- Gray Cardstock Paper
- Black Cardstock Paper
- Yellow Cardstock Paper
- Craft Scissors
- Embellishments
Directions:
Here’s how you can create your very own Christmas mail truck, step by step. Follow along and don’t forget to add your personalized twist.
- Start by gathering EIGHT jumbo popsicle sticks and some school glue.
- Lay four popsicle sticks side by side on a flat surface, resembling a fence.
- Take the remaining four sticks and glue them horizontally across the first four, forming a square frame (refer to our pictures for guidance).
- Once the sticks are securely glued together, set the frame aside to dry completely. Repeat this step for each mail truck you’d like to make.
- While the popsicle stick frames are drying, grab your colored cardstock and scissors.
- From the gray cardstock, cut a small rectangle for the window.
- From the black cardstock, cut out TWO small circles to serve as wheels.
- From the yellow cardstock, cut a small half-circle for the truck’s headlight.
- Keep all the paper pieces aside for later assembly.
- Next, grab your dried popsicle stick frame, a paper plate, paintbrushes, and craft paint.
- Start by painting the entire frame white using your white craft paint.
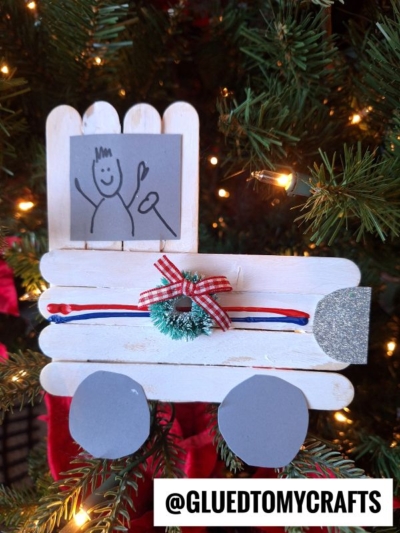
- Once the base coat is dry, use red and blue paint to add horizontal lines on the frame, mimicking the design of a postal truck.To complete your glue the cardstock pieces (window, wheels, and headlight) onto the painted frame. Add extra embellishments, such as a wreath or Santa stickers, to make it festive (we found ours at Michaels!).
- Once assembled, set everything aside to dry completely.
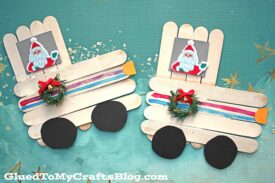
- Display your adorable mail truck creation or use it for imaginative play!
- Don’t forget to capture some photos of your finished craft and share them with us on social media using #gluedtomycrafts. We’d love to see your creativity in action!
RELATED —> Popsicle Stick Christmas Truck
At Glued To My Crafts we believe in making awesome holiday memories through crafts!
Check out our popular Grinch & Friends, Christmas Truck and Red Truck Snow Globe craft posts that can be made in the comfort of your home today and in honor of the Christmas season.
No extra skills or elaborate materials required! Plus you have the whole family join in on the fun as well! #gluedtomycrafts

Popsicle Stick Christmas Mail Truck Craft Idea
Craft a festive Popsicle Stick Christmas Mail Truck with ease! A fun, creative activity kids will love - perfect for the holidays using simple materials.
Here’s your checklist of supplies to bring this craft to life:
- 8 Jumbo Popsicle Sticks
- Cardstock Paper
- Craft Paint
- Embellishments
- School Glue
Prepare your creative haven by laying down a protective cover before the crafting magic begins!
Directions:
- Start by gathering EIGHT jumbo popsicle sticks and some school glue.
- Lay four popsicle sticks side by side on a flat surface, resembling a fence.
- Take the remaining four sticks and glue them horizontally across the first four, forming a square frame (refer to our pictures for guidance).
- Once the sticks are securely glued together, set the frame aside to dry completely. Repeat this step for each mail truck you'd like to make.
- While the popsicle stick frames are drying, grab your colored cardstock and scissors.
- From the gray cardstock, cut a small rectangle for the window.
- From the black cardstock, cut out TWO small circles to serve as wheels.
- From the yellow cardstock, cut a small half-circle for the truck’s headlight.
- Keep all the paper pieces aside for later assembly.
- Next, grab your dried popsicle stick frame, a paper plate, paintbrushes, and craft paint.
- Start by painting the entire frame white using your white craft paint.
- Once the base coat is dry, use red and blue paint to add horizontal lines on the frame, mimicking the design of a postal truck.To complete your glue the cardstock pieces (window, wheels, and headlight) onto the painted frame. Add extra embellishments, such as a wreath or Santa stickers, to make it festive (we found ours at Michaels!).
- Once assembled, set everything aside to dry completely.
- Display your adorable mail truck creation or use it for imaginative play!
- Don't forget to capture some photos of your finished craft and share them with us on social media using #gluedtomycrafts. We'd love to see your creativity in action!

CLICK HERE TO PRINT THE DIRECTIONS FOR THIS CRAFT
If you've enjoyed our content or have any thoughts to share, we'd love to hear from you! Mention @gluedtomycrafts or tag #gluedtomycrafts on Instagram!