
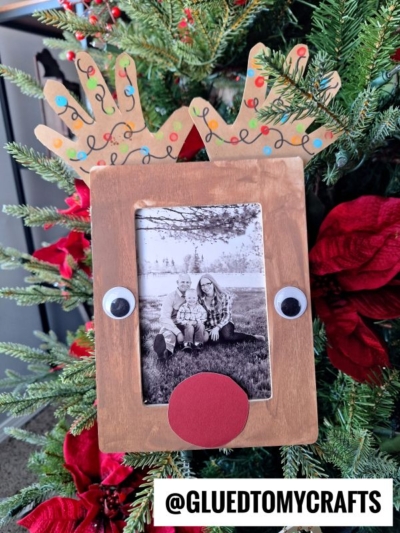
Christmas is a time for family, fun, and crafting! Get the kids involved this year with this adorable handprint reindeer frame. It’s easy to make and will be a great keepsake for years to come. Let’s get started!

Reindeer Picture Frame Craft Idea For Christmas
As the holiday season quickly approaches, it’s time to get creative with your kids and make some festive crafts!
Whether you are a teacher looking for something different to do in the classroom or a mom who wants to surprise her loved ones with homemade projects – this handprint reindeer frame craft will be an absolute hit.
It’s very easy and fun to make, bringing out everybody’s inner artist! Not only is this project great for getting into the Christmas spirit but it can also serve as a special keepsake that will remind you of years past.
Happy crafting, my friends! Don’t forget to share pictures of your beautiful and handmade handprint reindeer frames with us on our Facebook page! #gluedtomycrafts
RELATED: Reindeer Envelope Puppet and Paper Roll Reindeer

Are you looking for a way to keep the kids busy this holiday season? This easy DIY handprint reindeer frame is perfect! Not only will it keep them occupied, but it will also create a cherished keepsake that they can look back on for years to come. So get your craft supplies ready and let’s get started!
Craft Supplies:
- Large, Unfinished Wood Frame
- Brown Craft Paint
- Foam Paint Brush
- Small Paper Plate
- Red Cardstock Paper
- Brown Cardstock Paper
- White Cardstock Paper
- Large Paper Circle Punch
- Black Sharpie Marker
- Paper Craft Scissors
- Low-Temp Hot Glue Gun
Directions:
- First have your child paint their wood frame completely brown.
- When done, set aside the painted frame to let it dry completely.
- Now grab your brown cardstock and trace your child’s hands on it.
- Trim out those traced out designs. These will become the antlers for the reindeer.
- Now grab your red cardstock, white cardstock and paper punches.
- Out of both colors, cut/punch out facial embellishments to give the reindeer life {think eyes and a big red nose.}
- Use the black sharpie marker to draw on pupils on the white circle pieces.
- To finish off the handprint reindeer wood frame, hot glue the paper handprint cutouts, red nose and eye cutouts on the frame, in their designated spots.
- Add other embellishments if you like.
- Then display proudly for all to see!
RELATED —> Reindeer Clothespin Ornaments
If you are looking for even MORE Christmas themed kid crafts, from Glued To My Crafts, be sure to check out these fun posts listed below.
And “if” you decide to make this reindeer picture frame craft, please share a picture on our Facebook page for us to see. We love seeing our inspiration come to life!
- Paper Plate Wreath
- Paper Plate Gingerbread Man
- Popsicle Stick Christmas Wagon
- Popsicle Stick Trains
- Popsicle Stick Reindeer
- Thumbprint Snowman Frame
- Paper Plate Reindeer
- Reindeer Picture Frame

Handprint Reindeer Frame Craft
Here’s your checklist of supplies to bring this craft to life:
- Unfinished Wooden Craft Frame
- Craft Paint
- Cardstock Paper
Prepare your creative haven by laying down a protective cover before the crafting magic begins!
Directions:
- First have your child paint their wood frame completely brown.
- When done, set aside the painted frame to let it dry completely.
- Now grab your brown cardstock and trace your child's hands on it.
- Trim out those traced out designs. These will become the antlers for the reindeer.
- Now grab your red cardstock, white cardstock and paper punches.
- Out of both colors, cut/punch out facial embellishments to give the reindeer life {think eyes and a big red nose.}
- Use the black sharpie marker to draw on pupils on the white circle pieces.
- To finish off the handprint reindeer wood frame, hot glue the paper handprint cutouts, red nose and eye cutouts on the frame, in their designated spots.
- Add other embellishments if you like.
- Then display proudly for all to see!


CLICK HERE TO PRINT THE DIRECTIONS FOR THIS CRAFT