Create a festive Paper Plate Reindeer Picture Frame Craft with this fun Christmas project! Perfect for kids, using simple materials to inspire holiday creativity.
This Christmas, get the kids in on the fun with a festive paper plate reindeer frame craft!
It’s easy to make and requires minimal materials, so it’s perfect for a last-minute crafting session. All you need is some paper plates, paint, glue, and embellishments!

I’ve combined some of my favorite materials into a fun Christmas themed kid craft idea! Perfect for kids AND adults alike to make & show off this festive season!
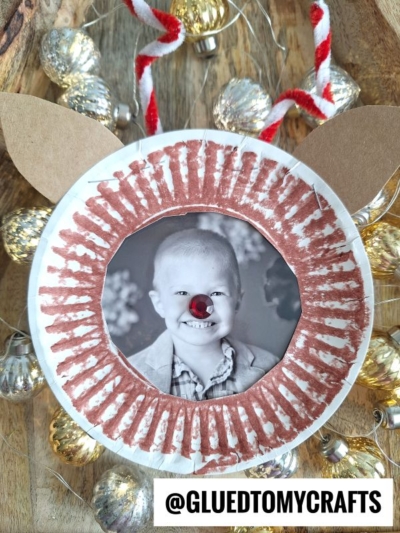
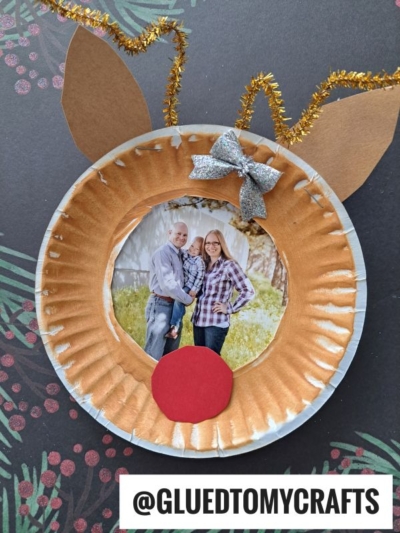
With complete customization at your crafty fingertips, your “reindeer picture frames” can be displayed as is or be turned into a paper plate tree ornament by hot gluing ribbon to the back {which makes it even more awesome – especially for a classroom keepsake craft idea!!!} You could even add custom embellishments like sequins, bows or a paper collar towards the bottom for your child’s name!
So don’t delay, find the full tutorial below! Then create your own magical paper plate reindeer piece to show off for all to see!!!
Happy crafting, my friends!!! Don’t forget to tag us or use our hashtag #gluedtomycrafts on Instagram for us to see your creations!

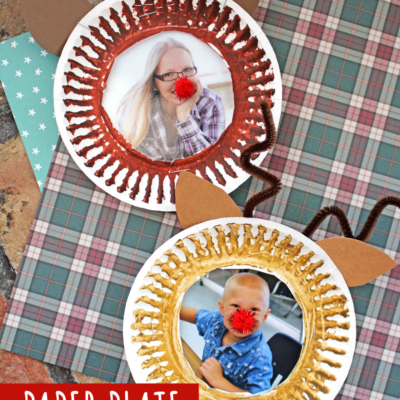
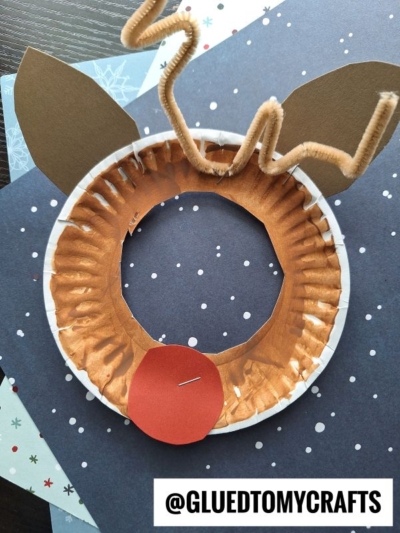
Make a paper plate reindeer picture frame craft for Christmas this year. This is an easy craft that doesn’t require much skill, and it’s perfect for the kids (or even your coworkers) to make!
Craft Supplies:
- Small White Paper Plate – 1 per craft
- 4×6″ Printed Facial Picture
- Basic Craft Scissors
- Brown Craft Paint
- Foam Paint Brush
- Hand-Held Office Stapler
- Brown Cardstock Paper
- Gold Pipe Cleaners
- Washi Tape
- Small Glue Dots
- Small Red Pom Poms
- optional material – ribbon/hot glue gun for hanging
Directions:
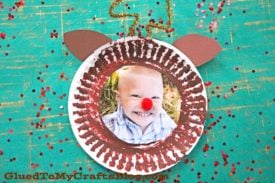
- First cut out a circle shape out of the center of your small paper plate {don’t cut the rim though!} to create an opening for your picture.
- Discard the excess paper you just cut out.
- Next up – paint the paper plate shape completely brown.
- Set aside to let it dry a bit.
- Grab your brown cardstock. Cut out TWO ears for the reindeer.
- Now grab the gold pipe cleaner.
- Fold it in half and curve each side to look like antlers.
- Go ahead and also trim down the printed picture to be placed inside the paper plate frame.
- Now we are ready for assembling.
- Go ahead and staple the reindeer cardstock ears in place.
- Follow that up with the pipe cleaner antlers.
- Use washi tape to secure the picture inside the frame.
- Finally – use a small glue dot to attach the red pom pom to the nose of your picture.
- If desired – add other embellishments or hot glue a piece of ribbon to the back for easy hanging.
- Then display proudly for ALL to see!
RELATED —> Popsicle Stick Reindeer
Don’t let the crafty fun stop here! Why not grab some coffee, scroll through our site and stay for a bit?
We have our newly posted Gingerbread Princesses, Cookies In Oven and Christmas Tree Stand craft posts for YOU to check out!

Paper Plate Reindeer Picture Frame Craft Idea
Create a festive Paper Plate Reindeer Picture Frame Craft with this fun Christmas project! Perfect for kids, using simple materials to inspire holiday creativity.
Here’s your checklist of supplies to bring this craft to life:
- 1 Paper Plate
- 1 Small Pom Poms red
- Washi Tape
- 1 Pipe Cleaner gold
- Cardstock Paper
- Craft Paint brown
- 1 Printed Picture
Prepare your creative haven by laying down a protective cover before the crafting magic begins!
Directions:
- First cut out a circle shape out of the center of your small paper plate {don't cut the rim though!} to create an opening for your picture.
- Discard the excess paper you just cut out.
- Next up - paint the paper plate shape completely brown.
- Set aside to let it dry a bit.
- Grab your brown cardstock. Cut out TWO ears for the reindeer.
- Now grab the gold pipe cleaner.
- Fold it in half and curve each side to look like antlers.
- Go ahead and also trim down the printed picture to be placed inside the paper plate frame.
- Now we are ready for assembling.
- Go ahead and staple the reindeer cardstock ears in place.
- Follow that up with the pipe cleaner antlers.
- Use washi tape to secure the picture inside the frame.
- Finally - use a small glue dot to attach the red pom pom to the nose of your picture.
- If desired - add other embellishments or hot glue a piece of ribbon to the back for easy hanging.
- Then display proudly for ALL to see!

CLICK HERE TO PRINT THE DIRECTIONS FOR THIS CRAFT
If you've enjoyed our content or have any thoughts to share, we'd love to hear from you! Mention @gluedtomycrafts or tag #gluedtomycrafts on Instagram!