Glued To My Crafts

Join thousands of others who have gotten GLUED to our craft tutorials!

  • Home
  • Privacy Policy
  • Craft Safety Guidelines
  • Seasonal Themes
    • New Years
    • Valentine’s Day
    • St. Patrick’s Day
    • Spring
    • Easter
    • Mother’s Day
    • Summer
    • Father’s Day
    • Patriotic
    • Halloween
    • Thanksgiving
    • Fall
    • Winter
    • Christmas
    • Snowmen
    • Story Time
  • About Us
  • Our Amazon Storefront
  • Monthly Themes
    • January Craft Ideas
    • February Craft Ideas
    • March Craft Ideas
    • April Craft Ideas
    • May Craft Ideas
    • June Craft Ideas
    • July Craft Ideas
    • August Craft Ideas
    • September Crafts
    • October Crafts
    • November Crafts
    • December Crafts

Tissue Paper & Paper Plate Reindeer Craft

When engaging in craft activities, it is important for young children to have adult supervision at ALL times. It is also recommended to use supplies that are suitable for your child's age. Feel free to modify materials or steps to meet your specific requirements. Please refer to our safety guidelines for more information.

As an Amazon Associate I earn from qualifying purchases. This post may contain affiliate links. For more information, please see our disclosure policy.

UPDATE FOR 2026 - To reduce storage costs and download fees, we recently made some changes to our website. The password for all our files this year is GLUEDTOMYCRAFTS2026. No sign-up is required to download our free printables! You can enjoy our printables without creating an account or paying for Box.com. Simply follow the download instructions on our FAQ PAGE.

This tutorial is simple and fun, and your little ones will love seeing their handiwork displayed during the season.
SKIP THE FLUFF AND PRINT THE DIRECTIONS
A Paper Plate Reindeer craft featuring brown paper squares, big eyes, antlers, and a red nose, displayed on plaid paper with pine branches in the corner. The text reads "Paper Plate Reindeer" for a festive paper reindeer activity.

You probably know the famous tune and perhaps even know all the reindeer names BUT do you know how easy this adorable red nose reindeer is?

If you are still looking for some easy kid crafts to do with your child during this holiday season – today’s Tissue Paper & Paper Plate Reindeer kid craft idea is another fun & festive post just for you!

A Paper Plate Reindeer craft featuring brown paper squares, big eyes, antlers, and a red nose, displayed on plaid paper with pine branches in the corner. The text reads "Paper Plate Reindeer" for a festive paper reindeer activity.

Get into the holiday spirit with this adorable Tissue Paper & Paper Plate Reindeer Craft! Perfect for kids, this easy and creative project transforms simple materials like tissue paper and paper plates into a charming reindeer masterpiece.

Whether it’s for a classroom activity, a holiday party, or a cozy crafting session at home, this craft is a wonderful way to celebrate the season. With its bright colors and festive flair, kids will love bringing their reindeer to life – complete with a shiny red nose, of course!

So, grab your supplies and let’s get started on this merry crafting adventure! 🦌🎄✨

A Paper Plate Reindeer craft featuring brown paper squares, big eyes, antlers, and a red nose, displayed on plaid paper with pine branches in the corner.

This is a great and easy Christmas craft for kids! All you need are some paper plates, brown tissue paper, and red cardstock paper. Let your child’s creativity shine as they make their very own reindeer!

Craft Supplies:

  • Large Paper Plate – 1 per craft
  • Brown Tissue Paper
  • White School Glue
  • Craft Scissors
  • Dark Brown Cardstock Paper
  • Red Cardstock Paper
  • White Cardstock Paper
  • Circle Craft Punch
  • Stapler
  • Black Marker

Directions:

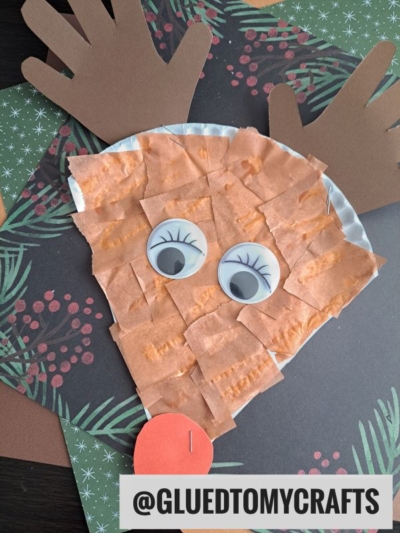
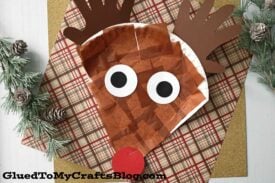
  • First cut your paper plate to look like a reindeer head. {see above picture}
  • Discard the cut off pieces.
  • Next cut your brown tissue paper into small squares.
  • Put a good amount of glue all over the paper plate cutout.
  • Have your child place the tissue paper on top of the glue, until the paper plate is completely covered.
  • Set aside to let it dry completely.
  • While that is drying, trace your child’s hands on some brown cardstock.
  • Trim those out. These are the reindeer antlers. Set aside.
  • Out of the other cardstock, cut out the eyes and nose for the reindeer.
  • To finish off the Paper Plate Reindeer craft, staple/glue on the antlers, eyes and nose.
  • Then display proudly for all to see!
  • Don’t forget to share pictures of your reindeer made out of a paper plate on your social media sites! #gluedtomycrafts

RELATED —> Paper Plate Snowman House

A children’s book titled Dasher Can’t Wait for Christmas is shown with handmade crafts, including a Paper Plate Reindeer and a brown tissue paper reindeer face with googly eyes. Plush reindeer, paper reindeer, and a Santa sleigh complete the festive scene.

AFFILIATE LINK – PAIR OUR CRAFT IDEA WITH THIS BOOK RECOMMENDATION

I hope this kid friendly Christmas reindeer craft idea from Glued To My Crafts, brings you lots of fun crafting memories with your child this season! I have a few more “reindeer” themed kid crafts coming up on the blog soon – so be sure to look out for those!

If you are looking for even MORE holiday themed kid crafts, be sure to check out these fun posts, listed below. And “if” you decide to make this craft, please share a picture on our Facebook page for us to see. We love seeing our inspiration come to life!

  • Christmas Tree Pinecone
  • Popsicle Stick Christmas Truck
  • Cork Snowman Ornament
  • Wooden Reindeer Frame
  • Handprint Reindeer Frame
  • Toilet Paper Roll Reindeer
  • Craft Stick Marshmallow
  • Handprint Reindeer Keepsake
  • Popsicle Stick Reindeer

stacey-signature-2023


A Paper Plate Reindeer craft featuring brown paper squares, big eyes, antlers, and a red nose, displayed on plaid paper with pine branches in the corner. The text reads "Paper Plate Reindeer" for a festive paper reindeer activity.
PRINT

Tissue Paper & Paper Plate Reindeer Craft

This tutorial is simple and fun, and your little ones will love seeing their handiwork displayed during the season.

Here’s your checklist of supplies to bring this craft to life:

  • 1 Large Paper Plate
  • Cardstock Paper brown, white and red
  • Tissue Paper brown
  • School Glue
  • Scissors
  • Circle Paper Punch
  • Stapler
  • Washable Markers
  • Christmas Book Recommendations - link to our Amazon shop

Prepare your creative haven by laying down a protective cover before the crafting magic begins!

Directions:

  • First cut your paper plate to look like a reindeer head.
  • Discard the cut off pieces.
  • Next cut your brown tissue paper into small squares.
  • Put a good amount of glue all over the paper plate cutout.
  • Have your child place the tissue paper on top of the glue, until the paper plate is completely covered.
  • Set aside to let it dry completely.
  • While that is drying, trace your child's hands on some brown cardstock.
  • Trim those out. These are the reindeer antlers. Set aside.
  • Out of the other cardstock, cut out the eyes and nose for the reindeer.
  • To finish off the Paper Plate Reindeer craft, staple/glue on the antlers, eyes and nose.
  • Then display proudly for all to see!
    A Paper Plate Reindeer craft featuring brown paper squares, big eyes, antlers, and a red nose, displayed on plaid paper with pine branches in the corner.
MINI-HEARTS-page-separator-logo-gluedtomycrafts

CLICK HERE TO PRINT THE DIRECTIONS FOR THIS CRAFT

If you've enjoyed our content or have any thoughts to share, we'd love to hear from you! Mention @gluedtomycrafts or tag #gluedtomycrafts on Instagram!

Craft Activity Safety Guidelines:

Always Ensure Adult Supervision - Young children should be supervised at all times when engaging in craft activities. This is essential to keep them safe and ensure materials are used correctly. Use Age-Appropriate Supplies - Choose craft supplies that are suitable for your child’s age. Check labels for recommendations and avoid items with small parts or sharp edges for younger children. Modify as Needed - Feel free to adapt materials or steps to meet your child's abilities and safety needs. For example, substitute scissors with safety scissors if necessary. Keep an Eye on Allergies - Be mindful of potential allergens in craft materials like glue, paint, or certain fabrics. Opt for non-toxic and hypoallergenic options whenever possible. Organize and Secure Supplies - Keep all craft tools and materials organized. Store sharp objects, small parts, and potentially hazardous items out of reach when not in use. Following these guidelines will ensure that crafts remain fun, creative, and, most importantly, safe for everyone involved!


OUR PRIVACY POLICY

OUR COPYRIGHT POLICY

  • Email
  • Facebook
  • Instagram
  • Pinterest
  • Twitter
  • YouTube

LOOKING FOR SOMETHING?

EXPLORE OUR SITE:

TRENDING TODAY:

  • A pink hand-shaped bookmark with red heart stickers and star confetti surrounds a round note that reads a heartfelt message about love and reading. The image is from GluedToMyCraftsBlog.com. Handprint Bookmark Keepsake: A Gift That Holds Your Spot
  • A handmade Valentine’s Day craft featuring a red rose made of torn paper, two green handprint leaves, a glue bottle, heart decorations, and a message: “LOOK WHAT I MADE - A ROSE THAT WON’T FADE! WISHING YOU LOVE THIS VALENTINE’S DAY!”. Torn Paper Rose Card Craft Tutorial for Valentine’s Day
  • A colorful craft project featuring a yellow felt moon, sparkly stars, and heart shapes, with glue and a heartfelt message. Torn Paper Love You To The Moon and Back Card Craft Idea For Kids
  • A handmade card with a rocket drawing, hearts, and messages of love. Felt hearts and an envelope are around it. Handprint Rocket Keepsake - I Love You Because
  • A colorful paper craft featuring a red and pink painted paper plate with yellow circles in the center, green handprint cutouts as leaves, surrounded by craft supplies, heart decorations, and paint bottles. Paint Splat Valentine's Day Flower Craft Idea
  • A vibrant Valentine's Day craft showcasing a torn-paper bumblebee with googly eyes on a white sheet, accompanied by the text "MY VALENTINE!" The scene is decorated with felt hearts, heart-shaped gems, and patterned papers, with a glue bottle and crafting supplies adding to the creative atmosphere. Torn Paper Bee My Valentine Card Craft Idea For Valentine's Day
  • A flat lay of handmade Valentine’s Day cards and decorations, including paper flowers, felt hearts, an envelope, and printed cards with romantic poems, arranged on a gray and pink background. Capture Memories With These 6 Handprint Flower Poems
  • Flat lay of a torn paper dandelion craft featuring a white sheet with a black dandelion outline. Torn yellow, pink, and purple paper pieces are glued to the dandelion head, simulating seeds. Surrounding the craft are Elmer's glue, felt hearts, paper flowers, and patterned scrapbook paper. The text 'MAKING WISHES, ONE PIECE OF PAPER AT A TIME.' and 'GluedToMyCraftsBlog.com' are printed on the white sheet. Torn Paper Dandelion Craft: Making Wishes, One Piece at a Time
  • A playful torn paper cactus craft with hearts and flowers. Includes glue and felt hearts. Torn Paper Cactus Card: A Sweet Mother's Day Craft
  • A colorful handprint craft made from purple paper with glitter edges sits on a multicolored polka dot background. A round tag with a poem is attached below, tied with red and white string. Flowers are visible in the corner. Easy Handprint Flower Craft with Poem – Perfect Spring DIY for Kids

© 2012–2026 Glued To My Crafts
All activities should be supervised by an adult at all times. Please refer to our safety guidelines for more information.


Please note that all the content of the website, including printables, are for classroom and personal use only. This means that any digital item you download from our site can be used for non-commercial use only. We kindly request that you do not reproduce or sell our creations. We appreciate your understanding and cooperation in respecting our content and intellectual property rights.

Accessibility Adjustments

Powered by OneTap

How long do you want to hide the toolbar?
Hide Toolbar Duration
Select your accessibility profile
Vision Impaired Mode
Enhances website's visuals
Seizure Safe Profile
Clear flashes & reduces color
ADHD Friendly Mode
Focused browsing, distraction-free
Blindness Mode
Reduces distractions, improves focus
Epilepsy Safe Mode
Dims colors and stops blinking
Content Modules
Font Size

Default

Line Height

Default

Color Modules
Orientation Modules