Glued To My Crafts

Join thousands of others who have gotten GLUED to our craft tutorials!

  • Home
  • Privacy Policy
  • Craft Safety Guidelines
  • Seasonal Themes
    • New Years
    • Valentine’s Day
    • St. Patrick’s Day
    • Spring
    • Easter
    • Mother’s Day
    • Summer
    • Father’s Day
    • Patriotic
    • Halloween
    • Thanksgiving
    • Fall
    • Winter
    • Christmas
    • Snowmen
    • Story Time
  • About Us
  • Our Amazon Storefront
  • Monthly Themes
    • January Craft Ideas
    • February Craft Ideas
    • March Craft Ideas
    • April Craft Ideas
    • May Craft Ideas
    • June Craft Ideas
    • July Craft Ideas
    • August Craft Ideas
    • September Crafts
    • October Crafts
    • November Crafts
    • December Crafts

Paint Splat Reindeer Craft Idea For Kids

When engaging in craft activities, it is important for young children to have adult supervision at ALL times. It is also recommended to use supplies that are suitable for your child's age. Feel free to modify materials or steps to meet your specific requirements. Please refer to our safety guidelines for more information.

As an Amazon Associate I earn from qualifying purchases. This post may contain affiliate links. For more information, please see our disclosure policy.

UPDATE FOR 2026 - To reduce storage costs and download fees, we recently made some changes to our website. The password for all our files this year is GLUEDTOMYCRAFTS2026. No sign-up is required to download our free printables! You can enjoy our printables without creating an account or paying for Box.com. Simply follow the download instructions on our FAQ PAGE.

Craft the perfect reindeer for the holiday season! Learn how to start with paper, brown paint, scissors, and glue and turn it into something special.
SKIP THE FLUFF AND PRINT THE DIRECTIONS
A paint splat reindeer craft made by folding paper with brown paint for the face, large googly eyes, black paper antlers, and a red paper nose. Pine branches surround the playful text: “PAINT SPLAT REINDEER.”.

A paint splat reindeer craft made by folding paper with brown paint for the face, large googly eyes, black paper antlers, and a red paper nose. Pine branches surround the playful text: “PAINT SPLAT REINDEER.”.

This Christmas season, surprise your kids with a fun and creative activity – making a “paint splat reindeer!” It’s a FIRST-SEEN-HERE idea from Glued To My Crafts and we hope you are inspired to recreate it today!

This craft is easy to make and enjoyable for elementary-aged children. Plus, your kids can proudly display their festive creations around the home as decorations.

From gathering materials to seeing the final product, you’ll be amazed by how much they get out of this holiday activity. So grab some paint and let’s start creating these cute reindeer today!

A paint splat reindeer craft made by folding paper with brown paint for the face, large googly eyes, black paper antlers, and a red paper nose.

Get creative this holiday season and have your kids make their own Paint Splat Reindeer craft! With a few simple supplies, they can make a fun & festive decoration that will bring some Christmas cheer to your home!

Craft Supplies:

  • Brown Puffy Paint
  • White Cardstock Paper
  • Black Cardstock Paper
  • Red Cardstock Paper
  • Pencil
  • Scissors
  • School Glue
  • Extra Large Wiggle Eyes – two per craft

RELATED —> Tissue Paper Reindeer

Directions:

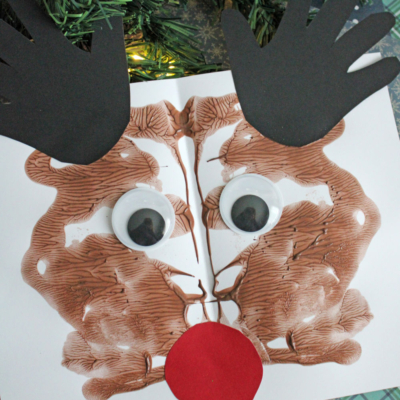
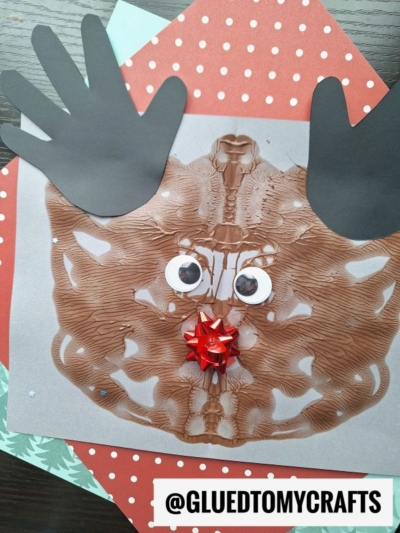
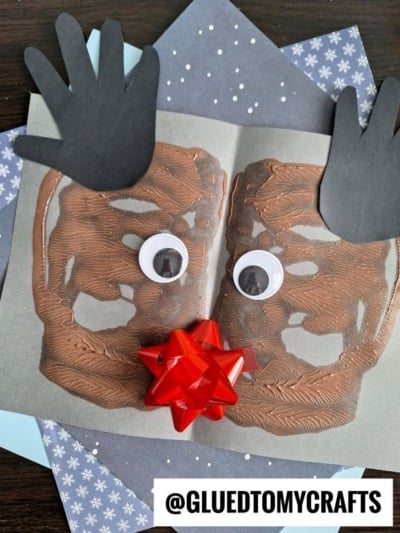
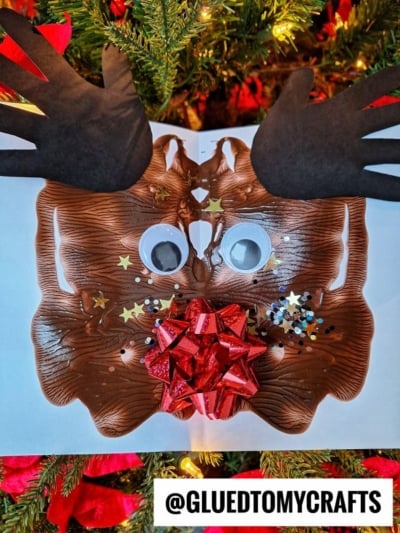
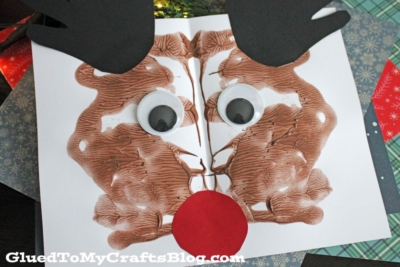
  • First things first – fold your WHITE cardstock paper in half and open it back up.
  • Grab your Tulip puffy paint and squirt some brown craft paint ON ONE SIDE before closing it up again.
  • Once the paper is closed for the second time, gently take your hand and “caress” the paper so the brown paint inside, makes a fun symmetrical print design on both sides of the paper.
  • Now you are ready to open it back up and see the BEGINNING of what your reindeer’s head will eventually be. From there you decorate it to bring it to life and give it life.
  • Next up, grab the black cardstock paper and pencil.
  • Trace both of your hands on the paper and trim them out. These will become the antlers.
  • Out of the remaining red cardstock paper, cut out a large nose.
  • Finally – the last step in completing this reindeer paint splatter craft is to glue down ALL the cardstock cutout pieces and the googly eyes, on top of the paint splat design. I would highly suggest starting with the nose in the center and building from there.
  • Once finished with your custom paint splatter reindeer masterpiece, then set aside to let it dry completely, before displaying proudly!

RELATED —> Popsicle Stick Reindeer

A children’s book titled How to Catch a Reindeer sits above a paint splat reindeer craft made from brown paint, googly eyes, black paper antlers, star confetti, and a red bow. Snowflake decorations and @GLUEDTOMYCRAFTS are visible.

AFFILIATE LINK – PAIR OUR CRAFT IDEA WITH THIS BOOK RECOMMENDATION

Get ready to be wowed this Christmas season and make lasting memories with your child! Learn how to take inexpensive craft materials and turn them into one-of-a-kind art projects with the help of us!!

At Glued To My Crafts we strive to keep the crafty fun going! Check out these past impressive blog posts from us, listed below and recreate them with your child today!

  • Paper Plate Snowman House
  • Handprint Santa’s Reindeer Keepsake
  • Popsicle Stick Carolers
  • Mini Craft Stick Marshmallow
  • Reindeer Gnome
  • Paper Gingerbread Man Hot Air Balloon
  • Popsicle Stick Reindeer

stacey-signature-2023


A paint splat reindeer craft made by folding paper with brown paint for the face, large googly eyes, black paper antlers, and a red paper nose. Pine branches surround the playful text: “PAINT SPLAT REINDEER.”.
PRINT

Paint Splat Reindeer Craft Idea For Kids

Craft the perfect reindeer for the holiday season! Learn how to start with paper, brown paint, scissors, and glue and turn it into something special.

Here’s your checklist of supplies to bring this craft to life:

  • Tulip Puffy Paint brown
  • Cardstock Paper
  • Large Wiggle Eyes
  • Pencil
  • Scissors
  • School Glue
  • Christmas Book Recommendations - link to our Amazon shop

Prepare your creative haven by laying down a protective cover before the crafting magic begins!

Directions:

  • First things first - fold your WHITE cardstock paper in half and open it back up.
  • Grab your Tulip puffy paint and squirt some brown craft paint ON ONE SIDE before closing it up again.
  • Once the paper is closed for the second time, gently take your hand and "caress" the paper so the brown paint inside, makes a fun symmetrical print design on both sides of the paper.
  • Now you are ready to open it back up and see the BEGINNING of what your reindeer's head will eventually be. From there you decorate it to bring it to life and give it life.
  • Next up, grab the black cardstock paper and pencil.
  • Trace both of your hands on the paper and trim them out. These will become the antlers.
  • Out of the remaining red cardstock paper, cut out a large nose.
  • Finally - the last step in completing this reindeer paint splatter craft is to glue down ALL the cardstock cutout pieces and the googly eyes, on top of the paint splat design. I would highly suggest starting with the nose in the center and building from there.
  • Once finished with your custom paint splatter reindeer masterpiece, then set aside to let it dry completely, before displaying proudly!
    Paint Splat Reindeer Craft Idea For Kids
MINI-HEARTS-page-separator-logo-gluedtomycrafts


CLICK HERE TO PRINT THE DIRECTIONS FOR THIS CRAFT

If you've enjoyed our content or have any thoughts to share, we'd love to hear from you! Mention @gluedtomycrafts or tag #gluedtomycrafts on Instagram!

Craft Activity Safety Guidelines:

Always Ensure Adult Supervision - Young children should be supervised at all times when engaging in craft activities. This is essential to keep them safe and ensure materials are used correctly. Use Age-Appropriate Supplies - Choose craft supplies that are suitable for your child’s age. Check labels for recommendations and avoid items with small parts or sharp edges for younger children. Modify as Needed - Feel free to adapt materials or steps to meet your child's abilities and safety needs. For example, substitute scissors with safety scissors if necessary. Keep an Eye on Allergies - Be mindful of potential allergens in craft materials like glue, paint, or certain fabrics. Opt for non-toxic and hypoallergenic options whenever possible. Organize and Secure Supplies - Keep all craft tools and materials organized. Store sharp objects, small parts, and potentially hazardous items out of reach when not in use. Following these guidelines will ensure that crafts remain fun, creative, and, most importantly, safe for everyone involved!


OUR PRIVACY POLICY

OUR COPYRIGHT POLICY

  • Email
  • Facebook
  • Instagram
  • Pinterest
  • Twitter
  • YouTube

LOOKING FOR SOMETHING?

EXPLORE OUR SITE:

TRENDING TODAY:

  • A pink hand-shaped bookmark with red heart stickers and star confetti surrounds a round note that reads a heartfelt message about love and reading. The image is from GluedToMyCraftsBlog.com. Handprint Bookmark Keepsake: A Gift That Holds Your Spot
  • A handmade Valentine’s Day craft featuring a red rose made of torn paper, two green handprint leaves, a glue bottle, heart decorations, and a message: “LOOK WHAT I MADE - A ROSE THAT WON’T FADE! WISHING YOU LOVE THIS VALENTINE’S DAY!”. Torn Paper Rose Card Craft Tutorial for Valentine’s Day
  • A colorful craft project featuring a yellow felt moon, sparkly stars, and heart shapes, with glue and a heartfelt message. Torn Paper Love You To The Moon and Back Card Craft Idea For Kids
  • A handmade card with a rocket drawing, hearts, and messages of love. Felt hearts and an envelope are around it. Handprint Rocket Keepsake - I Love You Because
  • A colorful paper craft featuring a red and pink painted paper plate with yellow circles in the center, green handprint cutouts as leaves, surrounded by craft supplies, heart decorations, and paint bottles. Paint Splat Valentine's Day Flower Craft Idea
  • A vibrant Valentine's Day craft showcasing a torn-paper bumblebee with googly eyes on a white sheet, accompanied by the text "MY VALENTINE!" The scene is decorated with felt hearts, heart-shaped gems, and patterned papers, with a glue bottle and crafting supplies adding to the creative atmosphere. Torn Paper Bee My Valentine Card Craft Idea For Valentine's Day
  • A flat lay of handmade Valentine’s Day cards and decorations, including paper flowers, felt hearts, an envelope, and printed cards with romantic poems, arranged on a gray and pink background. Capture Memories With These 6 Handprint Flower Poems
  • Flat lay of a torn paper dandelion craft featuring a white sheet with a black dandelion outline. Torn yellow, pink, and purple paper pieces are glued to the dandelion head, simulating seeds. Surrounding the craft are Elmer's glue, felt hearts, paper flowers, and patterned scrapbook paper. The text 'MAKING WISHES, ONE PIECE OF PAPER AT A TIME.' and 'GluedToMyCraftsBlog.com' are printed on the white sheet. Torn Paper Dandelion Craft: Making Wishes, One Piece at a Time
  • A playful torn paper cactus craft with hearts and flowers. Includes glue and felt hearts. Torn Paper Cactus Card: A Sweet Mother's Day Craft
  • A colorful handprint craft made from purple paper with glitter edges sits on a multicolored polka dot background. A round tag with a poem is attached below, tied with red and white string. Flowers are visible in the corner. Easy Handprint Flower Craft with Poem – Perfect Spring DIY for Kids

© 2012–2026 Glued To My Crafts
All activities should be supervised by an adult at all times. Please refer to our safety guidelines for more information.


Please note that all the content of the website, including printables, are for classroom and personal use only. This means that any digital item you download from our site can be used for non-commercial use only. We kindly request that you do not reproduce or sell our creations. We appreciate your understanding and cooperation in respecting our content and intellectual property rights.

Accessibility Adjustments

Powered by OneTap

How long do you want to hide the toolbar?
Hide Toolbar Duration
Select your accessibility profile
Vision Impaired Mode
Enhances website's visuals
Seizure Safe Profile
Clear flashes & reduces color
ADHD Friendly Mode
Focused browsing, distraction-free
Blindness Mode
Reduces distractions, improves focus
Epilepsy Safe Mode
Dims colors and stops blinking
Content Modules
Font Size

Default

Line Height

Default

Color Modules
Orientation Modules