'Tis the season to get creative! Keep your little elves occupied this holiday season with this fun and festive popsicle stick Christmas caroler craft!

Today’s post is beautiful on a budget. You can even turn up the holiday music as you craft away with your child, on this one! Keep scrolling to see how I made these Popsicle Stick Christmas Carolers come to life with inexpensive materials and steps!

Christmas is right around the corner, and what better way to get into the festive spirit than with a fun, easy, and creative craft for kids? This popsicle stick Christmas caroler craft idea brings together creativity, a love for the holidays, and a chance to bond with your little ones.
Recreating these adorable Christmas carolers out of popsicle sticks is not only budget-friendly, but it’s also a great way to keep kids entertained during the holiday season.
Stick around (pun intended), and we’ll guide you through steps for this delightful DIY craft, share some tips to make it even more fun, and show how this activity can become part of your holiday traditions.

Bring the Christmas spirit to your home with these fun and easy craft stick carolers. This craft is perfect for kids of all ages and can be adapted to any holiday theme. So grab some crafting supplies and get in the festive mood!
Craft Supplies:
Before you start, gather these materials. Most are inexpensive and easily accessible:
- Jumbo Popsicle Sticks – 3 per craft
- Mini Popsicle Sticks – 2 per craft
- Mini Clothespins – 2 per craft
- Low Temp Glue Gun
- Craft Paint
- Small Paint Brush
- Small Paper Plate
- Cardstock Paper
- Sharpie Markers
- Embellishments
Directions:
Now that you have everything ready, it’s time to craft!
- Begin by heating up the glue gun (adult supervision recommended).
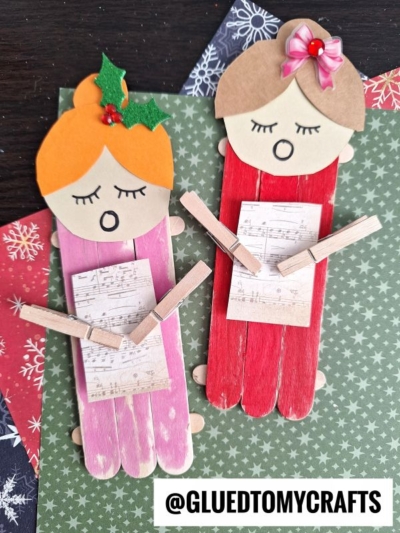
- Create the base for your by gluing three jumbo popsicle sticks side by side. Then, glue two mini popsicle sticks across them horizontally to form a door-like shape. Singing Caroler
- Set the base aside to dry completely. Repeat this step for each caroler you plan to make.
- Once the glue is fully set, squeeze some craft paint onto a paper plate.
- Use a paintbrush to fully coat the popsicle stick base in paint—this will serve as the body of your caroler. Allow it to dry completely.
- Next, paint two mini clothespins to resemble the caroler’s sleeves or arms. Set them aside to dry as well.
- Now, grab your cardstock, paper scissors, and Sharpie markers.
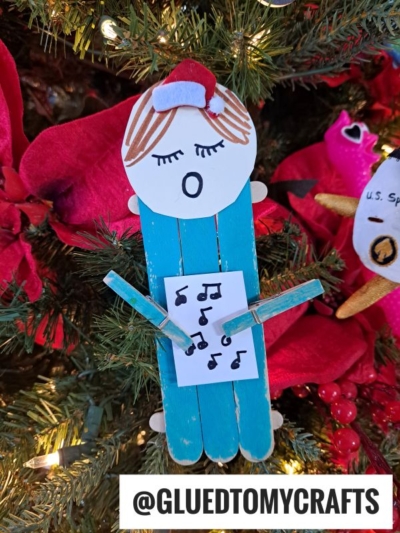
- Start by cutting out a large circle from the skin-tone cardstock to create the caroler’s head. Use the Sharpies to draw facial features like eyes, a nose, hair, and an open “O” shaped mouth.
- From the white cardstock, cut a small rectangle to represent the sheet music. Decorate it with music stickers or draw music notes by hand using a black Sharpie if stickers aren’t available.
- If you’re making a female caroler, cut long hair pieces from cardstock as well. Set all these paper components aside, except for the music sheet.
- Now for an important step: take your two painted mini clothespins and clip them onto the music sheet, one on each side, to make it look like the caroler is holding the sheet music.
- Use hot glue to attach the combined clothespins and music sheet to the center of the painted popsicle stick base.
- Finish assembling your by gluing the paper head to the top of the base. If you’ve created a hairpiece, attach it to the back of the head. Popsicle Stick Caroler
- Add any other embellishments or decorations you like to personalize your caroler.
- Allow everything to dry completely before proudly displaying your creation.
- Don’t forget to take a picture and share your masterpiece with us on social media using #gluedtomycrafts!
RELATED —> Paper Plate Christmas Camper

It’s not lie! EVERYONE just loves the kids craft tutorials they find on Glued To My Crafts and you will too! Before you go, be sure to click on over to our widely popular Paper Plate Santa and Popsicle Stick Christmas Truck craft posts!
Now go! Go get crafty with your child and snap a few pictures of those popsicle stick holiday carolers to share with us! #gluedtomycrafts

Popsicle Stick Christmas Caroler Craft Idea For Kids
'Tis the season to get creative! Keep your little elves occupied this holiday season with this fun and festive popsicle stick Christmas caroler craft!
Here’s your checklist of supplies to bring this craft to life:
- 3 Jumbo Popsicle Sticks
- 2 Mini Popsicle Sticks
- 2 Mini Clothespins
- Craft Paint
- Cardstock Paper
- Embellishments
Prepare your creative haven by laying down a protective cover before the crafting magic begins!
Directions:
- Begin by heating up the glue gun (adult supervision recommended).
- Create the base for your by gluing three jumbo popsicle sticks side by side. Then, glue two mini popsicle sticks across them horizontally to form a door-like shape. Singing Caroler
- Set the base aside to dry completely. Repeat this step for each caroler you plan to make.
- Once the glue is fully set, squeeze some craft paint onto a paper plate.
- Use a paintbrush to fully coat the popsicle stick base in paint—this will serve as the body of your caroler. Allow it to dry completely.
- Next, paint two mini clothespins to resemble the caroler’s sleeves or arms. Set them aside to dry as well.
- Now, grab your cardstock, paper scissors, and Sharpie markers.
- Start by cutting out a large circle from the skin-tone cardstock to create the caroler's head. Use the Sharpies to draw facial features like eyes, a nose, hair, and an open “O” shaped mouth.
- From the white cardstock, cut a small rectangle to represent the sheet music. Decorate it with music stickers or draw music notes by hand using a black Sharpie if stickers aren’t available.
- If you’re making a female caroler, cut long hair pieces from cardstock as well. Set all these paper components aside, except for the music sheet.
- Now for an important step: take your two painted mini clothespins and clip them onto the music sheet, one on each side, to make it look like the caroler is holding the sheet music.
- Use hot glue to attach the combined clothespins and music sheet to the center of the painted popsicle stick base.
- Finish assembling your by gluing the paper head to the top of the base. If you’ve created a hairpiece, attach it to the back of the head. Popsicle Stick Caroler
- Add any other embellishments or decorations you like to personalize your caroler.
- Allow everything to dry completely before proudly displaying your creation.
- Don’t forget to take a picture and share your masterpiece with us on social media using #gluedtomycrafts!


CLICK HERE TO PRINT THE DIRECTIONS FOR THIS CRAFT
If you've enjoyed our content or have any thoughts to share, we'd love to hear from you! Mention @gluedtomycrafts or tag #gluedtomycrafts on Instagram!