Want to do something unique with those foam egg shapes you find this time of year? Check out Easter bunny house craft tutorial for kids!

Want to do something unique with those craft foam egg shapes you find this time of year? Then keep scrolling for our first-seen-here Easter bunny house craft tutorial for kids! We are going to “build” pieces that ANY BUNNY will want to come home to!

Easter is the perfect time of year to bring out your creative side and make some fun and unique crafty projects with your family!
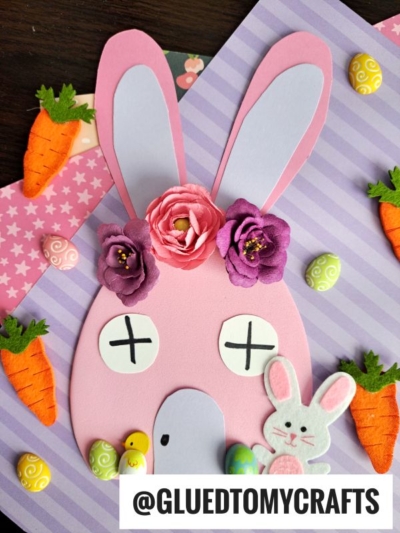
One craft that both kids and adults will love is this Easter Bunny House, which is a great way to get an entire afternoon filled with creativity. It’s full of beautiful colors, interesting shapes, and best of – sparkly decorations that ANY little bunny will want to come home to!
With easy-to-follow steps and materials that you can find either in your local store or online, you’ll be able to have fun crafting together as a family all while making something handmade that everyone will admire!
Ready to make it happen in your home this month? Let’s get started on our springtime project – it’s going to be so much fun! Find ALL the details you need to know, in the full tutorial below. Happy crafting, my friends!!!


Not only can kids have a blast decorating, but they would also enjoy playing with their finished bunny house masterpiece – creating memories that will last long after the holiday has passed.
Craft Supplies:
- Foam Egg Shapes – 1 per egg house
- Cardstock Paper
- Scissors
- Black Marker
- Glue Stick/School Glue
- Embellishments
Directions:
- First things first – pull out ONE craft foam egg shape and scissors.
- Go ahead and cut off a small sliver off of the larger end of the egg, to make the bunny house lay flat.
- Discard the small piece you just cut off.
- Set aside the egg piece.
- Next up -grab all your paper sheets and craft scissors again.
- Start off by cutting out TWO large bunny ears that will go on top of the house.
- Out of the remaining cardstock, cut out a door and two circular windows.
- Use the black Sharpie marker to draw lines and give the windows some dimension.
- Once you have all your paper pieces, it’s time to assemble it all together! Grab the craft foam egg shape, paper pieces and your choice of glue.
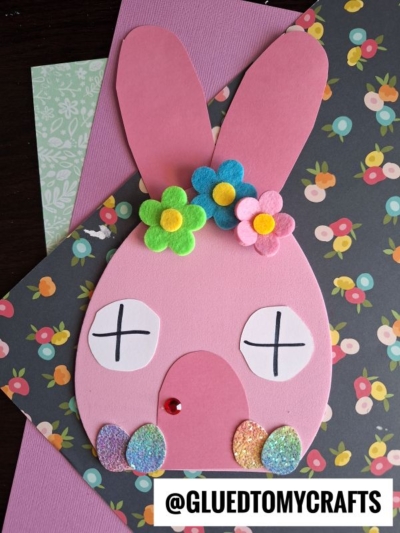
- Go ahead and glue the paper embellishments in place on the egg shape. I found that it was easier to start with the bunny ears {that go on the back of the egg shape} and work downward from there.
- Follow that up by adding a few of the paper flowers to create a “roof” under the bunny ears.
- Now add anything else you like for that custom look {like some egg stickers or glitter!} before displaying proudly!
- Don’t forget to share pictures with us of your custom craft foam Easter egg home on your various social media sites! #gluedtomycrafts
RELATED —> Popsicle Stick Bunny
Make your spring craft plans SUPER FRESH with tons of inspiration from Glued To My Crafts! We want YOU to check out our super popular Fork Painted Chick, Bunny Cupcake and Easter Egg Gnome craft posts! Then pair all three with today’s craft foam Easter bunny house tutorial for an epic day!
We also LOVE talking crafts with our lovely readers. Come join our private Facebook group where we chit chat, share and laugh together! Everyone is welcomed so come join the fun and share their craft creations!!! #gluedtomycrafts

Easter Egg Bunny House Craft Idea
Want to do something unique with those foam egg shapes you find this time of year? Check out Easter bunny house craft tutorial for kids!
Here’s your checklist of supplies to bring this craft to life:
- 1 Craft Foam Egg Shape
- Cardstock Paper
- Embellishments
Prepare your creative haven by laying down a protective cover before the crafting magic begins!
Directions:
- First things first - pull out ONE craft foam egg shape and scissors.1 Craft Foam Egg Shape
- Go ahead and cut off a small sliver off of the larger end of the egg, to make the bunny house lay flat.
- Discard the small piece you just cut off.
- Set aside the egg piece.
- Next up -grab all your paper sheets and craft scissors again.Cardstock Paper
- Start off by cutting out TWO large bunny ears that will go on top of the house.
- Out of the remaining cardstock, cut out a door and two circular windows.
- Use the black Sharpie marker to draw lines and give the windows some dimension.
- Once you have all your paper pieces, it's time to assemble it all together! Grab the craft foam egg shape, paper pieces and your choice of glue.
- Go ahead and glue the paper embellishments in place on the egg shape. I found that it was easier to start with the bunny ears {that go on the back of the egg shape} and work downward from there.Embellishments
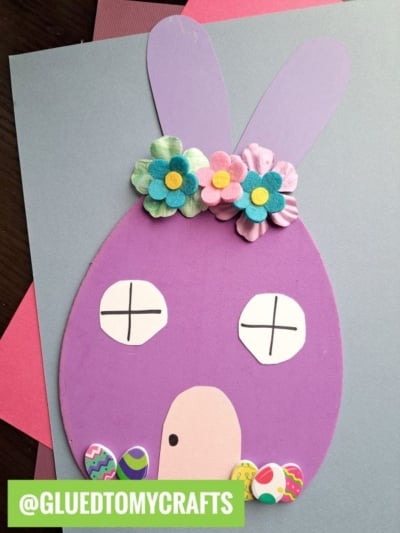
- Follow that up by adding a few of the paper flowers to create a "roof" under the bunny ears.
- Now add anything else you like for that custom look {like some egg stickers or glitter!} before displaying proudly!


CLICK HERE TO PRINT THE DIRECTIONS FOR THIS CRAFT
If you've enjoyed our content or have any thoughts to share, we'd love to hear from you! Mention @gluedtomycrafts or tag #gluedtomycrafts on Instagram!