
Whether you’re a teacher looking for imaginative activities or a mom wanting to create memories with her kids, this Easter bunny craft tutorial will show how anyone can take dull popsicle sticks and turn them into springtime perfection!

Popsicle Stick White Bunny
Hi my crafty friends! Easter is literally right around the corner {yikes!} so if you are looking for some last minute craft ideas to celebrate the upcoming spring holiday – you are in the right place today!
Just like with every holiday, this is the perfect moment to carve some time out of your busy schedule and let the kids get creative & in a festive mood by doing some themed crafts. I honestly wouldn’t “celebrate” the holidays any other way!
So for today’s post, I’m sharing a simple Popsicle Stick Bunny kid craft tutorial that is a brilliant way to keep little ones busy, as well as letting them channel that inner artist side within. Our “hoppin” friend is super simple to assemble, really inexpensive and fun for children of all ages! Kids can even pretend play with the finished piece and really let that imagination go wild!
On that note, what are you waiting for? Don’t let this adorable bunny craft idea HOP away from you! Grab those craft supplies and get to work now! You can find everything you need to know, in the full tutorial below! Happy crafting, my friends!
RELATED: Crinkle Paper Bunny and Egg Hot Air Balloon

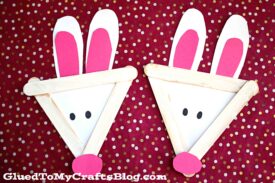
Make some adorable Popsicle Stick Bunny pieces in honor of the upcoming Easter holiday! Then display proudly or use for pretend play pieces!!!
Craft Supplies:
- Jumbo Popsicle Sticks – 3 per craft
- School Glue
- White Craft Paint
- Foam Paint Brush
- Small Paper Plate
- White Cardstock Paper
- Pink Cardstock Paper
- Black Cardstock Paper
- Craft Scissors
- Black Sharpie Marker
Directions:
- First grab three jumbo popsicle sticks {three per bunny craft} and glue them together to look like a triangle.
- Set aside to let it dry completely. Repeat for each bunny you want to make today.
- When the triangle shape is dry enough, it’s time for paint! Go ahead and squirt a small amount of white craft paint on your paper plate.
- Take the foam brush and paint your newly made popsicle stick triangle completely white.
- Set aside again.
- While that is drying, grab your white cardstock paper and cut a triangular shape that will be placed within the popsicle stick design and be the face of the bunny. At this time, you should also cut out two long bunny ears for on top and a small pink nose for the center.
- To finish off the Popsicle Stick Bunnies – glue your paper pieces in place on the popsicle stick shape {ears on top but on the back of the popsicle stick shape, while the nose will be placed in the center but on the front of the shape.}
- Go ahead and now draw in small “eyes” with the black Sharpie marker in the center, so your bunny can see.
- Add other embellishments they see fit. Maybe a small bow to make it a girl bunny!
- Once done, set aside to let it dry completely before displaying proudly!
- Don’t forget to share some pictures with us! #gluedtomycrafts
RELATED —> Paper Bag Bunny

If you are looking for even MORE easy spring themed kid craft ideas, from Glued To My Crafts, be sure to check out these fun posts listed below. All of which are just as easy as today’s craft stick Easter bunny idea!
- Carrot Garden Sensory Bin
- Wooden Spoon Bunnies
- Terra Cotta Pot Easter Friends
- Cupcake Liner Bunnies
- Popsicle Stick Flowers
- Paper Plate Bird Nest
- Thumbprint Bunny Cards
- Bunny Loves You Keepsake
FOLLOW US ON PINTEREST SO YOU NEVER MISS A NEW TUTORIAL FROM US!

Popsicle Stick Bunny Craft Idea For Spring
Here’s your checklist of supplies to bring this craft to life:
- School Glue
- 1 Scissors
Prepare your creative haven by laying down a protective cover before the crafting magic begins!
Directions:
- First grab three jumbo popsicle sticks {three per bunny craft} and glue them together to look like a triangle.
- Set aside to let it dry completely. Repeat for each bunny you want to make today.
- When the triangle shape is dry enough, it's time for paint! Go ahead and squirt a small amount of white craft paint on your paper plate.
- Take the foam brush and paint your newly made popsicle stick triangle completely white.
- Set aside again.
- While that is drying, grab your white cardstock paper and cut a triangular shape that will be placed within the popsicle stick design and be the face of the bunny. At this time, you should also cut out two long bunny ears for on top and a small pink nose for the center.
- To finish off the Popsicle Stick Bunnies – glue your paper pieces in place on the popsicle stick shape {ears on top but on the back of the popsicle stick shape, while the nose will be placed in the center but on the front of the shape.}
- Go ahead and now draw in small "eyes" with the black Sharpie marker in the center, so your bunny can see.
- Add other embellishments they see fit. Maybe a small bow to make it a girl bunny!
- Once done, set aside to let it dry completely before displaying proudly!

CLICK HERE TO PRINT THE DIRECTIONS FOR THIS CRAFT