It's a super simple cut & paste art project idea for younger children to make this spring season!


When I think of this time of year, I instantly think of little birdies chirping away in their nest. Spring in my opinion is a fresh new start and what better way to explain new life to a child, than with a bird nest filled with fresh baby chicks?!
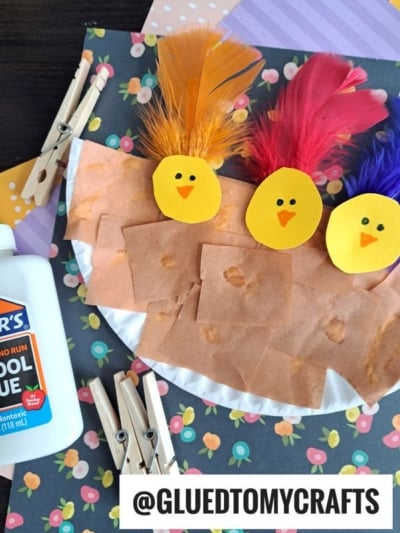
Not only is this Paper Plate Bird Nest Kid Craft super simple for young children and really inexpensive to make – but it also in-cooperates clothespins that can be “pinch” on and off, so your child will have a great piece to play with afterwards, as well!
So what are you waiting for? Grab those craft supplies, find the full tutorial below and get to work on creating this “tweet” little craft with your child today! I really do hope you are inspired to recreate your own version, right along side your child as well!
Happy crafting my friends! Don’t forget to share pictures of your child’s bird nest made from a paper plate and clothespins, by tagging us on Instagram. We can’t wait to see your creations! #gluedtomycrafts


Our bird nest craft is a super simple cut and paste art project idea for younger children to make this spring season!
Craft Supplies:
- Large Paper Plate
- Craft Scissors
- Brown Tissue Paper
- School Glue
- Wooden Clothespins
- Craft Feathers
- Cardstock Paper
- Black Sharpie Marker
- Orange Sharpie Marker
Directions:
- First cut your paper plate in half. Straight up the center to create TWO equal pieces.
- Reserve one for this craft {or use both today by repeating the steps TWICE.}
- Now grab the brown tissue paper and scissors.
- Cut your brown tissue paper into small squares.
- Put a good amount of glue all over the paper plate half from earlier.
- Have children place the tissue paper on top of the glue, until the plate is completely covered.
- Set aside the paper plate to allow it to dry COMPLETELY.
- Now grab your wooden clothespins, the Sharpie markers, cardstock paper and craft feathers.
- First start off by gluing ONE craft feather to your clothespin. Repeat for each clothespin.
- Next up – grab the cardstock and scissors.
- Cut out a small circle that will be the “baby bird’s” head. Repeat for each clothespin.
- Use the Sharpie markers to draw on eyes and a beak.
- Now you are going to glue the circle piece to the feather decorated clothespin. Again, repeat these steps for each clothespin bird you want to add to your paper plate nest.
- When done decorating the clothespins, set aside each piece to allow them to dry COMPLETELY before moving on.
- To finish off the craft {remember it ALL have to be completely dry} simply PINCH each decorated clothespin to the tissue paper covered paper plate.
- Add anything else you see fit and display it proudly for ALL to see!
RELATED —> Love Bird Keepsake

AFFILIATE LINK – PAIR OUR CRAFT IDEA WITH THIS BOOK RECOMMENDATION
If you are looking for even MORE easy spring themed kid craft ideas, be sure to check out these fun posts listed below. All of which are conveniently located on our website right now!
- Carrot Garden Sensory Bin
- Paper Plate Honey Bee
- Cupcake Liner Bunnies
- Popsicle Stick Flowers
- Craft Foam Egg Bird In Nest
- Bird Nest Sensory Bin Idea
- Paint Splat Bird
- Chalk Art Bird Nest
- Paper Bird’s Nest Craft

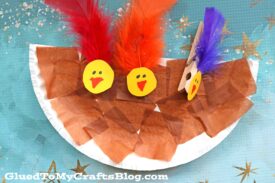
Paper Plate and Clothespin Bird Nest Craft Idea
It's a super simple cut & paste art project idea for younger children to make this spring season!
Here’s your checklist of supplies to bring this craft to life:
Prepare your creative haven by laying down a protective cover before the crafting magic begins!
Directions:
- First cut your paper plate in half. Straight up the center to create TWO equal pieces.
- Reserve one for this craft {or use both today by repeating the steps TWICE.}
- Now grab the brown tissue paper and scissors.
- Cut your brown tissue paper into small squares.
- Put a good amount of glue all over the paper plate half from earlier.
- Have children place the tissue paper on top of the glue, until the plate is completely covered.
- Set aside the paper plate to allow it to dry COMPLETELY.
- Now grab your wooden clothespins, the Sharpie markers, cardstock paper and craft feathers.
- First start off by gluing ONE craft feather to your clothespin. Repeat for each clothespin.
- Next up - grab the cardstock and scissors.
- Cut out a small circle that will be the "baby bird's" head. Repeat for each clothespin.
- Use the Sharpie markers to draw on eyes and a beak.
- Now you are going to glue the circle piece to the feather decorated clothespin. Again, repeat these steps for each clothespin bird you want to add to your paper plate nest.
- When done decorating the clothespins, set aside each piece to allow them to dry COMPLETELY before moving on.
- To finish off the craft {remember it ALL have to be completely dry} simply PINCH each decorated clothespin to the tissue paper covered paper plate.
- Add anything else you see fit and display it proudly for ALL to see!

CLICK HERE TO PRINT THE DIRECTIONS FOR THIS CRAFT
If you've enjoyed our content or have any thoughts to share, we'd love to hear from you! Mention @gluedtomycrafts or tag #gluedtomycrafts on Instagram!