
We are going to make a chalky circular mess on some basic cardstock paper and then turn these unsuspecting designs into a cozy nest for your new bird friend! Keep scrolling to check out our Chalk Art Bird Nest tutorial and score the free printable as well!

Sidewalk Chalk Bird Nest Craft
It’s another chalk art tutorial from Glued To My Crafts and I’m smiling ear to ear on this one! This time, you can really experiment on the colors you choose and how you blend them together to make the craft idea come to life. Just like in nature – kids {and birds} will gather a few unlikely supplies to “build” their perfect nest.
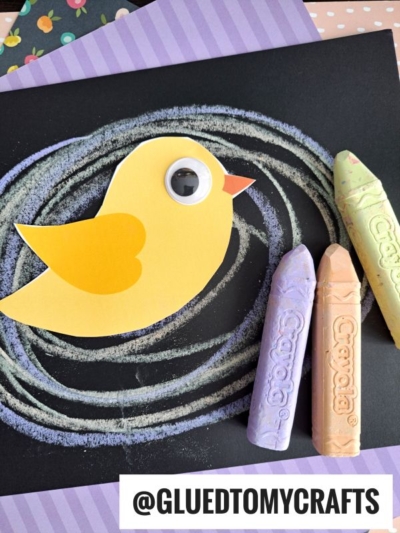
In the grand scheme of things, when you first start making those big and small circular chalk motions on your paper, it MIGHT not look like much in the beginning. But once you add that paper bird cutout to the center it will really start to take shape!
To really encourage you to make this chalk art bird nest project happen today, there’s even a FREE YELLOW BIRD PRINTABLE that you will find below, that you can download and print to use in the nest craft.
So what are we waiting for?! All crafty skill levels are going to LOVE this spring project tutorial and it’s the perfect boredom buster idea, as well! Make it happen today or bookmark it for later, for a fun “first day of spring” activity! Just keep on scrolling for ALL the details! Happy crafting, my dear friends!
RELATED —> Paint Splat Bird


This easy bird nest craft for kids is perfect for spring! It’s made with chalk and so simple that even toddlers can make it.
Craft Supplies:
- Free Bird Printable – on our landing page
- White Cardstock Paper
- Craft Scissors
- Black or Gray Cardstock Paper
- Sidewalk Chalk
- Baby Wipes
- Adhesive
Directions:
- First things first – grab our free yellow bird printable, listed above in the supply list.
- Go ahead and find it on your computer, right click and print it out on a single sheet of white cardstock. You only need ONE printable to make TWO chalk art bird nest crafts today. Print as many as you like but only use our file for personal use please.
- Now that you have the printable, go ahead and trim out ONE of the bird shapes. Save the remaining paper for repeating the craft later.
- Now grab a single sheet of black or gray cardstock and your choice of colors in chalk {I suggest 3-5 different colors to give your bird nest some flair.}
- Go ahead and draw several circular lines in center of the paper with the chalk {see our image for example – just make several circle lines going outward from the center.} Add as much chalk as you like. You want it to be nice and “fluffy” though.
- Use baby wipes to clean off excess chalk from fingers and hands.
- When done with the chalk, go ahead and grab your baby bird cutouts from earlier & your glue stick.
- Glue your bird piece into the center of the chalk art design you just made.
- Add any other embellishments you see fit.
- Then display your chalk bird nest paper piece proudly for all to see!
RELATED —> Paint Splat Tulip
Don’t you just love this Spring Inspired Chalk Bird craft idea?! We sure hope so!
Be sure to also check out our popular Chalk Art Fairy and Popsicle Stick Spring Flower Truck craft posts to recreate this season as well! Both of which are super unique to Glued To My Crafts and would pair nicely with today’s tutorial!
You can also find follow us on Pinterest for even more crafty inspiration to bring into your home! We PIN new things daily, so don’t miss out!

Chalk Art Bird Nest Craft
Here’s your checklist of supplies to bring this craft to life:
Prepare your creative haven by laying down a protective cover before the crafting magic begins!
Directions:
- First print out our provided printable, in color, on a single sheet of white cardstock paper. You only need one print per craft.Cardstock Paper
- Now that you have the printable, go ahead and trim out ONE of the bird shapes. Save the remaining paper for repeating the craft later.
- Now grab a single sheet of black or gray cardstock and your choice of colors in chalk {I suggest 3-5 different colors to give your bird nest some flair.}
- Go ahead and draw several circular lines in center of the paper with the chalk. Add as much chalk as you like. You want it to be nice and "fluffy" though.Sidewalk Chalk
- Use baby wipes to clean off excess chalk from fingers and hands.
- When done with the chalk, go ahead and grab your baby bird cutouts from earlier & your glue stick.
- Glue your bird piece into the center of the chalk art design you just made.
- Add any other embellishments you see fit.
- Then display your chalk bird nest paper piece proudly for all to see!


NEED MORE HELP DOWNLOADING OUR FREE PRINTABLES? PLEASE REFER TO OUR FAQ PAGE