

Paint Splatter Tulip Craft
If you need a break from the daily grind or just something different that is outside the norm to keep the kids busy this spring season, you are in the right place with our latest and greatest paper plate & paint splat tulip craft tutorial!
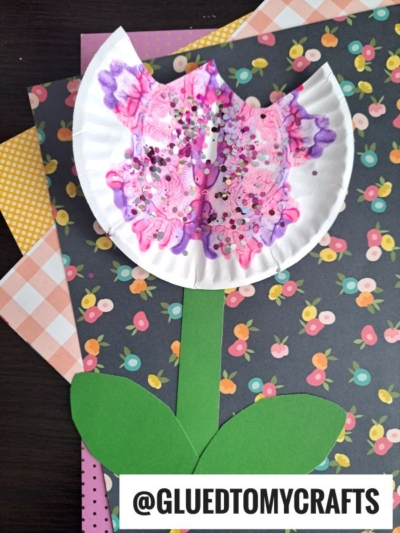
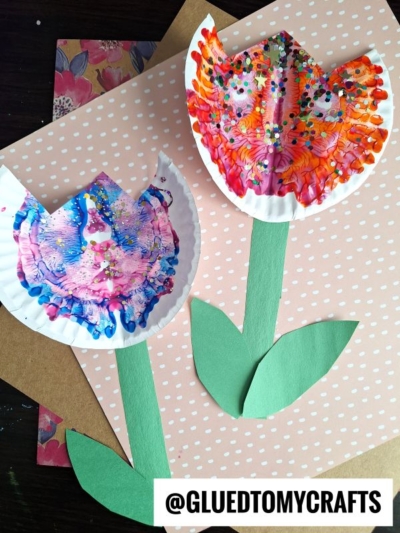
I’ve taken my popular and super unique “paint splat” technique & used it to make beautiful, multi-colored tulip flowers from inexpensive paper plates. It’s truly a first-seen-here craft idea on Glued To My Crafts and I really hope you are encouraged to “grow” it in your home this afternoon!
Today’s paper tulip tutorial is jam packed with a fantastic way to take basic craft materials and make them BLOSSOM into creative flowers that will stand out from the crowd {especially since no two flowers will ever look alike!} All it takes is folding a small paper plate in half, squirting some paint in the inside and SMASHING it back together again to make a marbled print appear. Then you do some cutting and add a paper flower stem cutout to the bottom to bring it to life. Easy peasy!!!
Well friends – enough chit chat from me. This crafty idea does take some dying time in between the paint and assembling steps, so I don’t want to hold you up from the fun! You can find all the details you need to know below, as well as a link to my favorite craft paint for this fun mixed media art technique.
Happy crafting, my dear friends and please don’t forget to come share pictures of your finished paint splat tulips by tagging us on Instagram. I can’t wait to see your child’s color choices for their tulips! #gluedtomycrafts
RELATED: Chalk Art Carrot and Paper Plate Carrot House


Spring is in the air, so why not celebrate with this easy and fun paper plate tulip craft idea for kids!
Craft Supplies:
- Small or Large Paper Plates – 1 per craft
- Tulip Puffy Paint
- Scissors
- Green Cardstock Paper
- Stapler
- Baby Wipes
Directions:
- Please make sure you have a good working area because paint will more than likely squeeze out of the sides of this craft! Please also keep in mind that it WILL take some extra time {and patience} between the paint & assembling steps!
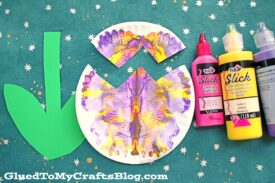
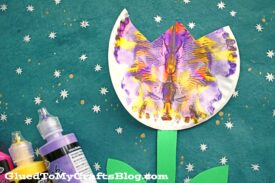
- First things first – fold your small paper plate in half. Straight up the center so it looks like a taco. You will do this step for each tulip flower that you want to make today.
- Unfold the paper plate and squirt two to three different color shades of craft paint, on one side of it. Be sure to keep the paint inside the paper plate and not place too much down. Three-four LIGHT SQUEEZE squiggles is all you need.
- Once the paint is down, go ahead and re-fold/squish your paper plate together again.
- Be sure to rub your hand all over the folded piece, so the paint will cover your the inside nicely {paint WILL more than likely squeeze out the sides, so be sure to pay attention to that and clean up with baby wipes!}
- Now carefully unfold your piece to reveal your colorful marbled flower design inside.
- Set aside the paper plate piece to allow the paint to dry a few hours before moving onto the next step.
- When the paint is dry {and I repeat – it needs to be DRY!} grab it, along with your scissors.
- You are going to cut out two triangles from one side of the paper plate, to give it more defined “tulip” look. Another way to think of it is making it look like a cracked open egg. Use our picture above for an example.
- Discard the small paper plate piece you just cut off.
- To finish the Paper Plate And Paint Splat Tulip – cut out and staple a flower stem out of the green cardstock to the bottom of the paper plate.
- And that’s it! Now display your flower proudly for ALL to see!
RELATED —> Paint Splat Unicorn Hair
Love this Spring Inspired Paint Splat Tulip craft idea?! Of course you do!
So on that note, be sure to also check out our popular Chalk Art Fairy and Popsicle Stick Flower Truck craft posts to recreate this season as well!

Paper Plate & Paint Splat Tulip Craft
Here’s your checklist of supplies to bring this craft to life:
Prepare your creative haven by laying down a protective cover before the crafting magic begins!
Directions:
- Please make sure you have a good working area because paint will more than likely squeeze out of the sides of this craft!
- First things first - fold your small paper plate in half. Straight up the center so it looks like a taco. You will do this step for each tulip flower that you want to make today.
- Unfold the paper plate and squirt two to three different color shades of craft paint, on one side of it. Be sure to keep the paint inside the paper plate and not place too much down. Three-four LIGHT SQUEEZE squiggles is all you need.
- Once the paint is down, go ahead and re-fold/squish your paper plate together again.
- Be sure to rub your hand all over the folded piece, so the paint will cover your the inside nicely {paint WILL more than likely squeeze out the sides, so be sure to pay attention to that and clean up with baby wipes!}
- Now carefully unfold your piece to reveal your colorful marbled flower design inside.
- Set aside the paper plate piece to allow the paint to dry a few hours before moving onto the next step.
- When the paint is dry {and I repeat - it needs to be DRY!} grab it, along with your scissors.
- You are going to cut out two triangles from one side of the paper plate, to give it more defined "tulip" look. Another way to think of it is making it look like a cracked open egg. Use our picture above for an example.

- Discard the small paper plate piece you just cut off.
- To finish the Paper Plate And Paint Splat Tulip - cut out and staple a flower stem out of the green cardstock to the bottom of the paper plate.
- And that's it! Now display your flower proudly for ALL to see!
CLICK HERE TO PRINT THE DIRECTIONS FOR THIS CRAFT