Get creative this holiday season with your family and create a beautiful festive craft! Learn how to make our simple marbled Christmas tree craft idea that's perfect for all ages.

This Paint Splat Christmas Tree Craft is not only easy and affordable but also a fantastic way to encourage creativity and family bonding during the holiday season. Each tree is unique, making it a memorable keepsake or decoration. Plus, it’s a great way to use up leftover craft supplies while keeping kids engaged and entertained.

Transform a simple paper plate into a dazzling marbled Christmas tree with this fun and easy craft! Perfect for kids and adults alike, this project combines creativity with holiday cheer.
Whether you’re looking for a rainy-day activity or a festive classroom project, this craft is sure to bring smiles and sparkle to your holiday season.

This easy Christmas craft is perfect for kids. Let them get creative and have fun making a paint splat tree. This is a great way to use up any leftover paint from other projects.
Craft Supplies:
- Large or Small Paper Plate – 1 per craft
- Green Tulip Puffy Paint
- Loose Craft Glitter
- Brown Cardstock Paper
- Yellow Cardstock Paper
- Scissors
- Stapler
Directions:
- Set Up Your Crafting Area: Cover your workspace with newspaper or a protective sheet to catch any paint spills—this craft can get a little messy!
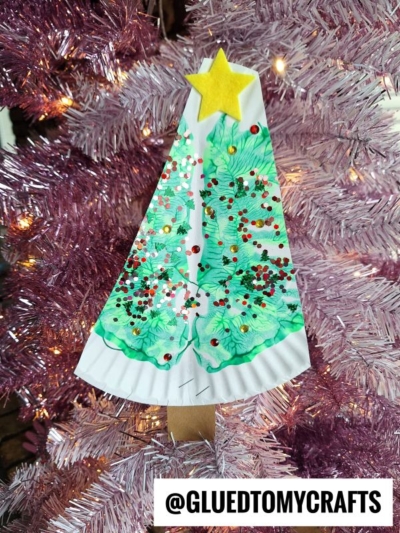
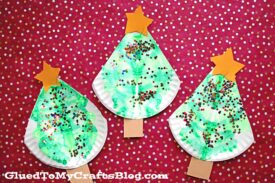
- Fold and Add Paint: Take a paper plate and fold it in half. Unfold it and squirt two shades of green puffy paint on one side of the plate. Be careful not to overdo the paint to avoid excessive mess.
- Create the Marbled Effect: Fold the plate back in half and press down gently. Rub your hand over the folded plate to spread the paint evenly. Open it up to reveal a beautiful marbled design that looks just like a Christmas tree!
- Add Sparkle and Texture: While the paint is still wet, sprinkle loose glitter or add rhinestones to mimic ornaments and give your tree a festive sparkle.
- Let It Dry Completely: Set the plate aside to dry thoroughly before moving on to the next steps.
- Shape Your Tree: Once the paint is dry, fold the plate again and use scissors to trim the edges into a triangular tree shape. Unfold it to see your tree come to life!
- Add the Final Details: Cut a small rectangle from brown cardstock for the tree trunk and a star from yellow cardstock for the top of the tree. Staple these pieces in place to complete your design.
- Display Your Masterpiece: Your marbled Christmas tree is ready to shine! Hang it on the wall, use it as a table centerpiece, or gift it to someone special.
RELATED —> Winter Craft Collection
Start crafting your marbled Christmas trees today and bring a touch of handmade charm to your holiday decor!
Be sure to also check out my personal favorite Paint Splat Christmas Ornaments post {it’s similar to today’s tutorial!}
And as always – if one of our crafts inspires you, be sure to share it on our Facebook page. We love seeing our inspiration come to life!
Paint Splat Marbled Christmas Tree Craft Idea
Get creative this holiday season with your family and create a beautiful festive craft! Learn how to make our simple marbled Christmas tree craft idea that's perfect for all ages.
Here’s your checklist of supplies to bring this craft to life:
Prepare your creative haven by laying down a protective cover before the crafting magic begins!
Directions:
- Set Up Your Crafting Area: Cover your workspace with newspaper or a protective sheet to catch any paint spills—this craft can get a little messy!
- Fold and Add Paint: Take a paper plate and fold it in half. Unfold it and squirt two shades of green puffy paint on one side of the plate. Be careful not to overdo the paint to avoid excessive mess.
- Create the Marbled Effect: Fold the plate back in half and press down gently. Rub your hand over the folded plate to spread the paint evenly. Open it up to reveal a beautiful marbled design that looks just like a Christmas tree!
- Add Sparkle and Texture: While the paint is still wet, sprinkle loose glitter or add rhinestones to mimic ornaments and give your tree a festive sparkle.
- Let It Dry Completely: Set the plate aside to dry thoroughly before moving on to the next steps.
- Shape Your Tree: Once the paint is dry, fold the plate again and use scissors to trim the edges into a triangular tree shape. Unfold it to see your tree come to life!
- Add the Final Details: Cut a small rectangle from brown cardstock for the tree trunk and a star from yellow cardstock for the top of the tree. Staple these pieces in place to complete your design.
- Display Your Masterpiece: Your marbled Christmas tree is ready to shine! Hang it on the wall, use it as a table centerpiece, or gift it to someone special.

Grab our favorite books via our Amazon affiliate link! In our Amazon storefront you will find books, toys and craft supplies we absolutely love using for our Glued To My Crafts tutorials!

If you've enjoyed our content or have any thoughts to share, we'd love to hear from you! Mention @gluedtomycrafts or tag #gluedtomycrafts on Instagram!