
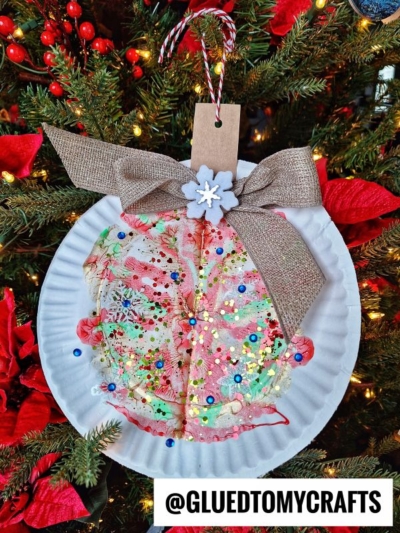
Help your child make beautiful marbled Paper Plate and Paint Splat Christmas Ornaments to show off on in your home all holiday season long!!!

Your kids will love making these beautiful marbled paper plate and paint splat ornaments. They’re perfect for adding a touch of handmade holiday magic to your home this season!
With our Paint Splat Christmas Ornament tutorial that you will find below, you are sure to have a fun “crafter-noon on a cold winter day” making some completely customizable one-of-a-kind paper ornament pieces together!
Just like all our other paint splat tutorials {btw – have you seen them all?!} this Christmas ornament one is super simple, extra fun and of course, no two pieces will EVER be alike! All it takes is folded a paper plate in half, squirting some paint and rubbing it “back together” to make a marbled look that is super impressive! Like I said – really easy for ANY little crafter to tackle this holiday season!
So what are you waiting for? The more the merrier so I hope you join your child in the fun! Keep scrolling for the full supply list and get ready to whip up some one-of-kind paper plate marble-art ornaments today!
Happy crafting this Christmas season, my friends!! Don’t forget to show off your paint smash puffy paint Christmas ornaments by sharing picture of them on our Facebook page. I can’t wait to see how they turn out! #gluedtomycrafts
RELATED —> Fingerprint Christmas Napkins


These marbled paper plate and paint splat ornaments are so much fun to make with your kids, and they’ll love showing them off all holiday season long. They’re easy to make and only require a few simple supplies, so get started today!
Craft Supplies:
- Large or Small Paper Plate
- Tulip Puffy Paint
- Glitter Cardstock Paper
- Scissors
- Ribbon
- Stapler
- Loose Craft Glitter
Directions:
- Please make sure you have a good working area that can get dirty because paint will squeeze out of the sides of this craft!!!
- First fold your paper plate in half {one per Christmas ornament craft you want to make today.}
- Unfold and squirt some holiday colored paint on one side of the paper plate {I like the Tulip Puffy Paint for this particular step since it’s in a nice controlled squirt bottle} Be sure to keep the paint inside the paper plate and not place too much down.
- Once the paint is down, go ahead and fold/squish your paper plate together again. Be sure to rub your hand all over the folded piece, so the paint will cover your the inside nicely {paint WILL more than likely squeeze out the sides, so be sure to pay attention to that and clean up with baby wipes!}
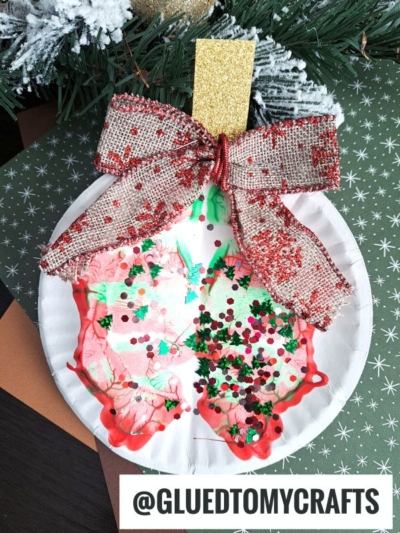
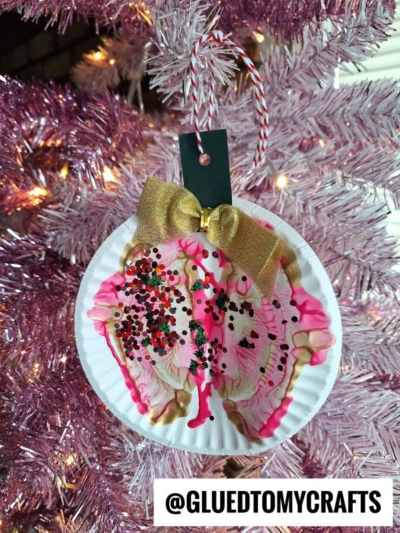
- Now carefully unfold your piece to reveal your “marbled Christmas ornament” design inside.
- If desired, sprinkle some glitter/rhinestones on top of the wet paint, to create more texture and sparkle.
- To finish the Paper Plate Marbled Ornament – cut out a small rectangle for the top of the ornament and it, along with a bow, to the top of the paper plate.
- Then set it aside to let it dry completely before displaying proudly.
- Don’t forget to show off those creations by taking pictures when done! #gluedtomycrafts
RELATED —> Paint Splat Christmas Tree
Create a holiday worth remembering with our easy step-by-step kid craft tutorials found right here on Glued To My Crafts!!!
Be sure to check out our PLASTIC ORNAMENT ROUNDUP post for even MORE crafty & festive inspiration that can be recreated today!
And as always – if one of our crafts inspires you, be sure to share it on our Facebook page. We love seeing our inspiration come to life!

Paint Splat Christmas Ornament Craft Idea
Here’s your checklist of supplies to bring this craft to life:
- Large or Small Paper Plate
- Tulip Puffy Paint
- Cardstock Paper
- Ribbon
- Embellishments
Prepare your creative haven by laying down a protective cover before the crafting magic begins!
Directions:
- Please make sure you have a good working area that can get dirty because paint will squeeze out of the sides of this craft!!!
- First fold your paper plate in half {one per Christmas ornament craft you want to make today.}Large or Small Paper Plate
- Unfold and squirt some holiday colored paint on one side of the paper plate. Be sure to keep the paint inside the paper plate and not place too much down.Tulip Puffy Paint
- Once the paint is down, go ahead and fold/squish your paper plate together again. Be sure to rub your hand all over the folded piece, so the paint will cover your the inside nicely {paint WILL more than likely squeeze out the sides, so be sure to pay attention to that and clean up with baby wipes!}
- Now carefully unfold your piece to reveal your "marbled Christmas ornament" design inside.
- If desired, sprinkle some glitter/rhinestones on top of the wet paint, to create more texture and sparkle.Embellishments
- To finish the Paper Plate Marbled Ornament - cut out a small rectangle for the top of the ornament and it, along with a bow, to the top of the paper plate.Cardstock Paper, Ribbon
- Then set it aside to let it dry completely before displaying proudly.


CLICK HERE TO PRINT THE DIRECTIONS FOR THIS CRAFT