
Let your kids go wild exploring their creativity and adding their own personal embellishments with today’s Colorful Paper Plate & Paint Splat Tree kid craft idea!

Paint Splatter & Paper Plate Tree
Recently I decided to design a kids craft project idea that would go along perfectly with one of our new favorite children’s books Tree: A Peek-Through Picture Book by Britta Teckentrup. Hence how today’s paint splat tree post came along!
Through a hole in the book’s cover, an owl invites you inside to meet a majestic tree and all its forest inhabitants during the changing seasons. With clever peekaboo holes throughout, each page reveals a new set of animals playing and living in the tree—baby bears frolicking in the spring, bees buzzing around apples in the summer, squirrels storing nuts in the fall, and finally the lone owl keeping warm during the winter chill—until another year begins. . . .
Our puffy paint marbled tree craft is perfect for a fall theme, but it can also be customized to represent any season you like, just like in the book! You can use shades of blues and white for a winter theme or various shades of green for a more neutral look.
So, let’s get started! Create your own paper plate and paint splatter tree with your child today. You can find the full step-by-step tutorial below. And don’t forget to read the Tree: A Peek-Through Picture Book along with your creation!
Happy crafting, my friends! Please don’t forget to share pictures of your paper plate tree creations on our Facebook page to admire! I can’t wait to see what colors you choose to use for your paint marble trees!! #gluedtomycrafts
RELATED: Burlap Leaf Owls and Paint Splat Rain Puddle


Spice up your weekend with this fun (and messy!) paint splat tree craft idea. Get the whole family involved for an afternoon of creative fun!
Craft Supplies:
- White Paper Plates – 1 per craft
- Brown Cardstock Paper
- Craft Scissors
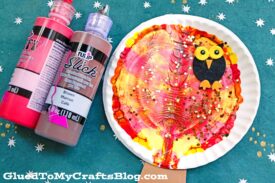
- Tulip Puffy Paint
- Owl Stickers
- Stapler
- Baby Wipes
- Embellishments
Directions:
- Please make sure you have a good working area that can get dirty because paint will squeeze out of the sides of this craft!!!
- First fold your paper plate in half {one per tree that you want to make.}
- Unfold and squirt some paint on one side of the paper plate {I like the Tulip Puffy Paint for this particular step since it’s in a nice controlled squirt bottle} Be sure to keep the paint inside the paper plate and not place too much down.
- Once the paint is down, go ahead and fold/squish your paper plate together again.
- Be sure to rub your hand all over the folded piece, so the paint will cover your the inside nicely {paint WILL more than likely squeeze out the sides, so be sure to pay attention to that and clean up with baby wipes!}
- Now carefully unfold your piece to reveal your colorful paint splatter tree design inside.
- To finish the Paper Plate And Paint Splat Tree – cut/staple a tree trunk piece out of the cardstock to the the center of the paper plate.
- Then add an owl in the tree to really tie it together!
- Set aside to let it dry completely before displaying proudly.
- If you like – you can also add glitter on top of the wet paint for an even more fun and sparkly look!
RELATED —> Potato Stamped Pumpkin Cards


AFFILIATE LINK – PAIR OUR CRAFT IDEA WITH THE BOOK “TREE”
Love this Paint Splat Tree kids craft idea?! Of course you do! Be sure to also check out our popular Paint Splat Town and Paint Splat Peacock posts to continue this fun marbling craft technique! #gluedtomycrafts

Paint Splat Tree Craft Idea For Kids
Here’s your checklist of supplies to bring this craft to life:
Prepare your creative haven by laying down a protective cover before the crafting magic begins!
Directions:
- Please make sure you have a good working area that can get dirty because paint will squeeze out of the sides of this craft!!!
- First fold your paper plate in half {one per tree that you want to make.}
- Unfold and squirt some paint on one side of the paper plate. Be sure to keep the paint inside the paper plate and not place too much down.
- Once the paint is down, go ahead and fold/squish your paper plate together again.
- Be sure to rub your hand all over the folded piece, so the paint will cover your the inside nicely.
- Now carefully unfold your piece to reveal your colorful paint splatter tree design inside.
- To finish the Paper Plate And Paint Splat Tree - cut/staple a tree trunk piece out of the cardstock to the the center of the paper plate.
- Then add an owl in the tree to really tie it together!
- Set aside to let it dry completely before displaying proudly.

Grab our favorite books via our Amazon affiliate link! In our Amazon storefront you will find books, toys and craft supplies we absolutely love using for our Glued To My Crafts tutorials!