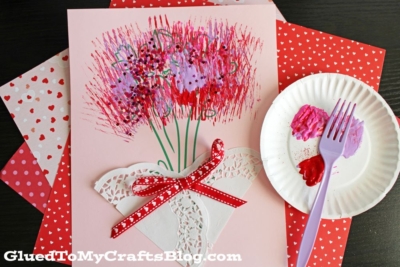
Bring creativity and color into playtime with a fork-painted flower bouquet! This delightful craft is not just a fun way to create beautiful art but also a fantastic opportunity for kids to improve their fine motor skills, explore colors, and let their imagination bloom.
In this post, we’ll guide you through the process of making a vibrant fork painted flower bouquet that will make a proud display on any fridge or wall this spring season!
Let your creativity bloom with this fun and easy DIY project! All you need is plastic forks, paper and paint to bring this fork painted flower project to life!
Card Supplies:
- Plastic Fork
- Craft Paints
- Small Paper Plate
- Spring Printable – Landing Page
- Cardstock Paper
- Loose Craft Glitter
- Glue Stick/Adhesive
- 4″ Circular Paper Doily
- Scissors
- Craft Ribbon
Directions:
- First things first – download and print out the provided flower file in the supply list above. You only need ONE print per flower craft. I suggest printing on a light colored sheet of cardstock paper but any color will do.
- Now grab your various colors of craft paint and squirt them on the paper plate.
- Take your plastic, dip it into the paint, then onto the greenery in the printable, to create little flower buds ALL over the stems. Repeat until your bouquet of flowers is nice and full.
- If desired, while the paint is still wet, go ahead and sprinkle some loose craft glitter on top.
- Now grab your circular paper doily and scissors. I used a kraft/tan colored paper for mine.
- Cut it in half, straight up the center to create two equal pieces.
- Next grab your glue stick and glue them to the bottom of your fork painted design, facing away from each other, to create the bouquet.
- To finish off the Fork Painted Flower craft – add other embellishments you see fit {like a decorative bow.}
- When done crafting, set aside to let it dry completely, before displaying proudly!!!
RELATED —> Paint Splat Tulip
Creating a fork-painted flower bouquet on paper is an enjoyable and educational activity that children of all ages can enjoy!
Share your kids’ floral masterpieces with us by tagging us on Facebook or Instagram —we’d love to admire their work! Remember, it’s not about perfection; it’s about expression. So don your artist’s hats, roll up your sleeves, and dive into a world of fork-painted flowers!
Fork Painted Flower Bouquet Craft Idea
Here’s your checklist of supplies to bring this craft to life:
Prepare your creative haven by laying down a protective cover before the crafting magic begins!
Directions:
- First things first - download and print out the provided flower file in the supply list above. You only need ONE print per flower craft. I suggest printing on a light colored sheet of cardstock paper but any color will do.
- Now grab your various colors of craft paint and squirt them on the paper plate.
- Take your plastic, dip it into the paint, then onto the greenery in the printable, to create little flower buds ALL over the stems. Repeat until your bouquet of flowers is nice and full.
- If desired, while the paint is still wet, go ahead and sprinkle some loose craft glitter on top.
- Now grab your circular paper doily and scissors. I used a kraft/tan colored paper for mine.
- Cut it in half, straight up the center to create two equal pieces.
- Next grab your glue stick and glue them to the bottom of your fork painted design, facing away from each other, to create the bouquet.
- To finish off the Fork Painted Flower craft – add other embellishments you see fit {like a decorative bow.}
- When done crafting, set aside to let it dry completely, before displaying proudly!!!


NEED MORE HELP DOWNLOADING OUR FREE PRINTABLES? PLEASE REFER TO OUR FAQ PAGE


