
Today we are going to show you how to paint an Easter bunny on paper! Just keep on scrolling to make it come to life in your home this spring season!

Fork Painted Easter Craft
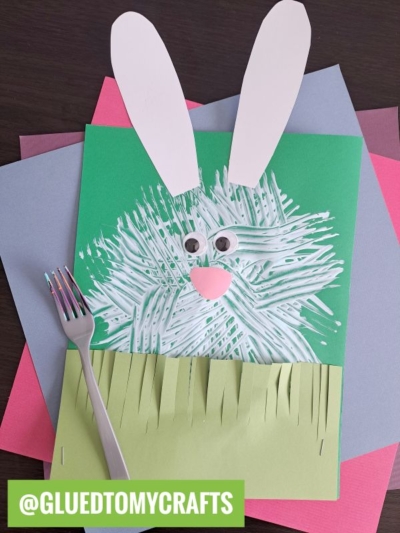
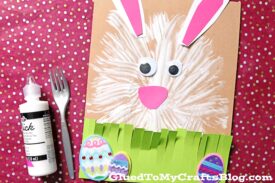
Today we are going to show YOU how easy it is to make an Easter bunny fork painting with your child today. It’s a fun Easter craft that is great for kids of all ages and sure to be a blast!
All you need is white craft paint, cardstock paper and a plastic fork to make this fluffy creature come to life within minutes! Throw in some Easter themed stickers and you have the perfect afternoon activity to do this spring season!
So without further ado – below is everything you need to know on how to make this unique Fork Painted Easter Bunny kid craft idea. It’s something I really hope you are inspired to recreate with your child this month. Remember – no two pieces will be alike so be sure to give it a try MORE than once!
P.S. I used Tulip brand puffy paint for mine and I absolutely loved the textured outcome of it. It added some detail to the already super fun craft idea. I highly recommend you add a bottle {or two} to your craft stash! Happy crafting, my friends!
RELATED —> Paper & Fork Carrot Craft


We are going to show YOU how easy it is to make an Easter bunny fork painting. All you need is paint, paper and a plastic fork to bring it to life!
Craft Supplies:
- Plastic Fork
- White Craft Paint
- Blue or Brown Cardstock Paper
- Pink Cardstock Paper
- White Cardstock Paper
- Green Cardstock Paper
- Craft Scissors
- School Glue
- Large Wiggle Eyes – 2 per craft
- Easter Egg Stickers
Directions:
- First squirt some white paint in the center of your colored cardstock paper. You don’t need a lot. The size of a quarter is a good starting point.
- Have children take their fork – which is their “paint brush” and spread the paint ALL around to make the fur of their bunny friend. Just make sure they keep the paint on the paper but they can move it anywhere and in any design/shape/angle they like.
- At this point in time, kids can sprinkle loose craft glitter on top of the wet craft paint if they choose.
- Once kids are done creating the “bunny fur” on paper – set it aside to let it dry a bit.
- Next grab the remaining pieces of cardstock paper and your scissors.
- Out of the white and pink cardstock paper, cut out bunny ears and a nose.
- Out of the green cardstock, cut out about a 3 inch wide rectangle for the grass.
- Use the scissors to cut a line of fringe on the piece of green cardstock paper and curl a few pieces to give it some character.
- Now to assemble it all. Go ahead and glue on the eyes, nose and ears to the fork painted design.
- Follow that up with the cardstock grass on the bottom of the design, to tie it all together. This way it looks like your bunny is hiding in it.
- Finally – the last step of this fork painted bunny craft. Add a few Easter egg stickers to the line of grass.
- When done decorating, set it aside to let it dry completely before displaying proudly!
RELATED —> Paper Plate Bunny Cars


Make your craft plans SUPER FRESH with tons of inspiration from Glued To My Crafts! We have tons of Easter activities just for you!
We want YOU to check out our super popular Bunny Gnome, Bunny Cupcake and Easter Bunny House craft posts! Then pair all three of these Easter craft ideas with today’s fork painted bunny hiding in grass tutorial for an epic day!
We also LOVE talking crafts with our lovely readers. Come join our private Facebook group where we chit chat, share and laugh together! Everyone is welcomed so come join the fun and share their craft creations!!! #gluedtomycrafts

Fork Painted Bunny Craft Idea For Spring
Here’s your checklist of supplies to bring this craft to life:
- Cardstock Paper
- Craft Paint
- 2 Wiggle Eyes
- Embellishments
- School Glue
Prepare your creative haven by laying down a protective cover before the crafting magic begins!
Directions:
- First squirt some white paint in the center of your colored cardstock paper. You don't need a lot. The size of a quarter is a good starting point.Cardstock Paper
- Have children take their fork - which is their "paint brush" and spread the paint ALL around to make the fur of their bunny friend. Just make sure they keep the paint on the paper but they can move it anywhere and in any design/shape/angle they like.Craft Paint
- Once they are done creating the "fur" - set it aside to let it dry a bit.
- Next grab the remaining pieces of cardstock paper and your scissors.
- Out of the white and pink cardstock paper, cut out ears and a nose for the bunny.
- Out of the green cardstock, cut out about a 3 inch wide rectangle for the grass.
- Use the scissors to cut a line of fringe on the piece of green cardstock paper and curl a few pieces to give it some character.
- Now to assemble it all. Go ahead and glue on the eyes, nose and ears to the fork painted design.2 Wiggle Eyes
- Follow that up with the cardstock grass on the bottom of the design, to tie it all together. This way it looks like your bunny is hiding in it.
- Finally - the last step of this fork painted bunny craft. Add a few Easter egg stickers to the line of grass.Embellishments
- When done decorating, set it aside to let it dry completely before displaying proudly!
CLICK HERE TO PRINT THE DIRECTIONS FOR THIS CRAFT