Glued To My Crafts

Join thousands of others who have gotten GLUED to our craft tutorials!

  • Home
  • Privacy Policy
  • Craft Safety Guidelines
  • Seasonal Themes
    • New Years
    • Valentine’s Day
    • St. Patrick’s Day
    • Spring
    • Easter
    • Mother’s Day
    • Summer
    • Father’s Day
    • Patriotic
    • Halloween
    • Thanksgiving
    • Fall
    • Winter
    • Christmas
    • Snowmen
    • Story Time
  • Favorite Craft Materials
    • Cupcake Liners
    • Torn Paper Crafts
    • Paper Plates
    • Popsicle Sticks
    • Sidewalk Chalk
    • Clothespin Crafts
    • Tulip Puffy Paint
    • Paper Bags
    • Craft Foam Hearts
    • Puffy Paint
  • About Us
  • Monthly Themes
    • January Craft Ideas
    • February Craft Ideas
    • March Craft Ideas
    • April Craft Ideas
    • May Craft Ideas
    • June Craft Ideas
    • July Craft Ideas
    • August Craft Ideas
    • September Crafts
    • October Crafts
    • November Crafts
    • December Crafts

Paper Plate & Paint Splat Peacock Craft Idea

When engaging in craft activities, it is important for young children to have adult supervision at ALL times. It is also recommended to use supplies that are suitable for your child's age. Feel free to modify materials or steps to meet your specific requirements. Please refer to our safety guidelines for more information.

As an Amazon Associate I earn from qualifying purchases. This post may contain affiliate links. For more information, please see our disclosure policy.

No sign-up is required to download our free printables! You can enjoy our printables without creating an account or paying for Box.com. Simply follow the download instructions on our FAQ PAGE. Please avoid pinning or saving the Box.com links, as they are updated weekly.

Create a vibrant Paint Splat Peacock with this fun and colorful craft for kids! Perfect for sparking creativity using paint and simple materials.
SKIP THE FLUFF AND PRINT THE DIRECTIONS
A marbled peacock craft made from a paper plate painted blue and purple to mimic feathers, topped with a blue peacock head and googly eyes, set on a red polka dot background. Text: “PAINT SPLAT PEACOCK.”.

We are so excited to bring you this latest marbled paint craft idea to you all today!

Keep scrolling for the full Paper Plate & Paint Splat Peacock project tutorial, so you can recreate one with your child TODAY!

Two paper plate peacock crafts feature blue and purple paint splat designs for tail feathers, creating a fun marbled peacock craft. Both are displayed on a red polka dot background.

Paint Splatter Peacock Craft

Paint splat crafts have become my new favorite technique as of late. If you have been following us for awhile now, I’ve shared quite a few different ideas on Glued To My Crafts already. By chance have you recreated any of them yet?

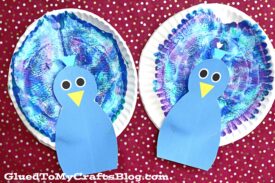
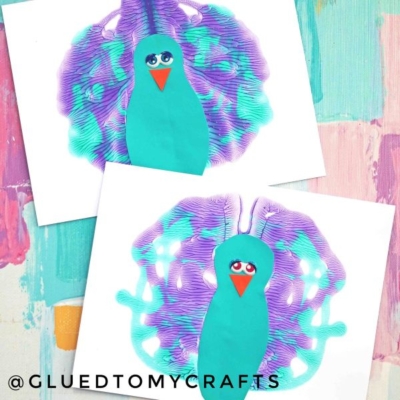
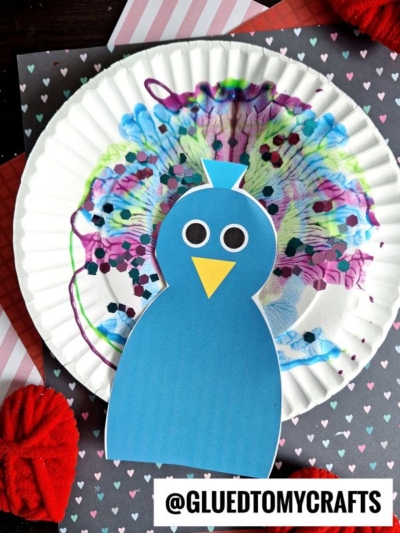
I recently took our popular paper plate and paint splash technique & changed it up a bit to make a colorful Paint Splat Peacock. All I did was change up the colors I used {keeping in line with shades of blue & purple} and added a bowling pin shape for the peacock’s body to the center. That’s it! Still just as easy as my previous paint splatter craft tutorials and still equally fun!

If this is something you want to do with your child today, keep scrolling for ALL the details and supply links below. I even decided to pull out my printable from our popular “chalk art peacock” post to make it even easier for us to make it! This way, I really do hope you are inspired to recreate this paint marble craft idea today! Happy crafting, my friends!!!

RELATED —> Handprint Peacock

Two paper plate peacock crafts feature blue and purple paint splat designs for tail feathers, creating a fun marbled peacock craft. Both are displayed on a red polka dot background.

Kids can make this super colorful peacock craft with just a few simple supplies!

Craft Supplies:

  • Large Paper Plates
  • Tulip Puffy Paint
  • Loose Craft Glitter
  • Peacock Printable – on our landing page
  • White Cardstock Paper
  • Scissors
  • Stapler
  • Baby Wipes

Directions:

  • Please make sure you have a good working area because paint will squeeze out of the sides of this craft!
  • First fold your large paper plate in half – straight up the center, into equal pieces {one per peacock that you want to make today.}
  • Unfold and squirt some paint on one side of the paper plate {I like the Tulip Puffy Paint for this particular step since it’s in a nice controlled squirt bottle} Be sure to keep the paint inside the paper plate and not place too much down.
  • Once the paint is down, go ahead and fold/squish your paper plate together again.
  • Be sure to rub your hand all over the folded piece, so the paint will cover your the inside nicely {paint WILL more than likely squeeze out the sides, so be sure to pay attention to that and clean up with baby wipes!}
  • Now carefully unfold your piece to reveal your colorful paint splat peacock feather design inside.
  • Sprinkle some loose craft glitter on top of the wet paint.
  • Set it aside to allow it to dry completely till the last step.
  • To finish the Paper Plate And Paint Splat Peacock – cut/staple the peacock design from the printable {listed above in the supply list} to the center of the decorated paper plate piece. If you by chance can’t print our file, just cut something out of blue cardstock instead.
  • And that’s it – don’t forget to snap a few pictures to share with us! #gluedtomycrafts

RELATED —> Coffee Filter Peacock

A marbled peacock craft made from a paper plate painted blue and purple to mimic feathers, topped with a blue peacock head and googly eyes, set on a red polka dot background. Text: “PAINT SPLAT PEACOCK.”.

Love this Paint Splat and Paper Plate Peacock craft idea?! We sure hope so!

Be sure to also check out our popular Handprint Chicken, Craft Foam Fox, and Paper Plate Sloth craft posts to recreate with your child today!

stacey-signature-2023

A marbled peacock craft made from a paper plate painted blue and purple to mimic feathers, topped with a blue peacock head and googly eyes, set on a red polka dot background. Text: “PAINT SPLAT PEACOCK.”.
PRINT

Paper Plate & Paint Splat Peacock Craft Idea

Create a vibrant Paint Splat Peacock with this fun and colorful craft for kids! Perfect for sparking creativity using paint and simple materials.

Here’s your checklist of supplies to bring this craft to life:

  • Cardstock Paper
  • PEACOCK PRINTABLE - LANDING PAGE
  • 1 Large Paper Plate
  • Tulip Puffy Paint
  • Loose Craft Glitter
  • 1 Scissors
  • 1 Stapler
  • Baby Wipes

Prepare your creative haven by laying down a protective cover before the crafting magic begins!

Directions:

  • Please make sure you have a good working area because paint will squeeze out of the sides of this craft!
  • First fold your large paper plate in half - straight up the center.
    1 Large Paper Plate
  • Unfold and squirt some paint on one side of the paper plate. Be sure to keep the paint inside the paper plate and not place too much down.
    Tulip Puffy Paint
  • Once the paint is down, go ahead and fold/squish your paper plate together again.
  • Be sure to rub your hand all over the folded piece, so the paint will cover your the inside nicely {paint WILL more than likely squeeze out the sides, so be sure to pay attention to that and clean up with baby wipes!}
  • Now carefully unfold your piece to reveal your colorful paint splat peacock feather design inside.
  • Sprinkle some loose craft glitter on top of the wet paint.
    Loose Craft Glitter
  • Set it aside to allow it to dry completely till the last step.
  • To finish the Paper Plate And Paint Splat Peacock - cut/staple the peacock design from our provided printable, to the center of the decorated paper plate piece.
    Cardstock Paper
  • And that's it! Now display it proudly for all to see.
    Paper Plate & Paint Splat Peacock - Kid Craft Idea
MINI-HEARTS-page-separator-logo-gluedtomycrafts

click-here-to-head-to-our-landing-page-gluedtomycrafts

NEED MORE HELP DOWNLOADING OUR FREE PRINTABLES? PLEASE REFER TO OUR FAQ PAGE

CLICK HERE TO PRINT THE DIRECTIONS FOR THIS CRAFT

If you've enjoyed our content or have any thoughts to share, we'd love to hear from you! Mention @gluedtomycrafts or tag #gluedtomycrafts on Instagram!

Craft Activity Safety Guidelines:

Always Ensure Adult Supervision - Young children should be supervised at all times when engaging in craft activities. This is essential to keep them safe and ensure materials are used correctly. Use Age-Appropriate Supplies - Choose craft supplies that are suitable for your child’s age. Check labels for recommendations and avoid items with small parts or sharp edges for younger children. Modify as Needed - Feel free to adapt materials or steps to meet your child's abilities and safety needs. For example, substitute scissors with safety scissors if necessary. Keep an Eye on Allergies - Be mindful of potential allergens in craft materials like glue, paint, or certain fabrics. Opt for non-toxic and hypoallergenic options whenever possible. Organize and Secure Supplies - Keep all craft tools and materials organized. Store sharp objects, small parts, and potentially hazardous items out of reach when not in use. Following these guidelines will ensure that crafts remain fun, creative, and, most importantly, safe for everyone involved!


OUR PRIVACY POLICY

OUR COPYRIGHT POLICY

  • Email
  • Facebook
  • Instagram
  • Pinterest
  • Twitter
  • YouTube

LOOKING FOR SOMETHING?

EXPLORE OUR SITE:

TRENDING TODAY:

  • A pink hand-shaped bookmark with red heart stickers and star confetti surrounds a round note that reads a heartfelt message about love and reading. The image is from GluedToMyCraftsBlog.com. Handprint Bookmark Keepsake: A Gift That Holds Your Spot
  • A handmade Valentine’s Day craft featuring a red rose made of torn paper, two green handprint leaves, a glue bottle, heart decorations, and a message: “LOOK WHAT I MADE - A ROSE THAT WON’T FADE! WISHING YOU LOVE THIS VALENTINE’S DAY!”. Torn Paper Rose Card Craft Tutorial for Valentine’s Day
  • A colorful paper craft featuring a red and pink painted paper plate with yellow circles in the center, green handprint cutouts as leaves, surrounded by craft supplies, heart decorations, and paint bottles. Paint Splat Valentine's Day Flower Craft Idea
  • A colorful craft project featuring a yellow felt moon, sparkly stars, and heart shapes, with glue and a heartfelt message. Torn Paper Love You To The Moon and Back Card Craft Idea For Kids
  • A handmade card with a rocket drawing, hearts, and messages of love. Felt hearts and an envelope are around it. Handprint Rocket Keepsake - I Love You Because
  • A vibrant Valentine's Day craft showcasing a torn-paper bumblebee with googly eyes on a white sheet, accompanied by the text "MY VALENTINE!" The scene is decorated with felt hearts, heart-shaped gems, and patterned papers, with a glue bottle and crafting supplies adding to the creative atmosphere. Torn Paper Bee My Valentine Card Craft Idea For Valentine's Day
  • A blue paper bird with a googly eye is colored and glued on a white sheet that says, Chirp, chirp, hooray—Spring is here to stay! with colorful foam flowers and ladybugs along the brown paper ground. Easy Torn Paper Bird Nest Craft for Kids: Fun Spring Activity Idea
  • Flat lay of a torn paper dandelion craft featuring a white sheet with a black dandelion outline. Torn yellow, pink, and purple paper pieces are glued to the dandelion head, simulating seeds. Surrounding the craft are Elmer's glue, felt hearts, paper flowers, and patterned scrapbook paper. The text 'MAKING WISHES, ONE PIECE OF PAPER AT A TIME.' and 'GluedToMyCraftsBlog.com' are printed on the white sheet. Torn Paper Dandelion Craft: Making Wishes, One Piece at a Time
  • A flat lay of handmade Valentine’s Day cards and decorations, including paper flowers, felt hearts, an envelope, and printed cards with romantic poems, arranged on a gray and pink background. Capture Memories With These 6 Handprint Flower Poems
  • A playful torn paper cactus craft with hearts and flowers. Includes glue and felt hearts. Torn Paper Cactus Card: A Sweet Mother's Day Craft

© 2012–2026 Glued To My Crafts
All activities should be supervised by an adult at all times. Please refer to our safety guidelines for more information.


Please note that all the content of the website, including printables, are for classroom and personal use only. This means that any digital item you download from our site can be used for non-commercial use only. We kindly request that you do not reproduce or sell our creations. We appreciate your understanding and cooperation in respecting our content and intellectual property rights.

Accessibility Adjustments

Powered by OneTap

How long do you want to hide the toolbar?
Hide Toolbar Duration
Select your accessibility profile
Vision Impaired Mode
Enhances website's visuals
Seizure Safe Profile
Clear flashes & reduces color
ADHD Friendly Mode
Focused browsing, distraction-free
Blindness Mode
Reduces distractions, improves focus
Epilepsy Safe Mode
Dims colors and stops blinking
Content Modules
Font Size

Default

Line Height

Default

Color Modules
Orientation Modules