Make your own nighttime scene come to life with today's super easy and colorful city skyline craft idea!

Get your kids creating with this fun and colorful paint splat city skyline craft idea! They’ll have a blast making their own one-of-a-kind masterpiece and you’ll be left with something special to hang on your wall.

Make your own nighttime scene come to life with today’s Paint Splat City Skyline Silhouette craft idea!
This is a great craft for kids of all ages! It’s fun to create your own nighttime scene come to life! Perfect for young children, tweens and teens.

What makes this craft amazing? It’s a stress-free process art activity! Kids adore the ‘big reveal’ when they unfold the paper, and it’s a fun way to explore color mixing without worrying about perfection.
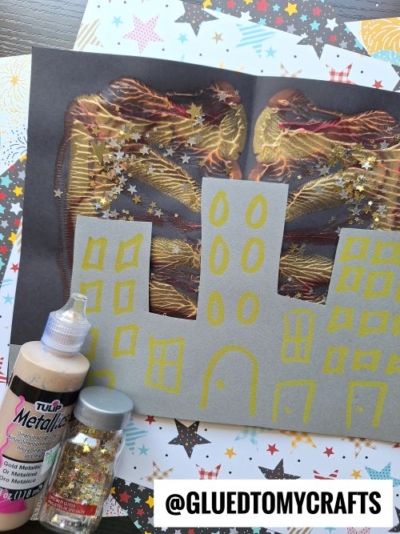
Craft Supplies:
- Gray Cardstock Paper
- Black Cardstock Paper
- Glow In The Dark Puffy Paint
- Loose Craft Glitter
- Craft Scissors
- Stapler
- White Crayon or Craft Paint
- Baby Wipes
Directions:
- Please make sure you have a good working area that can get dirty because paint may squeeze out of the sides of this craft!!!
- First fold your gray {or other dark colored} cardstock paper in half {one paper per city skyline craft}
- Unfold and squirt some paint {two-three colors} on one side of the paper {I like the Tulip Puffy Paint for this particular step since it’s in a nice controlled squirt bottle} Be sure to keep the paint inside the paper and not place too much down.
- Once the paint is down, go ahead and fold/squish your paper together again.
- Be sure to rub your hand all over the folded piece, so the paint will cover your the inside nicely {paint WILL more than likely squeeze out the sides, so be sure to pay attention to that and clean up with baby wipes!}
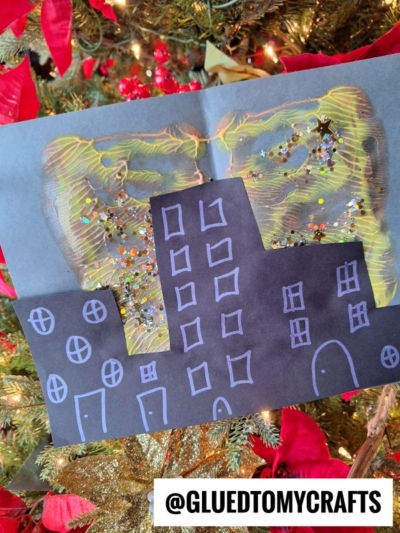
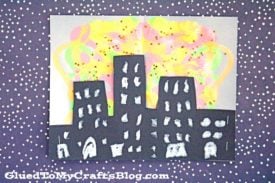
- Now carefully unfold your piece to reveal your colorful nighttime sky design inside. Add glitter on top of the wet paint, if desired before the paint dries completely. Set it aside.
- Next grab your black cardstock and scissors. Cut out a skyline design {just squares and rectangles.}
- Use the white crayon or white craft paint, to draw one some windows/doors on the various buildings you just made.
- To finish the Paint Splat City Skyline craft, staple your building scene to the top of the paint splat piece. Add other embellishments you see fit {maybe even a moon in the background!}
- Then display proudly!!!
RELATED —> Paint Splat Unicorn Hair
Love this cityscape craft idea? Be sure to also check out our Northern Lights version of this craft. It includes a FREE mountain printable to get you started even faster! Have fun!
BE SURE TO FOLLOW US ON PINTEREST SO YOU NEVER MISS A NEW TUTORIAL FROM US!

Paint Splat City Skyline Craft Idea For Kids
Make your own nighttime scene come to life with today's super easy and colorful city skyline craft idea!
Here’s your checklist of supplies to bring this craft to life:
Prepare your creative haven by laying down a protective cover before the crafting magic begins!
Directions:
- Please make sure you have a good working area that can get dirty because paint may squeeze out of the sides of this craft!!!
- First fold your gray cardstock paper in half {one paper per city skyline craft.}
- Unfold and squirt some paint {two-three colors} on one side of the paper. Be sure to keep the paint inside the paper and not place too much down.
- Once the paint is down, go ahead and fold/squish your paper together again.
- Be sure to rub your hand all over the folded piece, so the paint will cover your the inside nicely {paint WILL more than likely squeeze out the sides, so be sure to pay attention to that and clean up with baby wipes!}
- Now carefully unfold your piece to reveal your colorful nighttime sky design inside. Add glitter on top of the wet paint, if desired before the paint dries completely. Set it aside.
- Next grab your black cardstock and scissors. Cut out a skyline design {just squares and rectangles.}
- Use the white crayon or white craft paint, to draw one some windows/doors on the various buildings you just made.
- To finish the Paint Splat City Skyline craft, staple your building scene to the top of the paint splat piece.
- Add other embellishments you see fit. Then display proudly!!!

CLICK HERE TO PRINT THE DIRECTIONS FOR THIS CRAFT
If you've enjoyed our content or have any thoughts to share, we'd love to hear from you! Mention @gluedtomycrafts or tag #gluedtomycrafts on Instagram!