
Create your own unique masterpiece! Have some fun and channel your inner artist with this colorful Paint Splat Northern Lights craft!
Paint Splatter Northern Lights Craft Idea For Kids
You should know, that I’m very much a “squirrel” person when it comes to my crafts.
The ideas come at random times, with no rhythm or reason. Most of the time they come late at night, when I probably should be sleeping so I can adult the next morning 😉
Anyways – long story short, this Paint Splat Northern Lights kids craft idea is one of those “up late at night” ideas. Although it’s abstract, I hope you are intrigued!
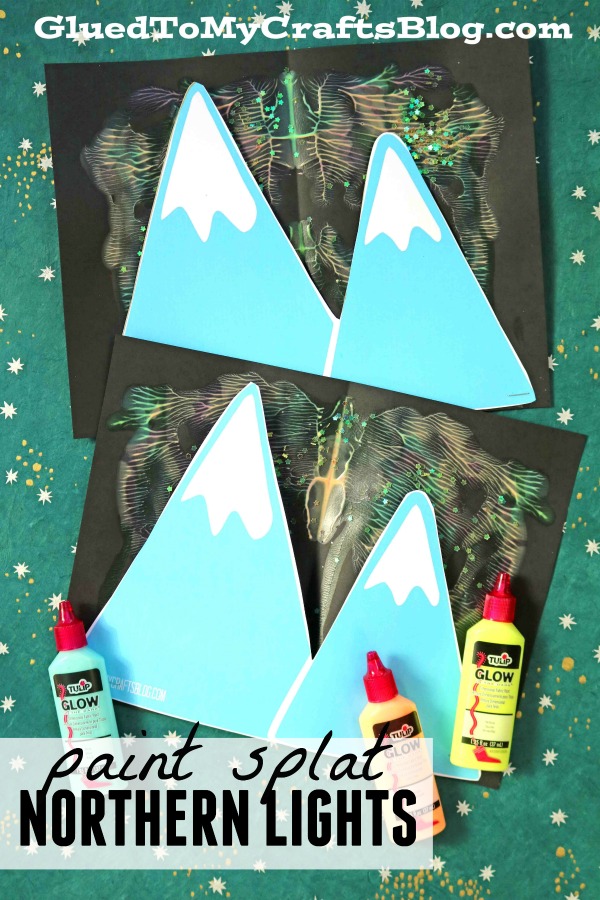
The other night I was cleaning up my craft area when I came across some extra printouts I did from our previous Watercolor Snowy Mountain Scene post. At the same time, I had also stumbled upon some bottles of Glow In The Dark Tulip Puffy Paint that were a hidden gem in my drawers.
In that instant, the wheels starting spinning and this abstract art piece came to life.
At first I was just going for a “night” scene with the mountains but as the glow in the dark colors started to dry and the star glitter came into the mix {all the glitter!!!} I instantly thought “Northern Lights.”
Although it’s not even close to the real thing, I still think our DIY tutorial is a cool {and beautiful} handmade art idea! I hope maybe you see the “vision” in my “squirrel moment” as well and will recreate your own masterpiece with your child today! Maybe afterwards, you can make a goal to see it in person one day {bucket list it!}
Be sure to also share with us your beautiful paper and paint splatter aurora lights craft using #gluedtomycrafts on your various social media sites or on our Facebook page! Happy crafting, my friends!!! I can’t wait to see what you come up with!
RELATED —> Popsicle Stick Snowy Mountain

Why we love this: It’s a low-stress way to explore abstract art while sneaking in a little science! The ‘paint splat’ technique creates a beautiful, symmetrical sky every time, making it a major confidence booster for kids who might be nervous about ‘messing up’ their painting.
Craft Supplies:
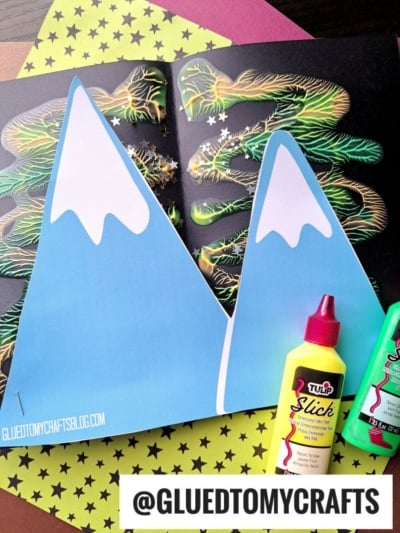
- Mountain Printable – on our landing page
- White Cardstock Paper
- Cardstock Paper
- Craft Scissors
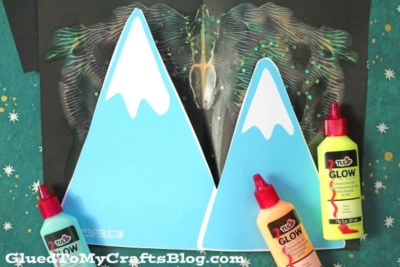
- Tulip Glow In The Dark Puffy Paint
- Stapler
- Baby Wipe
Stacey’s Pro-Tip: No printer? No problem! Grab a piece of black or dark blue cardstock and cut out a jagged, ‘zig-zag’ line across the width of the paper to create your own mountain range. It gives the craft a cool, silhouette look that really pops against the glowing sky!
Directions:
- Please make sure you have a good working area that can get dirty because paint may squeeze out of the sides of this craft!!!
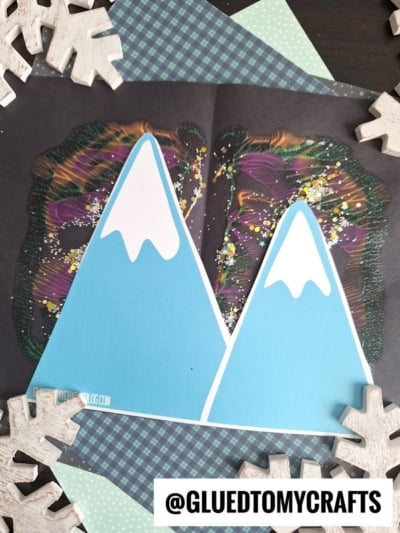
- First fold your dark cardstock paper in half {one paper per Northern Lights craft}
- Unfold and squirt some paint on one side of the paper {I like the Tulip Puffy Paint for this particular step since it’s in a nice controlled squirt bottle} Be sure to keep the paint inside the paper and not place too much down.
- Once the paint is down, go ahead and fold/squish your paper together again.
- Be sure to rub your hand all over the folded piece, so the paint will cover your the inside nicely {paint WILL more than likely squeeze out the sides, so be sure to pay attention to that and clean up with baby wipes!}
- Now carefully unfold your piece to reveal your colorful Northern Lights design inside. Add glitter on top if desired before the paint dries. Set it aside.
- Next print out the mountain printable above in color, on some white cardstock.
- Trim out the mountains with your scissors.
- To finish the Paint Splat Northern Lights craft, staple your mountain scene to the top of the paint splat piece.
- Add other embellishments you see fit.
- Then display proudly!!!
RELATED —> Thumbprint You Light Up My Life
Keep the crafty fun going:
- Paint Splat City Skyline: For kids who want to try the night sky technique again but with a different silhouette.
- Paint Splat Polar Bear: Since it uses the same wintry, “blue and white” color palette.
- Aluminum Foil Moon: A craft idea where kids will love to tear and crumple the foil.
- Watercolor Snowy Mountain: A different medium (watercolors) for kids who want to try a more “traditional” art style while keeping the mountain theme.
- Popsicle Stick Snowy Mountain: A wonderful tactile sensory experience that brings the magic of a winter landscape right to your craft table!
I hope this Paint Splat Northern Lights tutorial inspires you and your little ones to get a little messy and embrace the magic of the night sky! Whether yours glows in the dark or sparkles with glitter, remember that the best part is the time spent creating together. Happy crafting, my friends!

Paint Splat Northern Lights Craft
Here’s your checklist of supplies to bring this craft to life:
Prepare your creative haven by laying down a protective cover before the crafting magic begins!
Directions:
- Please make sure you have a good working area that can get dirty because paint may squeeze out of the sides of this craft!!!
- First fold your dark cardstock paper in half {one paper per Northern Lights craft}
- Unfold and squirt some paint on one side of the paper. Be sure to keep the paint inside the paper and not place too much down.
- Once the paint is down, go ahead and fold/squish your paper together again. Be sure to rub your hand all over the folded piece, so the paint will cover your the inside nicely {paint WILL more than likely squeeze out the sides, so be sure to pay attention to that and clean up with baby wipes!}
- Now carefully unfold your piece to reveal your colorful Northern Lights design inside. Add glitter on top if desired before the paint dries. Set it aside.
- Next print out the mountain printable above in color, on some white cardstock paper.
- Trim out the mountains with your scissors.
- To finish the Paint Splat Northern Lights craft, staple your mountain scene to the top of the paint splat piece.
- Add other embellishments you see fit. Then display proudly!!!


NEED MORE HELP DOWNLOADING OUR FREE PRINTABLES? PLEASE REFER TO OUR FAQ PAGE