
April showers bring May flowers and today we are hoping to “grow” some inspiration within you, with our latest Paint Splat Rain Puddle kid craft tutorial. You are never too old to “play in the rain” so I hope you join your child in recreating this DIY idea, as well!

Paint Splatter Rain Puddle Craft
Although splashing in puddles on a rainy day is super fun, as moms, we don’t necessarily like the after-math that comes with it.
So I was recently inspired to make this “paint splat rain puddle” idea come to life, for those who want to play with the idea of splashing puddles but would rather stay indoors instead.
No TWO PUDDLE PIECES will be alike with this our creative technique that we absolutely love sharing on Glued To My Crafts. But I swear – it’s so simple, I promise! And with it being perfect for this sometimes rainy spring season, this blog post is one to beat those boredom blues!
So let’s grab those craft supplies listed below {along with the free printable!} and make some one-of-a-kind “PUDDLES” together. Don’t forget to use our hashtag #gluedtomycrafts on your social media sites to show off those awesome creations!
Happy crafting, my friends! BTW – another huge thank you to dailyarthub.com for the rain boot graphics we used in today’s post. We owe them a HUGE thanks!
RELATED —> Fingerprint Raindrops

If your kids are looking for a fun painting project, try this Paint Splat Rain Puddle Craft! They’ll have a blast making their own little puddle of color.
Craft Supplies:
- Rainboot Printables – on our landing page
- White Cardstock Paper
- Paper Scissors
- Blue Tulip Puffy Paint
- optional materials – loose craft glitter
Directions:
- First print out the free rain boot templates listed above. You have a choice of purple or green {or both!} You will only need ONE printable per craft. Please only use these for personal use 🙂
- When your printable is printed, go ahead and trim out the rain boots in it & set aside till later.
- Next go ahead and grab another sheet of white cardstock.
- Fold it in half {either way works!}
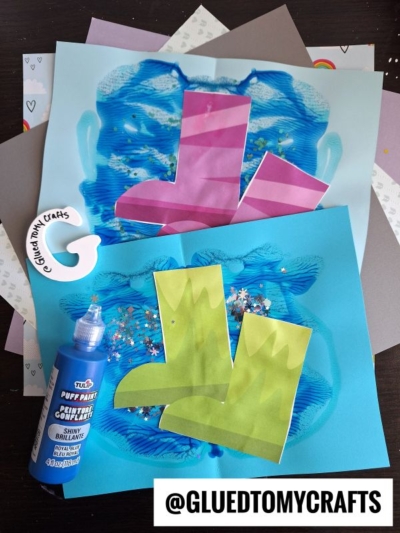
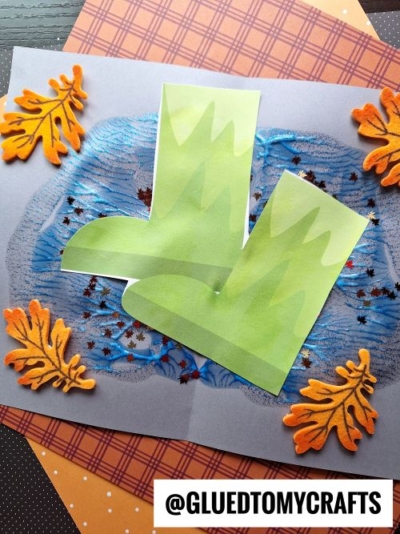
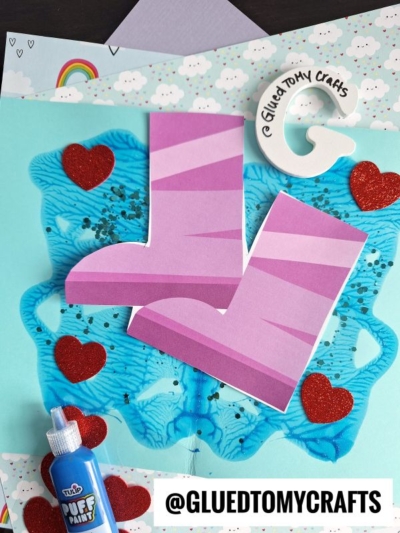
- Now unfold and squirt some paint on one side of the paper. You only need a few dots or squiggles of each color of blue paint {I like the Tulip Puffy Paint for this particular step since it’s in a nice controlled squirt bottle} Be sure to keep the paint inside the paper and not to close to the open edge. Also, less is more!
- Once the paint is down, go ahead and carefully fold up/squish your piece of paper together again.
- Rub your hand all over the folded piece, so the paint will make a symmetrical splat inside.
- Now carefully unfold your piece to reveal your “rain puddle” design.
- To finish the Smashed Rain Puddle Design – sprinkle some glitter on top of the wet puffy paint and lay your rain boot cutout on top of it, so it will all dry together {or if you like, use some school glue to secure it instead!}
- Then set aside to let it dry completely before displaying proudly.
- If you like – you can also cut out the finished design and display it that way as well.
RELATED —> Paper Boot Flower Vase
Do you love our Paint Splat Rain Puddle tutorial? We also have our Ice Cream Cones, Easter Sunrise and City Skyline paint splatter craft posts for you to check out as well.
Clearly we love this creative painting technique and we want YOU to be hooked too – wink wink!

Paint Splat Rain Puddle Craft
Here’s your checklist of supplies to bring this craft to life:
Prepare your creative haven by laying down a protective cover before the crafting magic begins!
Directions:
- First print out the free provided rain boot templates. You have a choice of purple or green {or both!} You will only need ONE printable per craft.
- When your printable is printed, go ahead and trim out the rain boots in it & set aside till later.
- Next go ahead and grab another sheet of white cardstock.
- Fold it in half {either way works!}
- Now unfold and squirt some paint on one side of the paper. You only need a few dots or squiggles of each color of blue paint. Be sure to keep the paint inside the paper and not to close to the open edge. Also, less is more!
- Once the paint is down, go ahead and carefully fold up/squish your piece of paper together again.
- Rub your hand all over the folded piece, so the paint will make a symmetrical splat inside.
- Now carefully unfold your piece to reveal your "rain puddle" design.
- To finish the Smashed Rain Puddle Design - sprinkle some glitter on top of the wet puffy paint and lay your rain boot cutout on top of it, so it will all dry together {or if you like, use some school glue to secure it instead!}
- Then set aside to let it dry completely before displaying proudly.


NEED MORE HELP DOWNLOADING OUR FREE PRINTABLES? PLEASE REFER TO OUR FAQ PAGE