Don't let the weather get your down - grab those craft supplies and get to work on creating these fun cupcake liner umbrella cards today!

Get creative and brighten someone’s day with these fun and colorful cupcake liner umbrella cards! What a perfect way to spread joy and put a smile on someone’s face!

This kid friendly craft is super easy, really inexpensive and totally customizable with supplies you probably have on hand all ready {just think of all the cupcake liner color combinations!} Plus since it’s a card, it’s the perfect excuse to lift up someone else who “might” be feeling under the weather these days!
So don’t let the weather get your down – grab those craft supplies and get to work on creating some of your own fun cupcake liner and paper umbrella cards with your child today!!!
Happy crafting with your little ones, my friends! Please don’t forget to share pictures of your paper umbrella cards with us, by tagging us on Instagram to see! I can’t wait to see what colors you choose for your umbrellas! #gluedtomycrafts

Looking for a fun rainy day craft? These adorable cupcake liner umbrella cards are perfect!
Craft Supplies:
- Large Cupcake Liners
- Cardstock Paper
- Glue Stick
- Scissors
- Markers
- Embellishments
Directions:
- First things first – grab ONE large cupcake liner {one per umbrella card} and flatten it out with your hands.
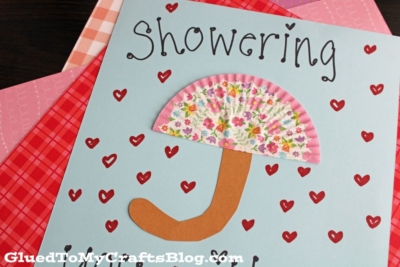
- Next fold it in half and glue it together, in the center of a single sheet of cardstock paper, to make the umbrella shape.
- Next up -grab your brown cardstock and scissors.
- Go ahead and cut out an umbrella “handle” for your card. I best suggestion is to imagine a candy cane.
- To finish off the cupcake liner umbrella card – glue your handle paper piece under the cupcake liner shape on the card.
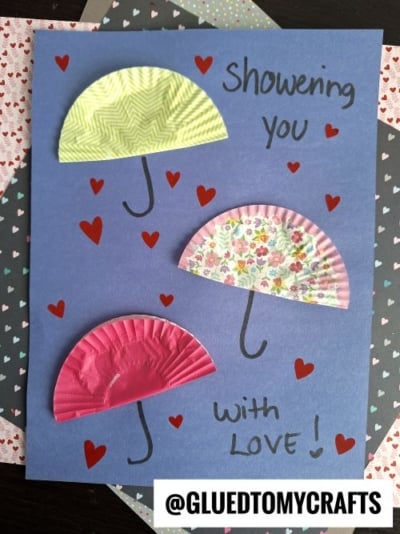
- Then add other embellishments you see fit. I drew several hearts and wrote “showering you with love” around it but feel free to change it up!
- When done, allow it all to dry completely before you give it away proudly!
RELATED –> Paper Plate Umbrella


AFFILIATE LINK – PAIR OUR CRAFT IDEA WITH THIS BOOK RECOMMENDATION
Our cupcake liner craft tutorials are our best kept secret! Be sure to check them all out today!
If you are looking for even MORE easy kid craft ideas that use cupcake liners, be sure to check out these fun posts listed below.
- Cupcake Liner Ladybugs
- Cupcake Liner Bunnies
- Cupcake Liner Rainbow Fish
- Cupcake Liner Shamrock
- Cupcake Liner Bees
- Cupcake Liner Car Cards
- Cupcake Liner Olive Card
- Cupcake Liner Owl
- Cupcake Liner Candy Cards

Cupcake Liner Umbrella Card Craft Idea
Don't let the weather get your down - grab those craft supplies and get to work on creating these fun cupcake liner umbrella cards today!
Here’s your checklist of supplies to bring this craft to life:
- Large Cupcake Liners
- Cardstock Paper
- Embellishments
Prepare your creative haven by laying down a protective cover before the crafting magic begins!
Directions:
- First things first - grab ONE large cupcake liner {one per umbrella card} and flatten it out with your hands.
- Next fold it in half and glue it together, in the center of a single sheet of cardstock paper, to make the umbrella shape.
- Next up -grab your brown cardstock and scissors.
- Go ahead and cut out an umbrella "handle" for your card. I best suggestion is to imagine a candy cane.
- To finish off the cupcake liner umbrella card – glue your handle paper piece under the cupcake liner shape on the card.
- Then add other embellishments you see fit. I drew several hearts and wrote "showering you with love" around it but feel free to change it up!
- When done, allow it all to dry completely before you give it away proudly!

If you've enjoyed our content or have any thoughts to share, we'd love to hear from you! Mention @gluedtomycrafts or tag #gluedtomycrafts on Instagram!