Learn how to make a puffy paint Truffula tree using simple supplies like cardstock, straws, and shaving cream for creative fun.
Dr. Seuss Week is almost here! Every year around March 2nd (Dr. Seuss’s birthday), classrooms and homes buzz with whimsical rhymes, colorful characters, and important life lessons. One of the most beloved stories is The Lorax.
To celebrate, why not bring the vibrant world of The Lorax to life? These Paper Straw & Puffy Paint Truffula Trees are a perfect hands-on activity.
They are squishy, sparkly, and capture the fluffy texture of those famous trees perfectly. Plus, working with puffy paint is a fantastic sensory experience for little hands!
Craft Supplies:
- Light Blue Cardstock Paper
- Green Paper Straws – three per craft
- White School Glue
- Foam Shaving Cream
- Small Bowl
- Food Coloring
- Jumbo Craft Stick {for mixing}
- Loose Craft Glitter
Directions:
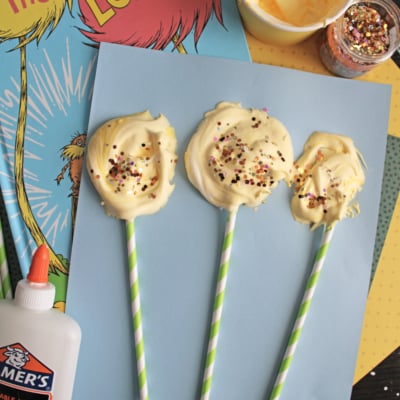
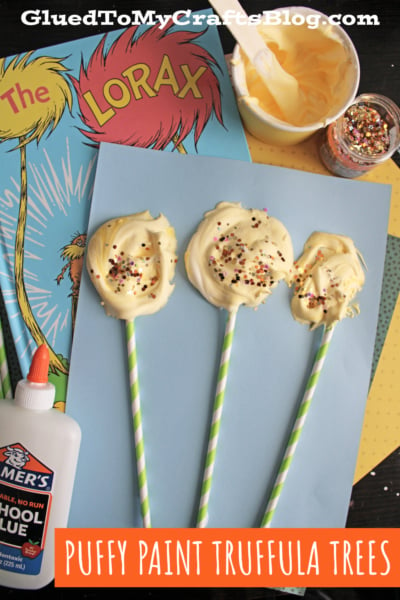
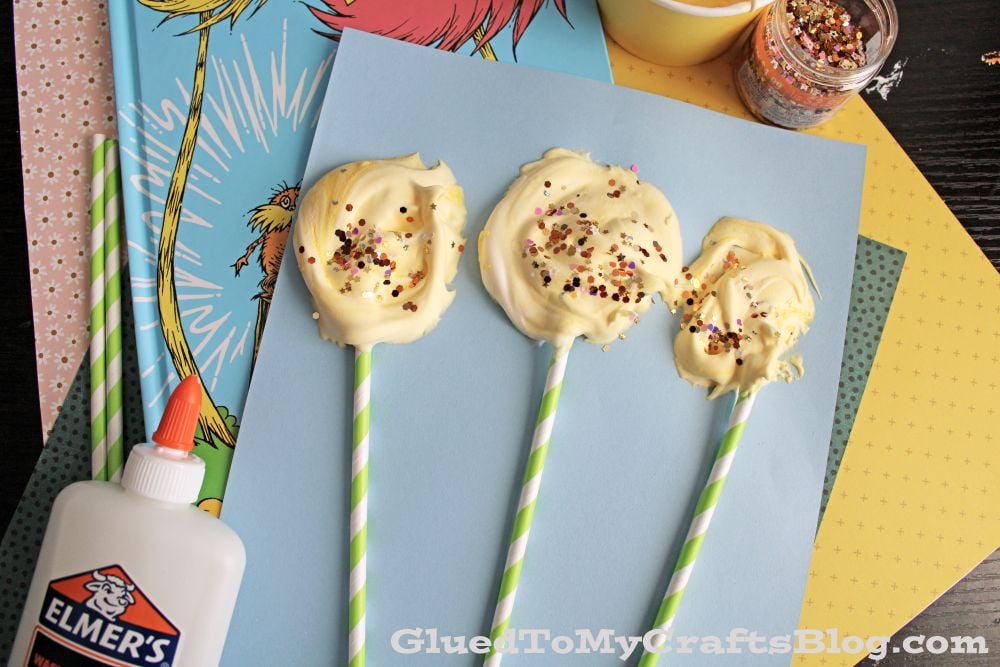
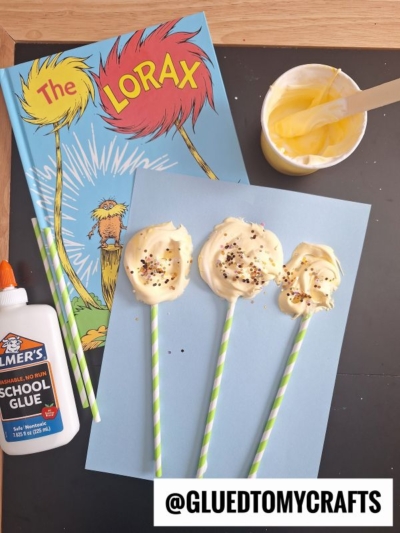
- Start by selecting a sturdy piece of cardstock. A light blue paper works wonderfully to represent the sky, but you can also use white. Lay it flat on your workspace.
- Take your green paper straws and glue them vertically onto the cardstock. These will act as the trunks of your Truffula Trees. If desired, you can cut them to different lengths to give your forest some variety and depth. Use a line of regular white glue to secure them in place.
- Now the fun part – make your puffy paint! Place equal amounts of shaving cream and glue in a small dish.
- Go ahead and also add a few drops of yellow food coloring to tint the mixture.
- Mix together until well combined.
- Using your craft stick, take a generous amount of puffy paint and make a dollop right at the top of each straw. Use the craft stick to swirl it into a circular, fluffy shape. Don’t worry about being perfect – Truffula trees are famous for being wild and tufted!
- While the paint is still wet, sprinkle your glitter over the puffy tops. The wet paint will hold the glitter in place as it dries. This adds a lovely texture and makes the trees pop off the page.
- Puffy paint takes a bit longer to dry than regular paint because it is so thick. Set your artwork aside in a safe, flat place for a few hours (or overnight) until the tufts are solid to the touch.
RELATED —> Pool Noodle Stamped Truffula Tree Craft Idea
GRAB “THE LORAX” BOOK VIA OUR AMAZON AFFILIATE LINK
Whether you’re crafting with a classroom, your family, or on your own, we hope this craft adds a splash of color and a lot of fun to your Dr. Seuss Week celebrations. Happy crafting, my friends!

Puffy Paint Truffula Trees For The Lorax
Learn how to make a puffy paint Truffula tree using simple supplies like cardstock, straws, and shaving cream for creative fun.
Here’s your checklist of supplies to bring this craft to life:
- Jumbo Craft Stick
Prepare your creative haven by laying down a protective cover before the crafting magic begins!
Directions:
- Start by selecting a sturdy piece of cardstock. A light blue paper works wonderfully to represent the sky, but you can also use white. Lay it flat on your workspace.
- Take your green paper straws and glue them vertically onto the cardstock. These will act as the trunks of your Truffula Trees. If desired, you can cut them to different lengths to give your forest some variety and depth. Use a line of regular white glue to secure them in place.
- Now the fun part - make your puffy paint! Place equal amounts of shaving cream and glue in a small dish.
- Go ahead and also add a few drops of yellow food coloring to tint the mixture.
- Mix together until well combined.
- Using your craft stick, take a generous amount of puffy paint and make a dollop right at the top of each straw. Use the craft stick to swirl it into a circular, fluffy shape. Don't worry about being perfect - Truffula trees are famous for being wild and tufted!
- While the paint is still wet, sprinkle your glitter over the puffy tops. The wet paint will hold the glitter in place as it dries. This adds a lovely texture and makes the trees pop off the page.
- Puffy paint takes a bit longer to dry than regular paint because it is so thick. Set your artwork aside in a safe, flat place for a few hours (or overnight) until the tufts are solid to the touch.


If you've enjoyed our content or have any thoughts to share, we'd love to hear from you! Mention @gluedtomycrafts or tag #gluedtomycrafts on Instagram!