Get your kids into the holiday spirit with this adorable, easy-to-make cupcake liner Christmas tree craft! Celebrate the season and let creativity shine

Get creative this holiday season and make your own cupcake liner Christmas tree! It’s an easy and fun craft for all ages.

If you have some MINI cupcake liners left over from your holiday baking – DON’T THROW THEM OUT! I have the perfect Christmas themed kid craft idea to use up those paper cups AND make a beautiful, one-of-a-kind masterpiece at the same time!
Just check out my Cupcake Liner Christmas Tree tutorial below to see what I’m talking about! Happy crafting, my friends!!!


Make this festive muffin cup liner Christmas tree as a kid craft for the holiday season! This easy to make DIY project is perfect for busy moms or teachers looking for an engaging activity that doubles as a learning opportunity.
Craft Supplies:
- Green Mini Cupcake Liners
- Pencil
- Cardstock Paper {any color you like!}
- Brown Cardstock Paper
- Gold Cardstock Paper
- School Glue
- Basic Craft Scissors
- Small Pom Poms/Craft Buttons
Directions:
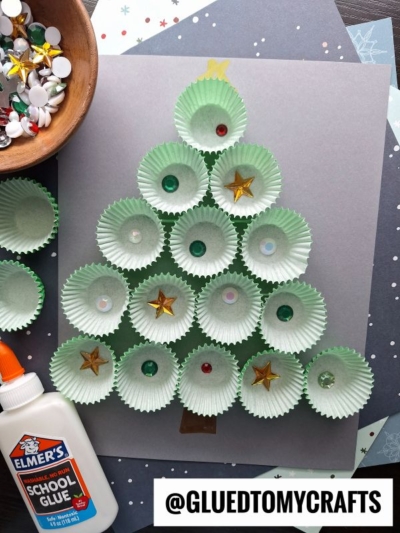
- First things first – go ahead and draw a large triangle on a single sheet of cardstock paper.
- Next up is the cupcake liners! Pull them out and separate them from the stack.
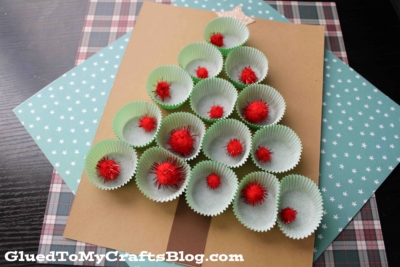
- One by one – glue down a green cupcake liner {not flattened or folded} inside the triangle design, to start giving the “tree” some dimension.
- Repeat until the tree is full with liners.
- Once all the liners are down and you have a look you like – it’s time for the embellishments!
- Have children glue buttons, sequins, glitter {whatever the heart desires} in the cups of the liners. Really let them go to town on this step! Remember – no two pieces will be alike either!!!
- Once done, set aside to let it dry completely, before displaying proudly!
RELATED —> Popsicle Stick Christmas Trees

Be sure to also check out our Paper Plate Christmas Tree craft tutorial! It’s another idea that is perfect for the holidays!!!
Don’t forget to also share pictures of your creations with us on our Facebook page to admire from a far this Christmas season!

Cupcake Liner Christmas Tree Craft Idea
Get your kids into the holiday spirit with this adorable, easy-to-make cupcake liner Christmas tree craft! Celebrate the season and let creativity shine
Here’s your checklist of supplies to bring this craft to life:
- Cardstock Paper
- Cupcake Liners
- Embellishments
Prepare your creative haven by laying down a protective cover before the crafting magic begins!
Directions:
- First things first - go ahead and draw a large triangle on a single sheet of cardstock paper.Cardstock Paper
- Next up is the cupcake liners! Pull them out and separate them from the stack.Cupcake Liners
- One by one - glue down a green cupcake liner {not flattened or folded} inside the triangle cardstock piece to start giving the "tree" some dimension.
- Repeat until the tree is full with liners.
- Once all the liners are down and you have a look you like - it's time for the embellishments!Embellishments
- Have children glue buttons, sequins, glitter {whatever the heart desires} in the cups of the liners. Really let them go to town on this step! Remember - no two pieces will be alike either!!!
- Once done, set aside to let it dry completely, before displaying proudly!

CLICK HERE TO PRINT THE DIRECTIONS FOR THIS CRAFT
If you've enjoyed our content or have any thoughts to share, we'd love to hear from you! Mention @gluedtomycrafts or tag #gluedtomycrafts on Instagram!