
QUICK! Don’t let this summer themed kid craft idea melt away! Let’s make some Paint Splat Ice Cream Cones together today! It’s quick, easy and totally re-creatable for ANY skill-level!!! Just check out our full tutorial below, to see!

Paper Plate & Paint Splatter Ice Cream Cones
If you have been a long time of follower of us, you probably already know that paint splat crafts are becoming my FAVORITE as of late.
It’s basically a “symmetrical” craft where you squirt various paint on a folded sheet of paper, squish together and open up to reveal a fun, marbled design inside. Then we take those paint splatter masterpieces and make them even better with some added crafting techniques! Like with today’s idea – adding cardstock paper embellishments to make it an ice cream cone!
So today I present to YOU our Paper Plate Paint Splat Ice Cream Cones kid craft idea! Still just as easy as my past tutorials you will find on our site BUT in my opinion – more fun since no two will ever be alike!!! PLUS {as an added bonus} just like REAL deal, these ice cream craft pieces can come in multiple colors and have ANY topping you like!
Follow the full step-by-step tutorial below to see what I’m talking about!
Happy crafting this summer season, my crafty friends!!! Don’t forget to share pictures of your finished paper plate and paint ice cream creations on our Facebook page! Happy crafting, my friends!
RELATED —> Cupcake Liner Ice Cream

Get creative with the kiddos and let them make their own unique ice cream cones out of paper plates! Pull out the paint and let the summer fun begin!
Craft Supplies:
- Small or Large Paper Plates
- Cardstock Paper
- Craft Scissors
- Tulip Puffy Paint
- Markers
- Stapler
- Baby Wipe
- Embellishments
Directions:
- Please make sure you have a good working area that can get dirty because paint will squeeze out of the sides of this craft!!!
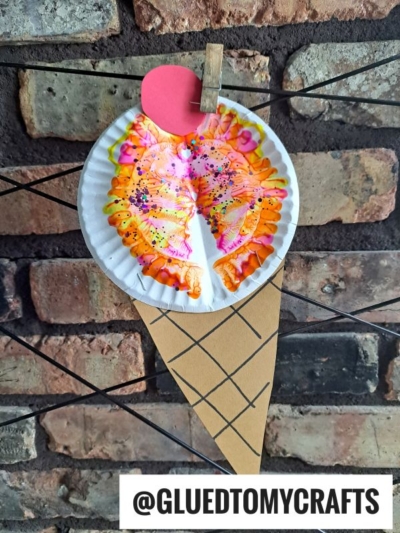
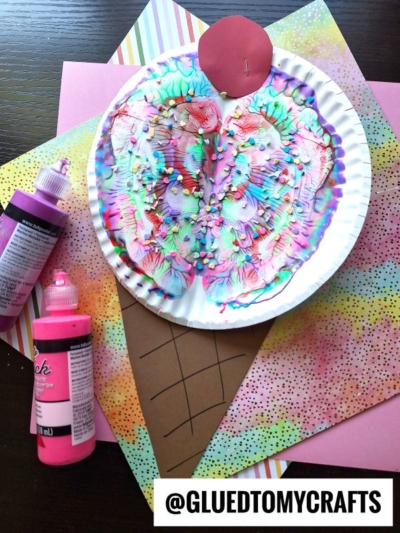
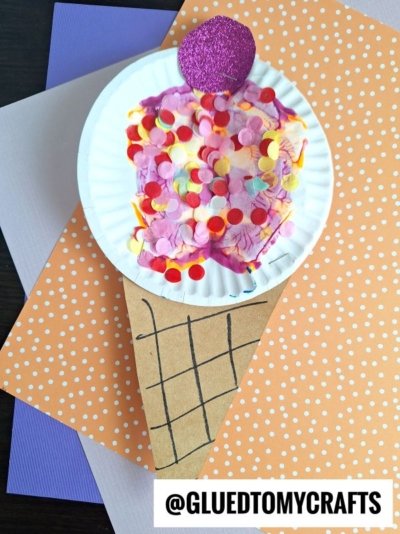
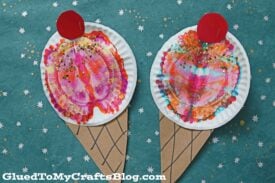
- First fold your paper plate in half. Straight up the center.
- Unfold and squirt some paint on one side of the paper plate {I like the Tulip Puffy Paint for this particular step since it’s in a nice controlled squirt bottle} Be sure to keep the paint inside the paper plate and not place too much down.
- Once the paint is down, go ahead and fold/squish your paper plate together again. Be sure to rub your hand all over the folded piece, so the paint will cover your the inside nicely {paint WILL more than likely squeeze out the sides, so be sure to pay attention to that and clean up with baby wipes!}
- Now carefully unfold your piece to reveal your “marbled ice cream” design inside. Sprinkle some glitter/rhinestones on top of the wet paint if desired to create sprinkles. Set aside your piece.
- To finish the Paper Plate Ice Cream Cones – cut/staple a triangle shape {the ice cream cone} out of tan/brown cardstock to the decorated circle paper plate. Then cut/staple a circle for the cherry on top. Add other embellishments you see fit. Set aside to let it dry completely before displaying proudly.
RELATED —> Paint Splat Unicorn Hair

Do you love our Colorful Paint Splat Ice Cream craft?
Then check out our Paint Splat Butterflies and Paint Splat Hot Air Balloon kids craft tutorials!
Both of which are a great craft idea for boredom busters during the summer AND they use Tulip puffy paint as well!!!

Paint Splat Ice Cream Cone Craft Idea For Summer
Here’s your checklist of supplies to bring this craft to life:
Prepare your creative haven by laying down a protective cover before the crafting magic begins!
Directions:
- First fold your paper plate in half. Straight up the center.1 Small Paper Plate
- Unfold and squirt some paint on one side of the paper plate. Be sure to keep the paint inside the paper plate and not place too much down.Tulip Puffy Paint
- Once the paint is down, go ahead and fold/squish your paper plate together again.
- Make sure you rub your hand all over the folded piece, so the paint will cover your the inside nicely.
- Now carefully unfold your piece to reveal your "marbled ice cream" design inside.
- Sprinkle some glitter/rhinestones on top of the wet paint if desired to create sprinkles.Loose Craft Glitter
- To finish the Paper Plate Ice Cream Cones - cut/staple a triangle shape {the ice cream cone} out of tan/brown cardstock to the decorated circle paper plate.Cardstock Paper
- Then cut/staple a circle for the cherry on top.
- Add other embellishments you see fit. Set aside to let it dry completely before displaying proudly.

Grab our favorite books via our Amazon affiliate link! In our Amazon storefront you will find books, toys and craft supplies we absolutely love using for our Glued To My Crafts tutorials!