
Create something EXTRA HOMEY for your imaginary bunny friend, with the help of our Paper Plate Carrot House kid craft tutorial!
It’s super simple, only takes a few materials and can start from a quick trip to your local dollar store!

Bunny Carrot House Craft
I’m HOPPIN’ with excitement right now! This is another FIRST-SEEN-HERE idea and I’m so EGG-CITED that the vision in my head FINALLY came together after hammering it out {several times} on my craft table. I really do hope you see my vision too!
With today’s Easter themed tutorial, you are going to take a basic orange paper plate & turn it a cozy safe-haven for some of your new imaginary bunny friends {maybe even for the Easter bunny himself!}
With the simple eggstra-special tutorial below, I hope to inspire you and your child, to customize your orange carrot fairy house by adding your own creative touches like different craft mediums, stickers and glitter – all of which you probably already have in your craft stash right now {if not – I highly suggest visiting your local Dollar Tree to stock up!}
On that note… I just know you are going to LOVE making this carrot inspired paper paper piece together. So without further ado – find the full tutorial for this fairy carrot house kids craft idea below! Happy crafting, my friends!!!
Remember – at Glued To My Crafts we set up the framework for you but we want YOU can make it however you like. Don’t feel restricted by our “directions” or even the provided pictures. We just hope to inspire you to make your own version of a magical carrot themed bunny house! You can even refer to our popsicle stick carrot house version for a few more ideas on how to decorate yours!
RELATED: Cotton Ball Bunny and Carrots Cars


Get in the spirit of Easter with this easy “paper plate bunny carrot house” craft for kids! All you need is a few craft supplies to build it!
By following our simple instructions below you can make this project with your children – no crafts skills required! It’s time to get creative and have some family-friendly fun together!
Craft Supplies:
- Large ORANGE Paper Plate – 1 per craft
- Basic Paper Craft Scissors
- Green Cardstock Paper
- Brown Cardstock Paper
- White Cardstock Paper
- Black Sharpie Marker
- Glue Stick
- Hand-Held Office Stapler
Directions:
- First things first – cut off a small section of your orange paper plate, to make the bottom of the carrot house lay flat.
- Discard the small piece you just cut off.
- Now grab your green cardstock paper and scissors.
- Cut out some greenery for on top of the orange carrot house, as well as some small bushes for on the sides of the door.
- Now grab your brown and white cardstock paper.
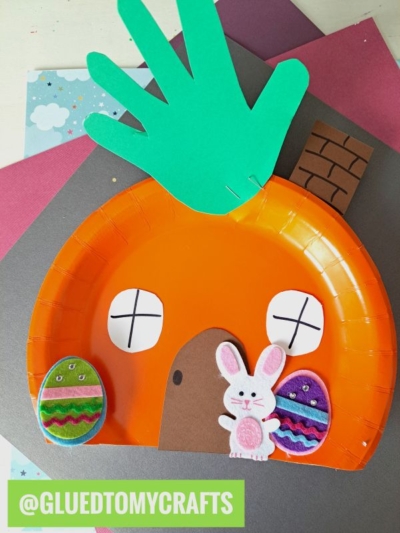
- Cut out two circle windows, a door and a rectangle chimney.
- Use the Sharpie marker to add details to your paper pieces {like window pane lines, a doorknob on the door, bricks on the chimney etc.}
- Once you have ALL your paper pieces complete and cut out, go ahead and now glue/staple all of them in place on the paper plate. I would highly suggest starting with the greenery “roof” on top of the paper plate and working down from there.
- Now add anything else you like for that custom look {like some small bunny or Easter egg stickers!} before displaying your paper plate carrot house proudly for all to see!
RELATED —> Handprint Carrots

AFFILIATE LINK – PAIR OUR CRAFT IDEA WITH THIS BOOK RECOMMENDATION
Come get extra crafty with us, this Easter season! We make it soooo easy from start to finish!
Just check out our Paper Plate Carrot, Handprint Carrot and Popsicle Stick Spring Flower Truck craft posts on the Glued To My Crafts website, to see what I’m talking about! 🙂
We also LOVE talking crafts with our lovely readers. Come join our private Facebook group where we chit chat, share and laugh together! Everyone is welcomed so come join the fun!!! PLUS this is a great place to share pictures of your finished paper plate carrot houses – hint hint!

Paper Plate Carrot House Craft
Here’s your checklist of supplies to bring this craft to life:
- 1 Large Paper Plate
- Cardstock Paper
- Embellishments
Prepare your creative haven by laying down a protective cover before the crafting magic begins!
Directions:
- First things first - cut off a small section of your orange paper plate, to make the bottom of the carrot house lay flat.
- Discard the small piece you just cut off.
- Now grab your green cardstock paper and scissors.
- Cut out some greenery for on top of the orange carrot house, as well as some small bushes for on the sides of the door.
- Now grab your brown and white cardstock paper.
- Cut out two circle windows, a door and a rectangle chimney.
- Use the Sharpie marker to add details to your paper pieces {like window pane lines, a doorknob on the door, bricks on the chimney etc.}
- Once you have ALL your paper pieces complete and cut out, go ahead and now glue/staple all of them in place on the paper plate. I would highly suggest starting with the greenery "roof" on top of the paper plate and working down from there.
- Now add anything else you like for that custom look {like some small bunny or Easter egg stickers!} before displaying your paper plate carrot house proudly for all to see!


CLICK HERE TO PRINT THE DIRECTIONS FOR THIS CRAFT