These fun little craft foam valentine bunnies are quick, easy and ideal for making with children this Valentine's Day season!

Love is in the air and Valentine’s Day is right around the corner! If you’re a parent, grandparent or teacher looking for a fun and creative activity to do with your little ones this holiday, then you’ve come to the right place!

This year, instead of buying store-bought cards and gifts, why not spend some quality time with your little ones by making a special Valentine themed craft together?
Not only will it be a great bonding activity, but it will also result in an adorable decoration that can be displayed around the house. In this blog post, we will share step-by-step instructions on how to make a cute heart-shaped bunny using easy-to-find materials.
Whether you’re a parent, grandparent or teacher looking for a fun classroom activity, this craft is sure to bring smiles and love into everyone’s hearts. So grab your scissors, glue and let’s get crafting!

Today we are excited to share a heart-shaped bunny craft that will not only melt your heart but also make for an adorable decoration or gift.
Craft Supplies:
- Cardstock Paper
- Heart Printable – from our landing page
- Large Paper Heart Doilies
- Scissors
- Adhesive
- Large Googly Eyes
- Embellishments
Directions:
- First decide the color scheme you want for your bunny. Remember, this is the fun part of the craft and where the creativity really shines! You don’t have to stick to the traditional Valentine’s Day colors either!
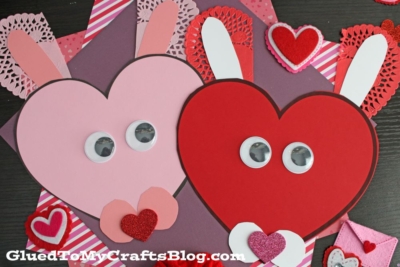
- Once you have the vision, it’s time to start pulling out the various materials. You will want ONE large paper heart shape {this is where I printable comes in handy!} ONE large paper heart doily and a little bit of regular craft paper for EACH bunny you want to make today.
- Lay your large paper heart on the table. Other than decorating it, you won’t be doing any cutting to it.
- Grab your paper heart doily and cut it in half. Straight up the center to make TWO ears for your bunny.
- Out the remaining paper, cut out a heart shaped nose, some big cheeks, circular eyes, some pieces for in the bunny’s ears, etc. Use our pictures for an example.
- The final step is assembling. Grab ALL your paper cutouts and choice of adhesive.
- Start off by securing the paper doily ears to the back of the large heart shape.
- Follow that up by gluing on the cheeks, as well as the googly eyes and nose to the heart.
- At this point in time set aside your finished heart shaped bunny piece to let it dry completely.
RELATED —> Heart Shaped Penguin

Before you leave our website, please be sure to check out our Craft Foam Heart Roundup for other creative ways to use this inexpensive materials in your Valentine’s Day plans!

Heart Shaped Bunny Craft For Valentine's Day
These fun little craft foam valentine bunnies are quick, easy and ideal for making with children this Valentine's Day season!
Here’s your checklist of supplies to bring this craft to life:
- Cardstock Paper
- Large Heart Printable - from our landing page
- Large Paper Heart Doilies
- Large Googly Eyes
- Embellishments
Prepare your creative haven by laying down a protective cover before the crafting magic begins!
Directions:
- First decide the color scheme you want for your bunny. Remember, this is the fun part of the craft and where the creativity really shines! You don’t have to stick to the traditional Valentine’s Day colors either!
- Once you have the vision, it's time to start pulling out the various materials. You will want ONE large paper heart shape {this is where I printable comes in handy!} ONE large paper heart doily and a little bit of regular craft paper for EACH bunny you want to make today.
- Lay your large paper heart on the table. Other than decorating it, you won't be doing any cutting to it.
- Grab your paper heart doily and cut it in half. Straight up the center to make TWO ears for your bunny.
- Out the remaining paper, cut out a heart shaped nose, some big cheeks, circular eyes, some pieces for in the bunny's ears, etc. Use our pictures for an example.
- The final step is assembling. Grab ALL your paper cutouts and choice of adhesive.
- Start off by securing the paper doily ears to the back of the large heart shape.
- Follow that up by gluing on the cheeks, as well as the googly eyes and nose to the heart.
- At this point in time set aside your finished heart shaped bunny piece to let it dry completely.


NEED MORE HELP DOWNLOADING OUR FREE PRINTABLES? PLEASE REFER TO OUR FAQ PAGE
If you've enjoyed our content or have any thoughts to share, we'd love to hear from you! Mention @gluedtomycrafts or tag #gluedtomycrafts on Instagram!