Create a magical Popsicle Stick Garden Fairy with this fun, kid-friendly craft! Easy to make with simple materials for a whimsical touch of creativity!

These adorable popsicle stick garden fairies are the perfect craft project for kids of all ages!

Inspired by spring – today’s Popsicle Stick Garden Fairies craft tutorial is picture-perfect for the crafty little girls in your life!
These winged fairies are perfect to celebrate the glorious spring weather outside OR any day of the year really – these beautiful popsicle stick fairy creations can be used in home decor or in your child’s creative imaginative play.
So let’s grab our supplies and throw some pixie dust in the air as we make these adorable & completely customizable fairies together! Then display as is OR set up shop for some “fairy” playtime in the living room. Whatever you do – you AND your child have fun creating them together! Happy crafting my friends!!!

Are you looking for a fun craft idea to keep the kids entertained this afternoon? These popsicle stick garden fairies are perfect!
Craft Supplies:
Before you start crafting, make sure you’ve got everything at hand. Here’s your materials checklist for making popsicle stick fairies:
- Jumbo Popsicle Sticks – 3 per craft
- School Glue
- Craft Paint
- Small Paint Brush
- Small Paper Plate
- Cardstock Paper
- Scrapbook Paper
- Paper Heart Doilies
- Craft Scissors
- Sharpie Markers
Directions:
Now that your supplies are ready, it’s time to bring these little fairies to life!
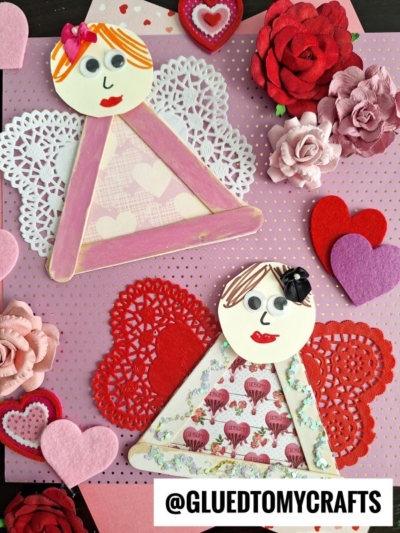
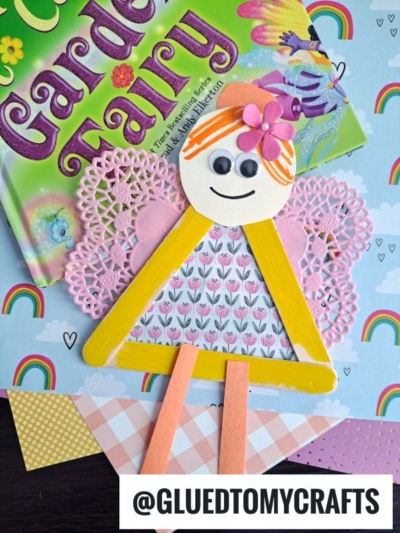
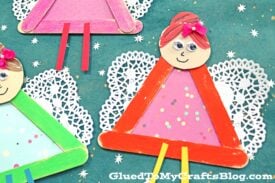
- Begin by taking three popsicle sticks per fairy and gluing them together to form a triangle shape.
- Set the triangles aside and let them dry completely. Repeat this step for as many fairies as you’d like to create.
- If desired, apply craft paint to the popsicle stick triangles using a paper plate as your palette. Allow them to dry thoroughly before proceeding.
- While waiting for the triangles to dry, cut out a triangle from scrapbook paper that will fit neatly inside the popsicle stick frame. This will serve as the fairy’s body and dress.
- Next, use cardstock to cut out a circular shape for the fairy’s head, as well as pieces for the hair and legs. Don’t forget to use markers to add facial features to the head.
- To complete your craft, glue the paper pieces in place. Use paper heart doilies for the fairy’s wings, and feel free to add any extra embellishments for a personal touch. Popsicle Stick Garden Fairy
- Once assembled, let the project dry completely before proudly displaying your whimsical garden fairies!
RELATED —> Chalk Art Fairy

AFFILIATE LINK – PAIR OUR CRAFT IDEA WITH THE “HOW TO CATCH A GARDEN FAIRY” BOOK
If you are looking for even MORE easy spring themed craft ideas, from Glued To My Crafts, be sure to check out these fun posts listed below!
- Polka Dot Eggs
- Handprint Carrot Gift Bags
- Chalk Art Fairy
- “Bunny” Loves You Keepsake
- Handprint Flowerpot Keepsake
- Egg Carton Tree
- Salt Dough Gift Tags To Make
- Scoop Stick Garden Gnomes
- Clothespin Bunnies
Popsicle Stick Garden Fairy Craft Idea
Create a magical Popsicle Stick Garden Fairy with this fun, kid-friendly craft! Easy to make with simple materials for a whimsical touch of creativity!
Here’s your checklist of supplies to bring this craft to life:
- 3 Jumbo Popsicle Sticks
- Cardstock Paper
- Scrapbook Paper
- Craft Paint
- Embellishments
- School Glue
- 1 Scissors
Prepare your creative haven by laying down a protective cover before the crafting magic begins!
Directions:
- Begin by taking three popsicle sticks per fairy and gluing them together to form a triangle shape.
- Set the triangles aside and let them dry completely. Repeat this step for as many fairies as you'd like to create.
- If desired, apply craft paint to the popsicle stick triangles using a paper plate as your palette. Allow them to dry thoroughly before proceeding.
- While waiting for the triangles to dry, cut out a triangle from scrapbook paper that will fit neatly inside the popsicle stick frame. This will serve as the fairy’s body and dress.
- Next, use cardstock to cut out a circular shape for the fairy's head, as well as pieces for the hair and legs. Don’t forget to use markers to add facial features to the head.
- To complete your craft, glue the paper pieces in place. Use paper heart doilies for the fairy’s wings, and feel free to add any extra embellishments for a personal touch. Popsicle Stick Garden Fairy
- Once assembled, let the project dry completely before proudly displaying your whimsical garden fairies!

Grab our favorite books via our Amazon affiliate link! In our Amazon storefront you will find books, toys and craft supplies we absolutely love using for our Glued To My Crafts tutorials!

If you've enjoyed our content or have any thoughts to share, we'd love to hear from you! Mention @gluedtomycrafts or tag #gluedtomycrafts on Instagram!