
Not only can these craft sticks pieces be used as festive decorations around the home or classroom, but they also provide an opportunity to explore creativity and spend quality time together with your child.

Easter Friends Made From Craft Sticks
Happy Monday my crafty friends!!! I know a lot of people don’t like Mondays because of various reasons – but I just want to give you can excuse to smile today. After all – there is always a good reason to pull out the craft supplies and for me, getting crafty always makes the blues go away {can you relate?} Not to mention – these simple Popsicle Stick Easter Friends are pretty adorable and sure to put a smile on anyone’s face!
Not only are these Popsicle Stick Chick & Easter Bunny really simple for you to do with your child BUT it’s also pretty inexpensive and makes for great spring decor too. You can easily hot glue some small magnets to the back to display on the fridge or hot glue some string to hang from a nail in your living room. It’s also pretty fun for adults to do when the kids aren’t around!
So what are you waiting for? Grab those supplies and get to work on making these adorable Popsicle Stick Chicks & Bunnies to add to your home decor! You can find EVERYTHING you need to know to recreate these Easter friends within minutes, in the full tutorial below!
Happy crafting my friends! Please don’t forget to share pictures of your child’s finished popsicle stick bunny and spring chick by tagging us on Instagram! I seriously can’t wait to see what you both come up with! #gluedtomycrafts
RELATED —> Paper Plate Easter Chick

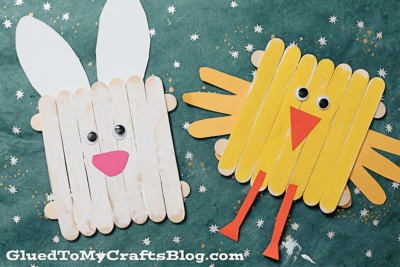
These adorable popsicle stick Easter friends are perfect for kids to make! They’re so easy and fun, your little ones will love them.
Craft Supplies:
- Jumbo Popsicle Sticks – 9 per craft
- Basic School Glue
- Yellow Craft Paint {chick}
- White Craft Paint {bunny}
- Paint Brushes
- Small Paper Plate
- Craft Scissors
- Cardstock Paper
- Pen or Marker
- Small Wiggle Eyes
Directions:
- First assemble the base of your chick & bunny. For each, simply glue your popsicle sticks together to look like a fence.
- Set them aside to let it dry completely.
- Next have your child paint the front of the popsicle stick fences {one white, one yellow}
- Again, set them aside to let it dry completely.
- Now cut out the cardstock embellishments to give your pieces life. For the chick, I traced my son’s hands for it’s wings, as well as cutting out it’s beak and feet. For the bunny I just cut out ears and a cute pink nose.
- To finish off the Easter Friends craft, glue on the paper embellishments, as well as wiggle eyes.
- Then let it all dry completely, before displaying proudly.
RELATED —> Handprint Chick

If you are looking for even MORE easy spring themed kid craft ideas to pair along with today’s tutorial, be sure to check out these fun posts listed below.
- Paint Splat Baby Chick
- Cupcake Liner Bunnies
- Popsicle Stick Flowers
- Paper Plate Bird Nest
- Foam Egg Easter Friends
- Handprint Baby Chicks
- Tissue Paper Baby Chick
- Baby Chicks Riding In Truck
- Easter Chick Cupcake

Popsicle Stick Easter Bunny & Chick Craft Idea
Here’s your checklist of supplies to bring this craft to life:
- 1 School Glue
Prepare your creative haven by laying down a protective cover before the crafting magic begins!
Directions:
- First assemble the base of your chick & bunny. For each, simply glue your popsicle sticks together to look like a fence.
- Set them aside to let it dry completely.
- Next have your child paint the front of the popsicle stick fences {one white, one yellow}
- Again, set them aside to let it dry completely.
- Now cut out the cardstock embellishments to give your pieces life. For the chick, I traced my son's hands for it's wings, as well as cutting out it's beak and feet. For the bunny I just cut out ears and a cute pink nose.
- To finish off the Easter Friends craft, glue on the paper embellishments, as well as wiggle eyes.
- Then let it all dry completely, before displaying proudly.

CLICK HERE TO PRINT THE DIRECTIONS FOR THIS CRAFT