
I can’t say it LOUD enough! Just imagine me screaming right now “THIS LATEST EASTER CRAFT IS SO EASY!” Because seriously – it is! I wouldn’t lie to you- EVER!
So come one, come all, let’s check out this Tissue Paper Baby Chick kid craft idea – shall we?!
There’s even a FREE PRINTABLE below for you to take advantage of and get started with ease!

Yellow Baby Chick Craft For Kids
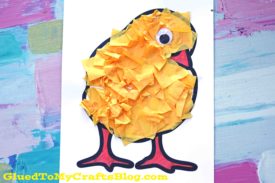
Paper and glue come together nicely in today’s super easy Tissue Paper Easter Chick kids craft idea! Boy is that a mouthful but the craft itself is NOT!
All you need to do is print our free baby chick printable {found below in the supply list} grab some yellow tissue paper, cut/tear and bunch it up with your fingers & glue those pieces to the printable to bring the little fella to life. That’s it!
You could even take it a step farther and add other embellishments like feathers, glitter, etc. Basically whatever your little artist desires, throw it on to complete the spring chick craft!
It’s a lightweight spring craft idea for kids, with minimal supplies and steps required! So don’t delay the fun. Find all the details and free file in the full yellow baby chick tutorial below! Happy crafting, my friends!!!
RELATED —> Handprint Baby Chicks

Get your toddlers ready for some creative fun-time! Together, they can make this adorable tissue paper baby chick craft – perfect for Easter decorations!
Craft Supplies:
- White Cardstock Paper
- FREE BABY CHICK FILE – from our landing page
- Orange Marker
- Yellow Tissue Paper
- Scissors
- School Glue
- Large Wiggle Eye
Directions:
- First things first – download and print the free file located above, on a single sheet of white cardstock paper. You only need ONE baby chick print per craft. Print as many as you like!
- Grab your orange marker. Color in the beak and the feet of the baby chick.
- Now grab your yellow tissue paper and scissors. Cut out a handful of small squares from it.
- Next take the school glue and place a good amount of it, INSIDE the baby chick on the printable.
- Now take one square of tissue paper and crumble it slightly with your fingers.
- Place that scrunched up piece, inside the printable, on top of the glue anywhere you like.
- Repeat the bunching off the yellow tissue paper and gluing it inside the printable, until the baby chick is completely filled in with yellow.
- Finally – the last step! Glue on the wiggle eye to the printable so he can see.
- Set aside to let it dry completely, then display as is!
RELATED —> Popsicle Stick Easter Friends

Transform ordinary materials into extra crafty ideas!
Check out these past posts on Glued To My Crafts for more Easter and spring themed kids craft fun!
All of which would pair nicely with today’s tissue paper baby chick craft idea!
- Pipe Cleaner Carrots
- Popsicle Stick Hatching Chick
- Paint Splat Baby Chick
- Cotton Ball Bunny Cupcake
- Paper Plate Chick
- Easter Chick Cupcake
- Foam Egg Easter Friends
- Handprint Chick Craft
FOLLOW US ON PINTEREST SO YOU NEVER MISS A NEW TUTORIAL FROM US!

Tissue Paper Baby Chick Craft
Here’s your checklist of supplies to bring this craft to life:
Prepare your creative haven by laying down a protective cover before the crafting magic begins!
Directions:
- First print out our provided printable, in color, on a single sheet of white cardstock paper. You only need one print per craft.
- Grab your orange marker. Color in the beak and the feet of the baby chick.
- Now grab your yellow tissue paper and scissors. Cut out a handful of small squares from it.
- Next take the school glue and place a good amount of it, INSIDE the baby chick on the printable.
- Now take one square of tissue paper and crumble it slightly with your fingers.
- Place that scrunched up piece, inside the printable, on top of the glue anywhere you like.
- Repeat the bunching off the yellow tissue paper and gluing it inside the printable, until the baby chick is completely filled in with yellow.
- Finally - the last step! Glue on the wiggle eye to the printable so he can see.
- Set aside to let it dry completely, then display as is!


NEED MORE HELP DOWNLOADING OUR FREE PRINTABLES? PLEASE REFER TO OUR FAQ PAGE