Glued To My Crafts

Join thousands of others who have gotten GLUED to our craft tutorials!

  • Home
  • Safety Guidelines
  • Seasonal Themes
    • New Years
    • Valentine’s Day
    • St. Patrick’s Day
    • Spring
    • Easter
    • Mother’s Day
    • Summer
    • Father’s Day
    • Patriotic
    • Halloween
    • Thanksgiving
    • Fall
    • Winter
    • Christmas
    • Snowmen
    • Story Time
  • About Us
  • Amazon Storefront
  • Monthly Themes
    • January Craft Ideas
    • February Craft Ideas
    • March Craft Ideas
    • April Craft Ideas
    • May Craft Ideas
    • June Craft Ideas
    • July Craft Ideas
    • August Craft Ideas
    • September Crafts
    • October Crafts
    • November Crafts
    • December Crafts
  • Collection Posts
    • 20+ Creative Paper Bag Craft Ideas for Kids to Enjoy Today
    • 20+ Plastic Egg Stamp Crafts for Spring Fun
    • 30+ Creative Thumbprint Craft Ideas for Spring Fun
    • Craft Ideas for Kids Using Egg Stickers
    • Thumbs Up! 50+ Creative Thumbprint Crafts for Kids
    • 40+ Insect Craft Ideas For Kids
    • 50+ Craft Ideas For Kids Using A Plastic Fork As A Paint Brush
    • 30+ Puffy Paint Craft Ideas For Kids To Try Today!
    • 20+ Fun and Easy Paper Bowl Crafts for Kids
    • Pete The Cat Craft Ideas: Fun & Easy Projects for Kids
    • Transform Coffee Filters into 40+ Stunning DIY Projects
    • Transform Crepe Paper Streamers into 60+ Stunning Crafts
    • Pie Server Stamped Craft Ideas Kids Will Adore
    • Paint Splat Pie Craft Idea For Kids

Popsicle Stick Hatching Baby Chick Craft Idea

When engaging in craft activities, it is important for young children to have adult supervision at ALL times. It is also recommended to use supplies that are suitable for your child's age. Feel free to modify materials or steps to meet your specific requirements. Please refer to our safety guidelines for more information.

As an Amazon Associate I earn from qualifying purchases. This post may contain affiliate links. For more information, please see our disclosure policy.

UPDATE FOR 2026 - To reduce storage costs and download fees, we recently made some changes to our website. The password for all our files this year is GLUEDTOMYCRAFTS2026. No sign-up is required to download our free printables! You can enjoy our printables without creating an account or paying for Box.com. Simply follow the download instructions on our FAQ PAGE.

Easter is coming and we have the perfect craft idea for you! This hatching chick is easy and fun to make with your kids.
SKIP THE FLUFF AND PRINT THE DIRECTIONS
A popsicle stick hatching baby chick, complete with googly eyes and a paper beak, peeks from a white paper plate shell against a pink polka dot background.

A popsicle stick hatching baby chick, complete with googly eyes and a paper beak, peeks from a white paper plate shell against a pink polka dot background.

When I think of this time of year, I instantly think of a little yellow chick bursting from it’s warm egg and chirping away at it’s new freedom. Spring in my opinion is a fresh new start and that’s exactly what today’s kid friendly idea is ALL about!

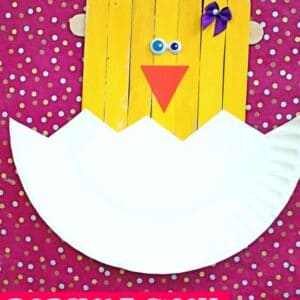
Not only is this Popsicle Stick Hatching Baby Chick craft idea super simple for young children and really inexpensive to make – but it also doubles as some cute decor you can display this spring season!!!

So what are you waiting for? Grab those craft supplies and get to work on creating this “tweet” little art project with your aspiring artist today! You can find ALL the details you need to know, in the full tutorial below! Happy crafting, my friends!

Two paper plate crafts on a red and white polka dot background: one is a closed popsicle stick egg and the other is a popsicle stick hatching baby chick with googly eyes, orange beak, and a cracked eggshell.

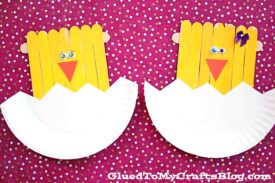
Have your little ones crack open the fun with this adorable craft idea! Brighten up your weekend with a Popsicle Stick Hatching Baby Chick craft. Your kids will love making their own fluffy friends!

Craft Supplies:

  • Large Paper Plate
  • Jumbo Popsicle Sticks – 9 per craft
  • School Glue
  • Yellow Craft Paint
  • Paint Brush
  • Orange Cardstock Paper
  • Scissors
  • Large Wiggle Eyes – 2 per craft

Directions:

  • First things first – grab your paper plate and scissors.
  • Cut your paper plate in half to look like a cracked egg.
  • Reserve one half for today’s craft and save the other for a rainy day.
  • Set it aside till later.
  • Next grab your jumbo popsicle sticks and school glue.
  • Line up and glue your popsicle sticks into a fence formation. Seven next to each other and two across.
  • Set it aside to let it dry completely.
  • When the sticks are secured, grab your yellow paint and paint brush.
  • Paint your newly made popsicle stick shape, completely yellow.
  • Again, set it aside.
  • Next up – grab your orange cardstock.
  • Cut out a triangular nose for your chick.
  • To finish off the Yellow Hatching Chick craft, simply glue your paper plate half to the front of the painted popsicle stick shape and add your cardstock nose & wiggle eyes to bring the chick to life.
  • Then display proudly for all to see!

RELATED —> Hatching Baby Dinosaur

popsicle-stick-hatching-chick-book-recommendation-gluedtomycrafts

AFFILIATE LINK – PAIR OUR CRAFT IDEA WITH THIS BOOK RECOMMENDATION

Love this popsicle stick hatching chick craft idea? We sure hope you do! So don’t let the fun stop here!!!

Check out our Tissue Paper Baby Chick and Chick Handprint Card craft posts for even more crafty inspiration from Glued To My Crafts!

stacey-signature-2023

A popsicle stick hatching baby chick, complete with googly eyes and a paper beak, peeks from a white paper plate shell against a pink polka dot background.
PRINT

Popsicle Stick Hatching Chick Craft Idea

Easter is coming and we have the perfect craft idea for you! This hatching chick is easy and fun to make with your kids.

Here’s your checklist of supplies to bring this craft to life:

  • 1 Large Paper Plate
  • Cardstock Paper
  • 9 Jumbo Popsicle Sticks
  • Craft Paint
  • 2 Wiggle Eyes
  • School Glue
  • 1 Foam Paint Brush
  • 1 Scissors
  • Spring Book Recommendations - link to our Amazon shop

Prepare your creative haven by laying down a protective cover before the crafting magic begins!

Directions:

  • First things first - grab your paper plate and scissors.
  • Cut your paper plate in half to look like a cracked egg.
    1 Large Paper Plate
  • Reserve one half for today's craft and save the other for a rainy day.
  • Set it aside till later.
  • Next grab your jumbo popsicle sticks and school glue.
  • Line up and glue your popsicle sticks into a fence formation. Seven next to each other and two across.
    9 Jumbo Popsicle Sticks
  • Set it aside to let it dry completely.
  • When the sticks are secured, grab your yellow paint and paint brush.
    Craft Paint
  • Paint your newly made popsicle stick shape, completely yellow.
  • Again, set it aside.
  • Next up - grab your orange cardstock paper.
    Cardstock Paper
  • Cut out a triangular nose for your chick.
  • To finish off the yellow chick craft, simply glue your paper plate half to the front of the painted popsicle stick shape and add your cardstock nose & wiggle eyes to bring the chick to life.
    2 Wiggle Eyes
  • Then display proudly for all to see!
    Paper Plate & Popsicle Stick Hatching Baby Chick - Spring Kid Craft
MINI-HEARTS-page-separator-logo-gluedtomycrafts

CLICK HERE TO PRINT THE DIRECTIONS FOR THIS CRAFT

If you've enjoyed our content or have any thoughts to share, we'd love to hear from you! Mention @gluedtomycrafts or tag #gluedtomycrafts on Instagram!

Craft Activity Safety Guidelines:

Always Ensure Adult Supervision - Young children should be supervised at all times when engaging in craft activities. This is essential to keep them safe and ensure materials are used correctly. Use Age-Appropriate Supplies - Choose craft supplies that are suitable for your child’s age. Check labels for recommendations and avoid items with small parts or sharp edges for younger children. Modify as Needed - Feel free to adapt materials or steps to meet your child's abilities and safety needs. For example, substitute scissors with safety scissors if necessary. Keep an Eye on Allergies - Be mindful of potential allergens in craft materials like glue, paint, or certain fabrics. Opt for non-toxic and hypoallergenic options whenever possible. Organize and Secure Supplies - Keep all craft tools and materials organized. Store sharp objects, small parts, and potentially hazardous items out of reach when not in use. Following these guidelines will ensure that crafts remain fun, creative, and, most importantly, safe for everyone involved!


OUR PRIVACY POLICY

OUR COPYRIGHT POLICY

  • Email
  • Facebook
  • Instagram
  • Pinterest
  • Twitter
  • YouTube

LOOKING FOR SOMETHING?

EXPLORE OUR SITE:

© 2012–2026 Glued To My Crafts
All activities should be supervised by an adult at all times. Please refer to our safety guidelines for more information.


Please note that all the content of the website, including printables, are for classroom and personal use only. This means that any digital item you download from our site can be used for non-commercial use only. We kindly request that you do not reproduce or sell our creations. We appreciate your understanding and cooperation in respecting our content and intellectual property rights.

Accessibility Adjustments

Powered by OneTap

How long do you want to hide the toolbar?
Hide Toolbar Duration
Select your accessibility profile
Vision Impaired Mode
Enhances website's visuals
Seizure Safe Profile
Clear flashes & reduces color
ADHD Friendly Mode
Focused browsing, distraction-free
Blindness Mode
Reduces distractions, improves focus
Epilepsy Safe Mode
Dims colors and stops blinking
Content Modules
Font Size

Default

Line Height

Default

Color Modules
Orientation Modules