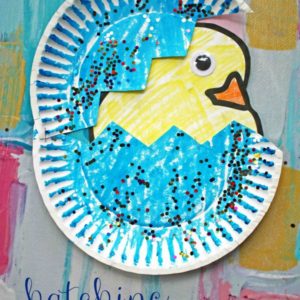
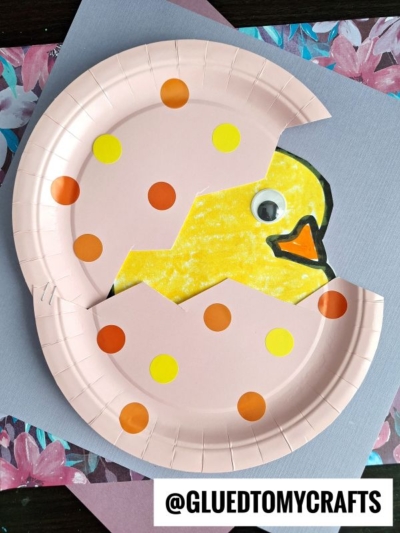
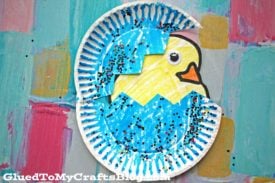
Easter is coming soon! Here’s a fun and easy paper plate hatching baby chick craft that kids of all ages will enjoy making!

Hatching Baby Chick Paper Plate Craft
Hi my crafty friends! Today’s kid friendly craft idea is all about fresh starts and bringing new life into our homes, as we welcome spring in as well!
When I think of this time of year, I instantly think of a little chick bursting from it’s warm egg and chirping away. Spring in my opinion is a fresh new start and that’s exactly what today’s kid friendly idea is ALL about!
Not only is this Paper Plate Hatching Baby Chick craft tutorial super simple for young children and really inexpensive to make – but it also doubles as some cute decor you can display this spring season!!! I’ve even included a FREE printable to get you started today – YAY!
So what are you waiting for? Grab those craft supplies, find the full tutorial below and get to work on creating this “tweet” little craft today!
Don’t forget to share pictures with us as well! You can always tag us on Instagram for easy sharing. Happy crafting my friends!
RELATED —> Popsicle Stick Hatching Chick

Get creative with your kids this spring by recreating this adorable baby chick paper plate craft with them!
Craft Supplies:
- Large Paper Plate
- Craft Paint
- Paint Brushes
- Scissors
- Stapler
- White Cardstock Paper
- Chick Printable – on our landing page
- Crayons, Markers, Pencils
- School Glue
- Large Wiggle Eye
Directions:
- First things first – print out the FREE hatching baby chick printable above. You only need to print one baby chick per craft, on a single sheet of white cardstock paper. Print as many as you like!
- Next go ahead and have children color in the baby chick in their printable, completely yellow with a little orange on his beak.
- Go ahead and glue the wiggle eye on the printable, so he can see.
- When done for those steps, have them trim out their decorated chick shape and set it aside till you are ready for it.
- Next up, grab ONE large paper plate per chick craft. Go ahead and cut it in half, to resemble a cracked Easter egg.
- Now take your various craft paints and paint brushes. Decorate the paper plate halves you just made, however you like.
- When done, set them aside to let them dry a bit.
- Finally – the last step. Grab all your paper pieces and hand-held stapler.
- Staple the two paper plate pieces back together to look like it’s a “hatching” egg.
- Follow that up by stapling in the paper chick, to the back of the paper plate pieces. Your new friend should look like it’s peeking out of the cracked egg now.
- And that’s it! Add other embellishments you see fit before displaying your Hatching Baby Chick Piece proudly for ALL to see!
RELATED —> Handprint Baby Chicks Puppet
If you are looking for even MORE easy spring themed kid craft ideas, be sure to check out these fun posts listed below!
- Cupcake Liner Carrot Cards
- Paper Bag Bunny Puppet
- Popsicle Stick Bunny Gnome
- Hatching Baby Dinosaur
- Handprint Chick Craft Idea
- Handprint Baby Chick Keepsake
- Fork Painted Baby Chick
- Pom Pom Stamped Chick Cupcake

Paper Plate Hatching Baby Chick Craft
Here’s your checklist of supplies to bring this craft to life:
- School Glue
Prepare your creative haven by laying down a protective cover before the crafting magic begins!
Directions:
- First print out our provided printable, in color, on a single sheet of white cardstock paper. You only need one print per craft.
- Next go ahead and have children color in the baby chick in their printable, completely yellow with a little orange on his beak.
- Go ahead and glue the wiggle eye on the printable, so he can see.
- When done for those steps, have them trim out their decorated chick shape and set it aside till you are ready for it.
- Next up, grab ONE large paper plate per chick craft. Go ahead and cut it in half, to resemble a cracked Easter egg.
- Now take your various craft paints and paint brushes. Decorate the paper plate halves you just made, however you like.
- When done, set them aside to let them dry a bit.
- Finally - the last step. Grab all your paper pieces and hand-held stapler.
- Staple the two paper plate pieces back together to look like it's a "hatching" egg.
- Follow that up by stapling in the paper chick, to the back of the paper plate pieces. Your new friend should look like it's peeking out of the cracked egg now.
- And that's it! Add other embellishments you see fit before displaying your Hatching Baby Chick Piece proudly for ALL to see!


NEED MORE HELP DOWNLOADING OUR FREE PRINTABLES? PLEASE REFER TO OUR FAQ PAGE