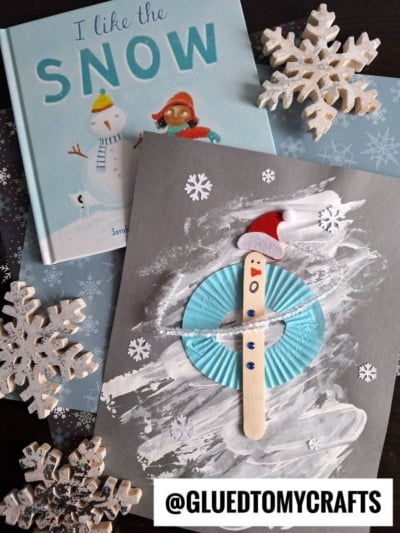
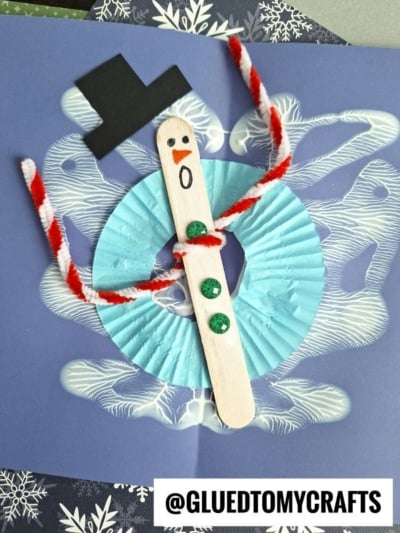
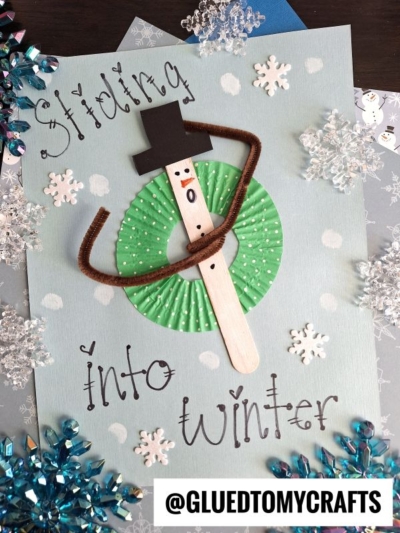
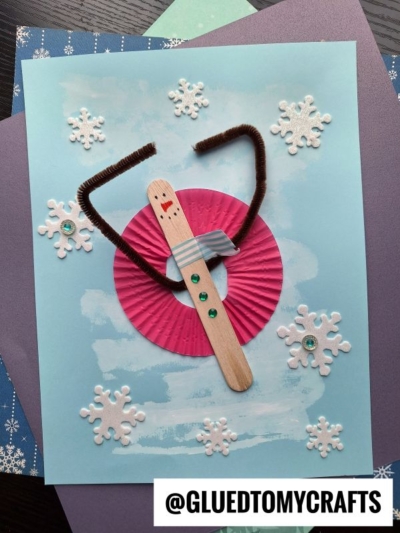
Make winter days extra fun! Fire up your family’s creativity with this easy and festive snow tubing snowman craft made with popsicle sticks.

Snow Tubing Snowman Craft Made With Popsicle Sticks
Add winter charm to your home and beat the boredom blues with the help of Glued To My Crafts today! We are sharing our version of a super creative Snow Tubing Snowman craft tutorial that only involves a few “building” supplies and steps to bring to life.
There is nothing like this on the internet {it truly is a first seen here!} so this is really going to be a one-of-a-kind snowman craft idea that you can bring to your home and brighten up the normally dreary snowy season with.
For this particular tutorial we are using baking liners, cardstock paper, pipe cleaners and inexpensive craft sticks to build our snowman friend who is having too much fun on the snowy slopes. This idea uses very basic materials that you probably have in your home right now and can pull out in a flash. I would also like to think this is a simple craft idea that you do before and/or after you do some snow tubing of your own!
So without further ado friends – don’t let this creative paper and craft stick snowtubing snowman craft idea melt away! Keep scrolling {but take it SNOW, man!} so you can catch all the details and make plans to make it happen with your little crafter today! Happy crafting my friends!!
RELATED: Sunglasses Snowman Ornament and Crinkle Paper Penguin


Popsicle Stick Snow Tubing Snowman
Fun, easy and creative craft tutorial for kids using popsicle sticks.
Craft Supplies:
- Jumbo Popsicle Sticks – 1 per craft
- White Craft Paint & Paint Brush
- Sharpie Markers or Paint Pens
- Blue Cardstock Paper
- Black Cardstock Paper
- Basic Craft Scissors
- Brown Pipe Cleaners
- Large Cupcake Liners
- School Glue or Glue Stick
Directions:
- First things first – we are going to decorate our popsicle stick snowman friend. You only need ONE jumbo popsicle stick per snowman craft.
- Use the white paint crayon to paint one side of the popsicle stick completely white.
- Follow that up by using the Sharpie markers to draw on the other snowman embellishments to bring him to life. Add as many details as you like, to really customize it!
- Once done decorating the popsicle stick, go ahead and grab ONE brown pipe cleaner.
- Bend it around the center of your decorated popsicle stick and curl it upward to look like his arms are up in the air.
- Set aside your newly made snowman friend till later.
- Now grab your blue cardstock and scissors.
- Fold your paper in half, open it back up and cut it straight up the center to make two equal sized pieces.
- Reserve one paper piece for today’s craft and save the other for a rainy day.
- Next grab the white paint crayon {or white craft paint and a paint brush if you like} and paint on a “snowy hill” on the blue paper.
- Now grab one cupcake liner and the scissors again.
- Flatten out the cupcake liner with your hands and cut out a small circle from the center of it, to make the snow tube.
- Go ahead and glue the “snow tube” to the center of your blue cardstock, with the painted on snow.
- To finish the popsicle stick snow tubing friend craft, glue your decorated popsicle stick piece to the center of the paper and cupcake liner float. You want it to look like he is sitting on top of the float, going down the slope and really enjoying his time with his arms up in the air.
- The last step for this popsicle stick snow tubing snowman craft, is to cut out a small hat shape from the black cardstock and either glue it on the snowman’s head or glue it somewhere in the snow element of the craft, so it looks like it flew off while he was having “snow” much fun.
- At this point you can also add other embellishments {like some small winter themed stickers, glitter, rhinestones} that you see fit to really make it your own.
- Now display your unique winter masterpiece proudly for all to see!
RELATED —> Paper Plate Snowman House
In addition to this creative popsicle stick snow tubing snowman craft that is a first-seen-here idea on our website, we also have these lovely tutorials for you to check out today:
- Popsicle Stick Lumberjack Bear
- Broccoli Stamped Winter Tree
- Paper Plate Snowman House
- Popsicle Stick Snow Bunny
- Popsicle Stick Christmas Caravan
- Handprint Snowman Poem
- DIY Colored Snow Paint
- SNOW Much Keepsake

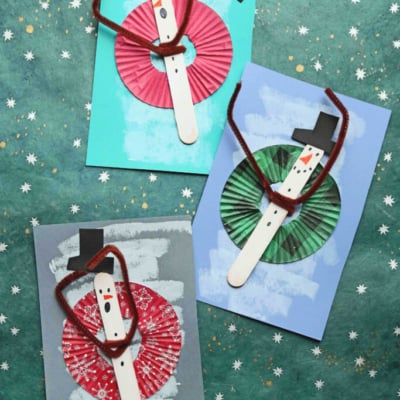
Popsicle Stick Snow Tubing Snowman Craft
Here’s your checklist of supplies to bring this craft to life:
- Cardstock Paper
- 1 Jumbo Popsicle Stick
- 1 Cupcake Liner
- 1 Pipe Cleaner
- Embellishments
- 1 Scissors
Prepare your creative haven by laying down a protective cover before the crafting magic begins!
Directions:
- First things first - we are going to decorate our popsicle stick snowman friend. You only need ONE jumbo popsicle stick per snowman craft.
- Use the white paint crayon to paint one side of the popsicle stick completely white.
- Follow that up by using the Sharpie markers to draw on the other snowman embellishments to bring him to life. Add as many details as you like, to really customize it!
- Once done decorating the popsicle stick, go ahead and grab ONE brown pipe cleaner.
- Bend it around the center of your decorated popsicle stick and curl it upward to look like his arms are up in the air.
- Set aside your newly made snowman friend till later.
- Now grab your blue cardstock and scissors.
- Fold your paper in half, open it back up and cut it straight up the center to make two equal sized pieces.
- Reserve one paper piece for today's craft and save the other for a rainy day.
- Next grab the white paint crayon {or white craft paint and a paint brush if you like} and paint on a "snowy hill" on the blue paper.
- Now grab one cupcake liner and the scissors again.
- Flatten out the cupcake liner with your hands and cut out a small circle from the center of it, to make the snow tube.
- Go ahead and glue the "snow tube" to the center of your blue cardstock, with the painted on snow.
- To finish the popsicle stick snow tubing friend craft, glue your decorated popsicle stick piece to the center of the paper and cupcake liner float. You want it to look like he is sitting on top of the float, going down the slope and really enjoying his time with his arms up in the air.
- The last step for this popsicle stick snow tubing snowman craft, is to cut out a small hat shape from the black cardstock and either glue it on the snowman's head or glue it somewhere in the snow element of the craft, so it looks like it flew off while he was having "snow" much fun.
- At this point you can also add other embellishments {like some small winter themed stickers, glitter, rhinestones} that you see fit to really make it your own.
- Now display your unique winter masterpiece proudly for all to see!


Grab our favorite books via our Amazon affiliate link! In our Amazon storefront you will find books, toys and craft supplies we absolutely love using for our Glued To My Crafts tutorials!