This crinkle paper penguin is the perfect craft idea for kids! It's simple to make and lots of fun to play with.

Have you been on the hunt for a fun, creative craft project for your kids to do together to get their minds engaged and hands moving? Look no further than this super simple yet charming paper penguin craft that is sure to create smiles!

While simple, there is something so captivating about transforming a basic piece of paper into a colorful penguin using just a few supplies.
The crinkled paper creates texture that brings these penguins to life, and watching them come to life through their tiny hands will provide memories that last far beyond the project itself.
In this post, I’ll share the step-by-step instructions for how to make these adorable paper penguin friends so you can experience the joy of creativity with your little ones too!

Keep your kids entertained and crafty this winter season with this easy and adorable crinkle paper penguin tutorial.
Craft Supplies:
- Sandwich Baggie – 1 per craft
- Black Crinkle Paper
- White Crinkle Paper
- Penguin Printable – on our landing page
- White Cardstock Paper
- Scissors
- Crayons
- Black Cardstock Paper
- Adhesive
- Stapler
Directions:
- First things first – grab ONE sandwich baggie and your white & black colored crinkle paper.
- Open up the baggie – nice and wide!
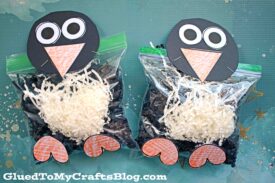
- First stuff the sandwich baggie with a small amount of white crinkle paper. Right in the center of the bag.
- Next grab a handful of black crinkle paper and stuff it inside the bag but AROUND the white paper you just placed in there. Try not to blend the two together. The white will represent the penguin’s belly, while the black is his body.
- Carefully remove some air from the bag and seal it off at the top.
- Set it aside till later.
- If you haven’t already, download and print out the FREE printable listed above in the supply list. You only need one print per craft.
- Grab your choice of coloring utensil in the shade of orange.
- Color in the feet and triangle nose in the printable.
- When done coloring, trim out ALL the pieces with your scissors.
- Discard excess white paper.
- Now grab the black colored cardstock.
- Cut out a medium sized circle for the head of the penguin.
- Go ahead and staple it to the stuffed baggie from earlier.
- To finish off the Plastic Baggie and Crinkle Paper Penguin craft, you are going to use the tape runner adhesive to adhere ALL the paper pieces you cut out earlier, onto the stuffed bag. The feet go on the bottom, while the facial pieces will go on the black circle.
- Add any other embellishments you see fit {maybe a small bow or a few stickers!}
- Then display your stuffed penguin friend made out of crinkle paper for ALL to see and don’t forget to share a picture with us on your social media sites! #gluedtomycrafts
RELATED —> Popsicle Stick Penguin

Learn how to easily transform ordinary craft supplies into creative art projects that shine this winter season! We have you covered with SUPER unique ideas!
Before you leave, be sure to click on over to check out our unique to us Snowman Magnets, Paint Splat Penguin and Chalk Penguin craft posts!

Crinkle Paper Penguin Craft Idea For Kids
This crinkle paper penguin is the perfect craft idea for kids! It's simple to make and lots of fun to play with.
Here’s your checklist of supplies to bring this craft to life:
- Sandwich Baggie
- Crinkle Paper black and white
- Cardstock Paper black and white
- Penguin Printable - on our landing page
Prepare your creative haven by laying down a protective cover before the crafting magic begins!
Directions:
- First things first - grab ONE sandwich baggie and your white & black colored crinkle paper.Sandwich Baggie
- Open up the baggie - nice and wide!
- First stuff the sandwich baggie with a small amount of white crinkle paper. Right in the center of the bag.
- Next grab a handful of black crinkle paper and stuff it inside the bag but AROUND the white paper you just placed in there. Try not to blend the two together. The white will represent the penguin's belly, while the black is his body.Crinkle Paper
- Carefully remove some air from the bag and seal it off at the top.
- Set it aside till later.
- If you haven't already, download and print out the FREE printable on white cardstock paper. You only need one print per craft.
- Grab your choice of coloring utensil in the shade of orange.
- Color in the feet and triangle nose in the printable.
- When done coloring, trim out ALL the pieces with your scissors.
- Discard excess white paper.
- Now grab the black colored cardstock.Cardstock Paper
- Cut out a medium sized circle for the head of the penguin.
- Go ahead and staple it to the stuffed baggie from earlier.
- To finish off the Plastic Baggie and Crinkle Paper Penguin craft, you are going to use the tape runner adhesive to adhere ALL the paper pieces you cut out earlier, onto the stuffed bag. The feet go on the bottom, while the facial pieces will go on the black circle.
- Add any other embellishments you see fit {maybe a small bow or a few stickers!}


NEED MORE HELP DOWNLOADING OUR FREE PRINTABLES? PLEASE REFER TO OUR FAQ PAGE
If you've enjoyed our content or have any thoughts to share, we'd love to hear from you! Mention @gluedtomycrafts or tag #gluedtomycrafts on Instagram!