
It’s your time to shine this winter season with our latest Paper & Chalk Penguin craft tutorial!
Chalk isn’t just for outdoor fun and I’m going to prove that to you, once more! Keep scrolling for all the details, as well as the free penguin printable to get you started with ease!

Sidewalk Chalk Penguin Craft To Make This Winter!
Our super creative, first seen here chalk art penguin art project is going to be really easy and inexpensive to pull together this winter season!
You might not even need to leave your home to make it happen! All you need is white chalk, black construction paper and our free penguin body printable that can be found below. That’s it! It’s just a matter of downloading the file, printing it out and setting up shop for those to recreate a penguin from paper!
PSST – even adults will want to join in on the fun and make their own paper penguin friend come to life. Each chalk and paper piece will be so unique and special, I’m sure you are going to love admiring them all!
So what are we waiting for?! All crafty skill levels are going to LOVE this winter art project tutorial and it’s the perfect winter break boredom buster idea, as well! Make it happen today or bookmark it for later, for a snow day activity!
On that note – all the details and the free penguin printable can be found below. Then when you recreate it, come show off those proud creations with us on our Facebook page! We love seeing those pics from you so please don’t be shy!
Happy crafting, my dear friends! I can’t wait to see pictures of your white chalk and paper penguins!! #gluedtomycrafts
RELATED: Snowman Shooting Star and Chalk Art Snowy Day

This winter, get creative with your kids and make a paper & chalk penguin! This easy art project is perfect for all ages and can be made with materials you already have at home.
Craft Supplies:
- Penguin Printable – on our landing page
- White Cardstock Paper
- Scissors
- Crayons
- Black Cardstock Paper
- White Sidewalk Chalk
- Baby Wipes
- Adhesive
RELATED —> Popsicle Stick Penguin
Directions:
- First things first – download our free penguin body printable, listed above in the supply list.
- Go ahead and find it on your computer, right click and print it out on a single sheet of white cardstock. You only need ONE printable to make ONE chalk art penguin craft. Print as many as you like but only use our file for personal use please.
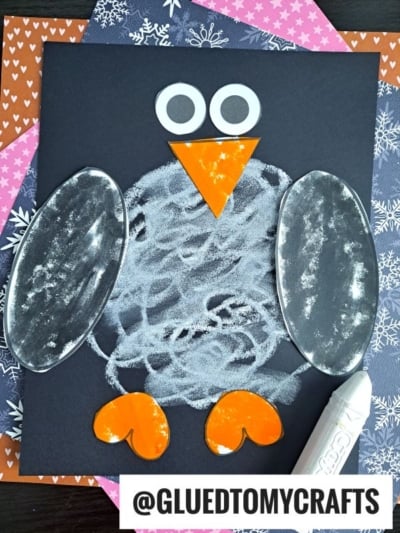
- Now that you have the printable, go ahead and color in the various shapes on it. The nose and feet will be orange, while the wings will be black. The eyes will stay blank in color.
- When done coloring, trim out each paper piece and set them aside till later.
- Discard excess paper.
- Now grab a single sheet of black cardstock and your white piece of chalk.
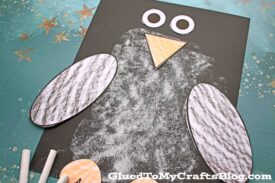
- Go ahead and draw/color in the penguin’s BELLY in the center of the paper with the white chalk {see our image for example} Add as much chalk as you like. You want it to be nice and “fluffy” though.
- Use baby wipes to clean off excess chalk from fingers and hands.
- When done with the chalk, go ahead and grab your penguin cutouts from earlier & your glue stick.
- Glue all the pieces in their designated spots, on chalk art design you just made.
- Add any other embellishments you see fit.
- Then display your chalk penguin paper piece proudly for all to see!
RELATED —> Penguin Craft Ideas

At Glued To My Crafts, we have a “knack” for stepping outside the traditional. It kinda gives us a thrill and we strive to be different! Especially during the winter season when our creative juices are pretty much spent from the Christmas holiday!
So before you leave, come check out our popular Broccoli Stamped Winter Tree, Snowman Poem and Snowman House craft posts.
All three are super unique and sure to impress the crafty fingers that recreate them! Plus they would pair nicely with today’s chalk art penguin craft tutorial – hint hint!

Paper & Chalk Penguin Craft
Here’s your checklist of supplies to bring this craft to life:
Prepare your creative haven by laying down a protective cover before the crafting magic begins!
Directions:
- First print out our provided printable, in color, on a single sheet of white cardstock paper. You only need one print per craft.
- Now that you have the printable, go ahead and color in the various shapes on it. The nose and feet will be orange, while the wings will be black. The eyes will stay blank in color.
- When done coloring, trim out each paper piece and set them aside till later.
- Discard excess paper.
- Now grab a single sheet of black cardstock and your white piece of chalk.
- Go ahead and draw/color in the penguin's BELLY in the center of the paper with the white chalk. Add as much chalk as you like. You want it to be nice and "fluffy" though.
- Use baby wipes to clean off excess chalk from fingers and hands.
- When done with the chalk, go ahead and grab your penguin cutouts from earlier & your glue stick.
- Glue all the pieces in their designated spots, on chalk art design you just made.
- Add any other embellishments you see fit.
- Then display your chalk penguin paper piece proudly for all to see!


NEED MORE HELP DOWNLOADING OUR FREE PRINTABLES? PLEASE REFER TO OUR FAQ PAGE