When engaging in craft activities, it is important for young children to have adult supervision at ALL times. It is also recommended to use supplies that are suitable for your child’s age. Feel free to modify materials or steps to meet your specific requirements.

Penguin Paper Plate Craft Idea
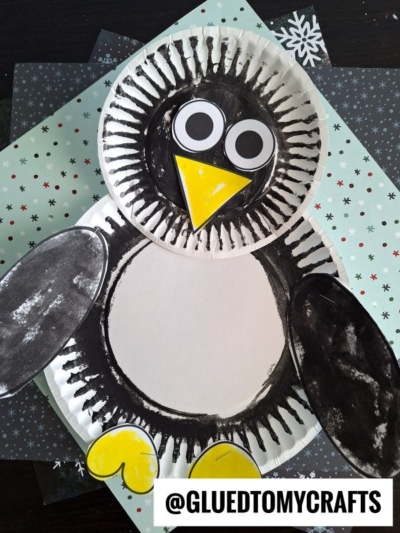
Fall in love with our super simple and extra adorable Paper Plate Penguin kid craft idea, that we are presenting to our readers today! It’s simply perfect for a winter boredom buster or story book theme in your home or classroom. I’ve even included a FREE PRINTABLE to get you started even faster today!
Pair our 5 minute paper penguin craft with one of our personal favorite Scholastic books {affiliate link ->} Flip and Flop by Dawn Apperley and you are sure to have a grand time with some story time AND craft time together today! All you need is a paper plate, black paint and cardstock paper to make this penguin kids craft happen within minutes!
If you would like to recreate this penguin themed kids craft, you can find ALL the details you need to know in the full penguin tutorial below, along with the free file. I promise you, it’s really easy and extra fun to make, so we hope you are inspired to make him come to life in your home as well!
RELATED —> Popsicle Stick Penguin

Let the kids craft some cute, cozy penguins! Get creative with paper plates and make your own little family of penguins. Tag us in your photos to show off their final masterpieces!
Craft Supplies:
- Large Paper Plate
- Small Paper Plate
- Black Craft Paint
- Foam Paint Brush
- Penguin Printable – on our landing page
- White Cardstock Paper
- Color Printer
- Scissors
- Orange Crayon
- Black Crayon
- Stapler
- School Glue
Directions:
- First things first – grab the large paper plate, a foam paint brush and the black craft paint.
- Squirt a small amount of black craft paint on the rim of the paper plate.
- Have children use the foam paint brush to paint the rim completely black.
- When done painting, set it aside to allow it to dry completely.
- Now grab the smaller paper plate.
- Using the same paint brush and black craft paint, paint the smaller paper plate completely black.
- When done, set it aside with the other paper plate from the first set.
- Next go ahead and grab the printable you just printed, along with some crayons and scissors.
- Color in the feet and nose of the printable completely orange.
- Color in the two oval {arm shapes} completely black.
- Leave the two eye shapes blank.
- Now grab your scissors.
- Trim out each piece from the printable.
- Discard the excess paper.
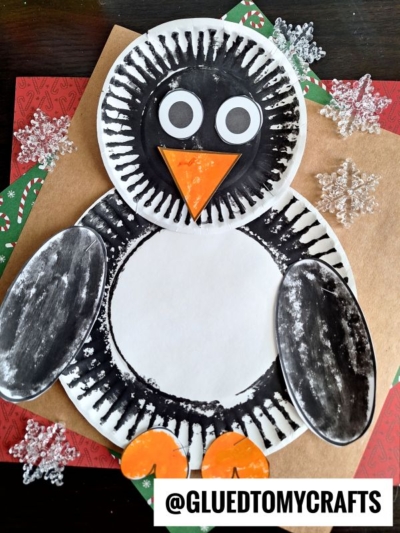
- To finish off the Paper Plate Penguin kid craft idea – staple the small painted paper plate to the larger painted paper plate to create it’s body.
- Then glue/staple the remaining cardstock pieces in place. The arms go on the sides and the feet towards the bottom.
- Add any other embellishments you see fit {maybe some glitter or small bows to make it a girl!}
- Then display proudly for ALL to see!
RELATED —> White Cotton Ball Penguin
At Glued To My Crafts we have an AMAZING selection of kid craft tutorials!
Check out our Paint Splat Penguin, Paint & Paper Penguin and Penguin Scarf Ornament posts for even more inspiration! #gluedtomycrafts


Paper Plate Penguin Craft Idea For Kids
Here’s your checklist of supplies to bring this craft to life:
Prepare your creative haven by laying down a protective cover before the crafting magic begins!
Directions:
- First things first - grab the large paper plate, a foam paint brush and the black craft paint.1 Large Paper Plate
- Squirt a small amount of black craft paint on the rim of the paper plate.Craft Paint
- Have children use the foam paint brush to paint the rim completely black.
- When done painting, set it aside to allow it to dry completely.
- Now grab the smaller paper plate.1 Small Paper Plate
- Using the same paint brush and black craft paint, paint the smaller paper plate completely black.
- When done, set it aside with the other paper plate from the first set.
- Next go ahead and grab your printed printable, along with some crayons and scissors.Cardstock Paper
- Color in the feet and nose of the printable completely orange.
- Color in the two oval {arm shapes} completely black.
- Leave the two eye shapes blank.
- Now grab your scissors.
- Trim out each piece from the printable.
- Discard the excess paper.
- To finish off the Paper Plate Penguin craft idea - staple the small painted paper plate to the larger painted paper plate to create it's body.
- Then glue/staple the remaining cardstock pieces in place. The arms go on the sides and the feet towards the bottom.
- Add any other embellishments you see fit {maybe some glitter or small bows to make it a girl!}
- Then display proudly for ALL to see!


NEED MORE HELP DOWNLOADING OUR FREE PRINTABLES? PLEASE REFER TO OUR FAQ PAGE