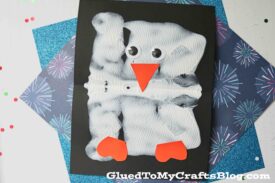
The paint splat craft tutorial meets Glued To My Crafts again with this super adorable “Paint Splat Penguin Friends” kid craft idea! Perfect for a zoo themed craft day in the classroom or any day of the year!
Think of this as an evergreen craft that you can bookmark today and refer back to, anytime the crafty mood strikes!
What’s cuter than one penguin? A whole bunch of penguin friends! This “Paint Splat Penguin Friends” craft is a fantastic way to keep kids engaged during chilly winter days. It’s creative, easy to make, and results in unique, colorful penguins that bring smiles all around.
Whether you’re crafting with your kids at home or leading an activity in the classroom, these penguin buddies will add a playful wintery touch to any setting. Gather your materials – it’s time to meet your flock of friendly, splatter-made penguins!
Create adorable paint splat penguins with this quick and easy craft. A fun activity that sparks creativity in little crafters.
Craft Supplies:
- Black Cardstock Paper
- Orange Cardstock Paper
- White Tulip Puffy Paint
- Googly Eyes
- School Glue
- Scissors
Directions:
Cover your table with newspaper or a plastic sheet to protect it from any splatters.
- To recreate this Paint Splat Penguin Friend, all I did was take some basic black cardstock paper and white Tulip Puffy Paint to make the body of the penguin.
- Just fold your black cardstock in half, open back up and squirt some white paint ON ONE SIDE before closing it up again.
- Once the paper is closed for the second time, gently take your hand and “caress” the white paint around inside, so it makes a fun symmetrical print design on both sides of the paper {keep in mind – paint might ooze from the sides of the cardstock, so be sure to work in an area that can get dirty!}
- Now you are ready to open it back up and see your newly made paint splat & what will eventually become the penguin’s body. We are going to take that “ink blot” and decorate it to give it a custom look & feel.
- To bring it to life, you can take scrap cardstock pieces, glitter, wiggle eyes, feathers etc. – whatever you want to bring it to life. You may need school glue to make things “stick” BUT if you work really fast, while the paint is still wet, you may be able to just lay your embellishments directly on top of the wet paint and skip the glue all together.
- Once finished with your custom paint smash penguin masterpiece, then set aside to let it dry completely, before displaying proudly! And of course – repeat as many times as you like! No two pieces will be the same and I think that’s what makes this crafty idea even more fun!
RELATED —> White Cotton Ball Penguin
Our “Paint Splat Penguin” craft is not only a cheerful way to celebrate winter – it’s also a wonderful activity for unleashing creativity and encouraging fine motor skills. No two penguins will be alike, making each creation extra special!
Kids can express their personalities through their penguin designs, while parents and teachers will love watching the excitement unfold. Plus, it’s inexpensive, easy to set up, and endlessly fun. Happy crafting, and enjoy the super-cute penguin colony you create! 🐧❄️
Paint Splat Penguin Craft Idea For Winter
Here’s your checklist of supplies to bring this craft to life:
Prepare your creative haven by laying down a protective cover before the crafting magic begins!
Directions:
- Just fold your black cardstock in half.
- Now open back up and squirt some white paint ON ONE SIDE before closing it up again.Tulip Puffy Paint
- Once the paper is closed for the second time, gently take your hand and "caress" the white paint around inside, so it makes a fun symmetrical print design on both sides of the paper {keep in mind - paint might ooze from the sides of the cardstock, so be sure to work in an area that can get dirty!}
- Open it back up and see your newly made paint splat & what will eventually become the penguin's body. We are going to take that "ink blot" and decorate it to give it a custom look & feel.
- To bring it to life, you can take scrap cardstock pieces, glitter, wiggle eyes, feathers etc. - whatever you want to bring it to life. You may need school glue to make things "stick" BUT if you work really fast, while the paint is still wet, you may be able to just lay your embellishments directly on top of the wet paint and skip the glue all together.Cardstock Paper, 2 Wiggle Eyes
- Once finished with your custom paint smash penguin masterpiece, then set aside to let it dry completely, before displaying proudly!

CLICK HERE TO PRINT THE DIRECTIONS FOR THIS CRAFT


