Glued To My Crafts

Join thousands of others who have gotten GLUED to our craft tutorials!

  • Home
  • Privacy Policy
  • Craft Safety Guidelines
  • Seasonal Themes
    • New Years
    • Valentine’s Day
    • St. Patrick’s Day
    • Spring
    • Easter
    • Mother’s Day
    • Summer
    • Father’s Day
    • Patriotic
    • Halloween
    • Thanksgiving
    • Fall
    • Winter
    • Christmas
    • Snowmen
    • Story Time
  • Favorite Craft Materials
    • Cupcake Liners
    • Torn Paper Crafts
    • Paper Plates
    • Popsicle Sticks
    • Sidewalk Chalk
    • Clothespin Crafts
    • Tulip Puffy Paint
    • Paper Bags
    • Craft Foam Hearts
    • Puffy Paint
  • About Us
  • Monthly Themes
    • January Craft Ideas
    • February Craft Ideas
    • March Craft Ideas
    • April Craft Ideas
    • May Craft Ideas
    • June Craft Ideas
    • July Craft Ideas
    • August Craft Ideas
    • September Crafts
    • October Crafts
    • November Crafts
    • December Crafts

Paper & Fork Painted Penguin Craft

When engaging in craft activities, it is important for young children to have adult supervision at ALL times. It is also recommended to use supplies that are suitable for your child's age. Feel free to modify materials or steps to meet your specific requirements. Please refer to our safety guidelines for more information.

As an Amazon Associate I earn from qualifying purchases. This post may contain affiliate links. For more information, please see our disclosure policy.

It's super really easy for the younger ones to recreate today and it's even got an added keepsake element to it!
SKIP THE FLUFF AND PRINT THE DIRECTIONS
Paper and Fork Painted Penguin - Kid Craft Idea For Winter

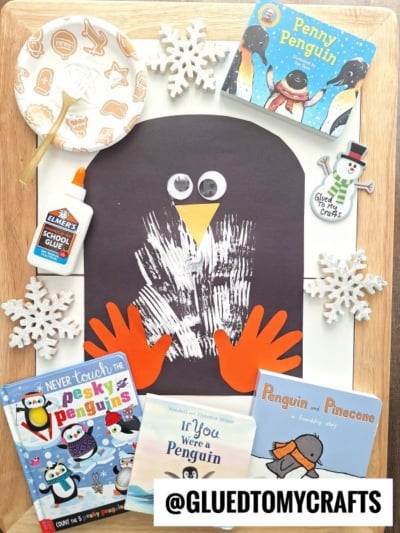
Time to get creative! We love this fun and easy paper & fork painted penguin craft – it’s the perfect way to get your little ones in the holiday spirit. Grab some paint and paper, and let their imaginations fly!

Paper and Fork Painted Penguin - Kid Craft Idea For Winter

Feeling some chilly vibes? Get creative and make this fun paper & fork painted penguin craft! A perfect weekend project for all ages that the whole family can enjoy.

Craft Supplies:

  • Black Cardstock Paper
  • White Cardstock Paper
  • Orange Cardstock Paper
  • Paper Scissors
  • Marker and/or Pencil
  • White Craft Paint
  • Paint Brush or Plastic Fork
  • School Glue
  • Hand-Held Office Stapler

Directions:

  • First trace both of your child’s hands on the orange cardstock paper.
  • Trim out each shape.
  • Set them aside till later on. These will be the penguin’s feet.
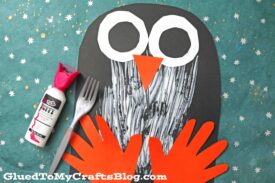
  • Next cut out a large penguin shape out of the black construction paper.
  • Add a squirt of white paint in the center. Just a small amount. You can always add more later on.
  • Hand over a paint brush {or fork} to your child. Tell them to only paint the middle part to create the belly of the penguin.
  • While they are working on that, cut out the remaining penguin elements from the cardstock. Think triangle beak, circular large eyes etc.
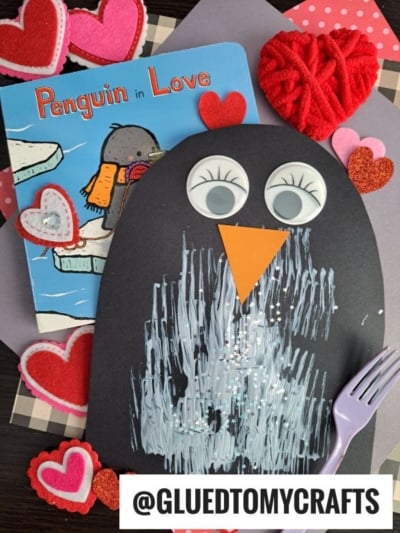
  • When they are done painting the belly on, it’s time for the last step! To finish off the Fork Painted Penguin kid craft, staple/glue your cardstock pieces in place.
  • Then add other embellishments you see fit {maybe some glitter or a hairbow} before displaying proudly!!!

RELATED —> Handprint French Fries

AFFILIATE LINK – PAIR OUR CRAFT IDEA WITH THIS BOOK RECOMMENDATION

Do you love this rather simple Paper and Craft Paint Penguin post?

Then be sure to also check out Popsicle Stick Penguin and Paint Splat Penguin craft tutorials! Both of which are super simple and would pair nicely with today’s fork painted penguin craft – hint hint!

stacey-signature-2023

Paper and Fork Painted Penguin - Kid Craft Idea For Winter
PRINT

Paper & Fork Painted Penguin Craft

It's super really easy for the younger ones to recreate today and it's even got an added keepsake element to it!

Here’s your checklist of supplies to bring this craft to life:

  • Cardstock Paper orange, black and white
  • Craft Paint white
  • Craft Scissors
  • Crayons, Markers or Coloring Pencils
  • Plastic Fork
  • School Glue
  • Stapler

Prepare your creative haven by laying down a protective cover before the crafting magic begins!

Directions:

  • First trace both of your child's hands on the orange cardstock paper.
    Cardstock Paper
  • Trim out each shape.
  • Set them aside till later on. These will be the penguin's feet.
  • Next cut out a large penguin shape out of the black cardstock paper.
  • Add a squirt of white paint in the center. Just a small amount. You can always add more later on.
    Craft Paint
  • Hand over a paint brush {or fork} to your child. Tell them to only paint the middle part to create the belly of the penguin.
  • While they are working on that, cut out the remaining penguin elements from the remaining cardstock paper. Think triangle beak, circular large eyes etc.
  • When they are done painting the belly on, it's time for the last step! To finish off the Fork Painted Penguin kid craft, staple/glue your cardstock pieces in place.
  • Then add other embellishments you see fit {maybe some glitter or a hairbow} before displaying proudly!!!
    Paper and Fork Painted Penguin - Kid Craft Idea For Winter

CLICK HERE TO PRINT THE DIRECTIONS FOR THIS CRAFT

If you've enjoyed our content or have any thoughts to share, we'd love to hear from you! Mention @gluedtomycrafts or tag #gluedtomycrafts on Instagram!

Craft Activity Safety Guidelines:

Always Ensure Adult Supervision - Young children should be supervised at all times when engaging in craft activities. This is essential to keep them safe and ensure materials are used correctly. Use Age-Appropriate Supplies - Choose craft supplies that are suitable for your child’s age. Check labels for recommendations and avoid items with small parts or sharp edges for younger children. Modify as Needed - Feel free to adapt materials or steps to meet your child's abilities and safety needs. For example, substitute scissors with safety scissors if necessary. Keep an Eye on Allergies - Be mindful of potential allergens in craft materials like glue, paint, or certain fabrics. Opt for non-toxic and hypoallergenic options whenever possible. Organize and Secure Supplies - Keep all craft tools and materials organized. Store sharp objects, small parts, and potentially hazardous items out of reach when not in use. Following these guidelines will ensure that crafts remain fun, creative, and, most importantly, safe for everyone involved!


OUR PRIVACY POLICY

  • Email
  • Facebook
  • Instagram
  • Pinterest
  • Twitter
  • YouTube

LOOKING FOR SOMETHING?

EXPLORE OUR SITE:

© 2012–2025 Glued To My Crafts
All activities should be supervised by an adult at all times. Please refer to our safety guidelines for more information.


Please note that all the content of the website, including printables, are for classroom and personal use only. This means that any digital item you download from our site can be used for non-commercial use only. We kindly request that you do not reproduce or sell our creations. We appreciate your understanding and cooperation in respecting our content and intellectual property rights.