Glued To My Crafts

Join thousands of others who have gotten GLUED to our craft tutorials!

  • Home
  • Safety Guidelines
  • Seasonal Themes
    • New Years
    • Valentine’s Day
    • St. Patrick’s Day
    • Spring
    • Easter
    • Mother’s Day
    • Summer
    • Father’s Day
    • Patriotic
    • Halloween
    • Thanksgiving
    • Fall
    • Winter
    • Christmas
    • Snowmen
    • Story Time
  • About Us
  • Amazon Storefront
  • Monthly Themes
    • January Craft Ideas
    • February Craft Ideas
    • March Craft Ideas
    • April Craft Ideas
    • May Craft Ideas
    • June Craft Ideas
    • July Craft Ideas
    • August Craft Ideas
    • September Crafts
    • October Crafts
    • November Crafts
    • December Crafts
  • Collection Posts
    • 20+ Creative Paper Bag Craft Ideas for Kids to Enjoy Today
    • 20+ Plastic Egg Stamp Crafts for Spring Fun
    • 30+ Creative Thumbprint Craft Ideas for Spring Fun
    • Craft Ideas for Kids Using Egg Stickers
    • Thumbs Up! 50+ Creative Thumbprint Crafts for Kids
    • 40+ Insect Craft Ideas For Kids
    • 50+ Craft Ideas For Kids Using A Plastic Fork As A Paint Brush
    • 30+ Puffy Paint Craft Ideas For Kids To Try Today!
    • 20+ Fun and Easy Paper Bowl Crafts for Kids
    • Pete The Cat Craft Ideas: Fun & Easy Projects for Kids
    • Transform Coffee Filters into 40+ Stunning DIY Projects
    • Transform Crepe Paper Streamers into 60+ Stunning Crafts
    • Pie Server Stamped Craft Ideas Kids Will Adore
    • Paint Splat Pie Craft Idea For Kids

Modeling Clay Melted Snowmen Ornaments

When engaging in craft activities, it is important for young children to have adult supervision at ALL times. It is also recommended to use supplies that are suitable for your child's age. Feel free to modify materials or steps to meet your specific requirements. Please refer to our safety guidelines for more information.

As an Amazon Associate I earn from qualifying purchases. This post may contain affiliate links. For more information, please see our disclosure policy.

UPDATE FOR 2026 - To reduce storage costs and download fees, we recently made some changes to our website. The password for all our files this year is GLUEDTOMYCRAFTS2026. No sign-up is required to download our free printables! You can enjoy our printables without creating an account or paying for Box.com. Simply follow the download instructions on our FAQ PAGE.

Crafty fun for anyone AND you will have wonderful pieces to show off on the refrigerator!
SKIP THE FLUFF AND PRINT THE DIRECTIONS
Clay Melted Snowmen Magnets - Kid Craft

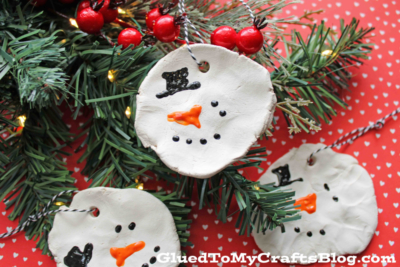
Get creative with your holiday decorations this year! Make these adorable melted snowmen ornaments out of modeling clay for a unique addition to your tree – the possibilities are endless!

Handmade polymer clay melted snowman ornaments with black and orange painted faces hang on a pine branch adorned with red berries. Text reads Melted Snowmen Ornaments.

Clay Snowmen Ornament

With today’s Clay Melted Snowmen Ornament craft tutorial, you are sure to have some crafty fun AND some wonderful pieces to show off on the Christmas tree this year! PLUS with it being COLD outside, this is the perfect time to bring the fun IN!

So on note – make memories with your child that will melt your heart with today’s adorable Modeling Clay Christmas Ornament craft project. Our simple snowman Christmas ornament craft tutorial you don’t have to worry about the bitter cold, the wet slushy mess outside or even the rules.

That’s right – the RULES! Just like building a snowman, the aftermath doesn’t have to be perfect either. Let kids explore their creative side while they make their own one-of-a-kind melted mess! Not only is this snowman Christmas ornament craft idea super duper easy for *anyone* to make but it is also an inexpensive way to keep those kiddos busy during those chilly winter days ahead!

So what are you waiting for?! Go gather up your supplies and let’s get crafting! #gluedtomycrafts

RELATED —> Thumbprint Heart Magnets

Handmade polymer clay melted snowman ornaments with black and orange painted faces hang on a pine branch adorned with red berries.

Snowman Christmas Ornaments

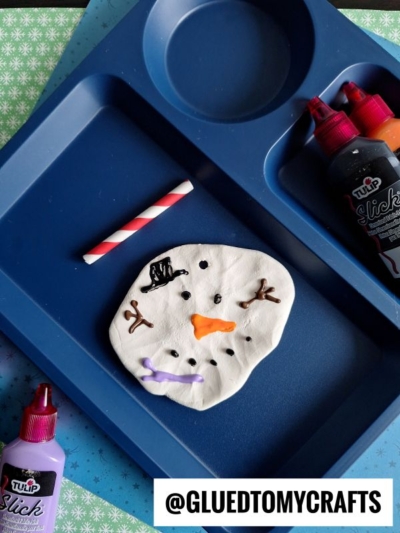
These adorable little snowmen ornaments are made from modeling clay and melted down to create a fun, crafty decoration for your tree!

Craft Supplies:

  • Crayola White Model Magic Clay
  • Orange/Black Puffy Paint
  • Large Cookie Sheet
  • Straw
  • String or Ribbon
  • Scissors

Directions:

  • First things first – take about an inch of white clay in between your hands and roll it into a ball.
  • Splat” it with your fingers to create the snowman puddle. It doesn’t need to be perfect either. Thickness depends on you.
  • Repeat for each snowman ornament you want to make today.
  • Now lay your flattened pieces on a clean cookie sheet.
  • One by one, take your orange & black puffy paint and paint on “snowman” embellishments like a hat, nose, dots for the mouth etc. on the clay pieces. You can also draw on other embellishments you see fit.
  • Once done, and before you set them aside to dry, be sure to use the straw to make a “hole” on the top of the clay piece.
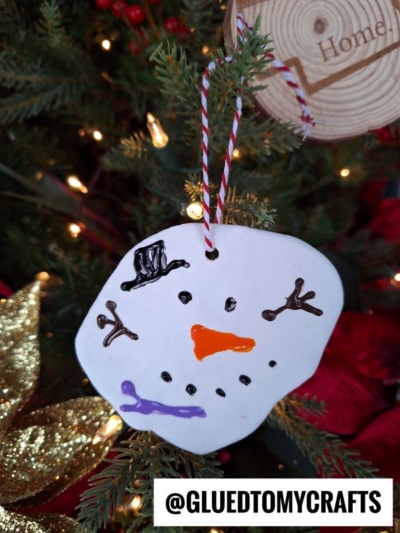
  • Now set aside your cookie sheet covered in melted snowmen, in an undisturbed area to allow the clay to air dry for a few days. If need be – flip the snowman pieces over once a day, so it dries evenly on each side.
  • When they are completely dry – it’s time for the string! Simply cut off a piece of string, thread it through the hole and tie off.
  • Then display proudly for ALL to see!!!

RELATED —> Mama Bear Magnets

Handmade polymer clay melted snowman ornaments with black and orange painted faces hang on a pine branch adorned with red berries.

If you are looking for even MORE winter themed kid craft ideas, be sure to check out these fun posts listed below!

  • Stained Glass Snowmen
  • Bubble Wrap Snowy Tree
  • Snowman Sensory Bin
  • Snowman Playdough
  • Melted Snowman w/Cotton Balls
  • Terra Cotta Pot Snowman
  • Cotton Ball Snowman Cupcake
  • Craft Foam Melted Snowman

stacey-signature-2023


Clay Melted Snowmen Magnets - Kid Craft
PRINT

Modeling Clay Melted Snowmen Ornaments

Crafty fun for anyone AND you will have wonderful pieces to show off on the refrigerator!

Here’s your checklist of supplies to bring this craft to life:

  • Air Dry Clay
  • Tulip Puffy Paint
  • Magnets
  • 1 Large Cookie Sheet
  • 1 Hot Glue Gun - adult supervision required

Prepare your creative haven by laying down a protective cover before the crafting magic begins!

Directions:

  • First things first - take about an inch of white clay in between your hands and roll it into a ball. Then "splat" it with your fingers to create the snowman puddle. It doesn't need to be perfect either. Thickness depends on you. Repeat for each snowman magnet you want to make.
    Air Dry Clay
  • Now lay your flattened pieces on a clean cookie sheet.
  • One by one, take your orange & black puffy paint and paint on "snowman" embellishments like a hat, nose, dots for the mouth etc. on the clay pieces. You can also draw on other embellishments you see fit.
    Tulip Puffy Paint
  • Once done, set aside your cookie sheet covered in melted snowmen, in an undisturbed area to allow the clay to air dry for a few days. If need be - flip the snowman pieces over once a day, so it dries evenly on each side.
  • When they are completely dry - it's time for the magnets! Simply hot glue ONE MAGNET to the back of each snowman piece.
    Magnets
  • Then display proudly for ALL to see!!!
    Handmade polymer clay melted snowman ornaments with black and orange painted faces hang on a pine branch adorned with red berries.
MINI-HEARTS-page-separator-logo-gluedtomycrafts

CLICK HERE TO PRINT THE DIRECTIONS FOR THIS CRAFT

If you've enjoyed our content or have any thoughts to share, we'd love to hear from you! Mention @gluedtomycrafts or tag #gluedtomycrafts on Instagram!


Craft Activity Safety Guidelines:

Always Ensure Adult Supervision - Young children should be supervised at all times when engaging in craft activities. This is essential to keep them safe and ensure materials are used correctly. Use Age-Appropriate Supplies - Choose craft supplies that are suitable for your child’s age. Check labels for recommendations and avoid items with small parts or sharp edges for younger children. Modify as Needed - Feel free to adapt materials or steps to meet your child's abilities and safety needs. For example, substitute scissors with safety scissors if necessary. Keep an Eye on Allergies - Be mindful of potential allergens in craft materials like glue, paint, or certain fabrics. Opt for non-toxic and hypoallergenic options whenever possible. Organize and Secure Supplies - Keep all craft tools and materials organized. Store sharp objects, small parts, and potentially hazardous items out of reach when not in use. Following these guidelines will ensure that crafts remain fun, creative, and, most importantly, safe for everyone involved!


OUR PRIVACY POLICY

OUR COPYRIGHT POLICY

  • Email
  • Facebook
  • Instagram
  • Pinterest
  • Twitter
  • YouTube

LOOKING FOR SOMETHING?

EXPLORE OUR SITE:

© 2012–2026 Glued To My Crafts
All activities should be supervised by an adult at all times. Please refer to our safety guidelines for more information.


Please note that all the content of the website, including printables, are for classroom and personal use only. This means that any digital item you download from our site can be used for non-commercial use only. We kindly request that you do not reproduce or sell our creations. We appreciate your understanding and cooperation in respecting our content and intellectual property rights.

Accessibility Adjustments

Powered by OneTap

How long do you want to hide the toolbar?
Hide Toolbar Duration
Select your accessibility profile
Vision Impaired Mode
Enhances website's visuals
Seizure Safe Profile
Clear flashes & reduces color
ADHD Friendly Mode
Focused browsing, distraction-free
Blindness Mode
Reduces distractions, improves focus
Epilepsy Safe Mode
Dims colors and stops blinking
Content Modules
Font Size

Default

Line Height

Default

Color Modules
Orientation Modules