It's super unique for winter! We have ALL the supplies and directions you need to know in the full tutorial!


The winter season isn’t just about jack frost and snowballs—it’s the perfect time for families to huddle up and get creative.
Swap out hot cocoa for a steaming mug of inspiration; we’re about to craft a whimsical winter wonder that’s bound to sprinkle a little extra fun on those cozy snow days.
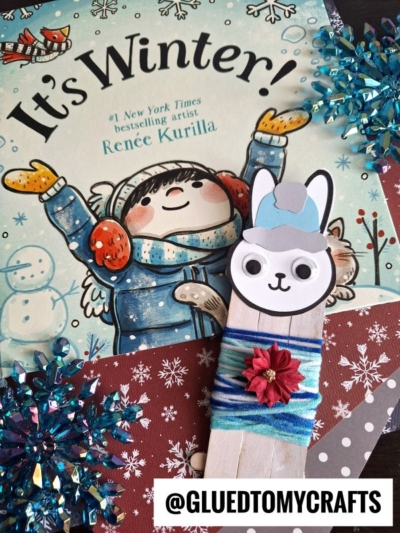
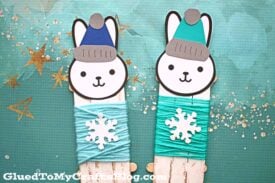
Introducing our unique Popsicle Stick Snow Bunny tutorial —a craft so delightful, it will melt the iciest of hearts. It’s easy enough for tiny hands to manage yet detailed enough to spark imagination and creativity.
This is not your average craft; it’s a bonding experience, a memory in the making, and a showcase of your child’s artistry all rolled into one.

Bring the winter season indoors with this fun and easy kids craft made from popsicle sticks and yarn!
Craft Supplies:
- Jumbo Popsicle Sticks – 3 per craft
- Mini Popsicle Sticks – 2 per craft
- Low Temp Glue Gun
- White Paint Crayon
- Craft Yarn
- Scissors
- Snowflake Stickers
- Bunny Printable – on our landing page
- White Cardstock Paper
- Cardstock Paper Scraps
Directions:
- First get the glue gun hot and ready.
- Assemble the base of your snow bunny friend by gluing THREE jumbo popsicle sticks and TWO mini popsicle sticks together to look like a fence door {3 next to each other and the mini popsicle sticks across to secure in place.}
- Allow it to dry completely. Repeat for each bunny friend you want to make today.
- Now grab your white paint crayon.
- Go ahead and paint the front side of your popsicle stick shape completely white.
- Allow a few minutes to pass {to allow it to dry} before you grab your craft yarn and scissors.
- Take one end of your yarn and hot glue it to the back of your white painted popsicle stick bunny body shape.
- Start wrapping the yarn SEVERAL times around the popsicle stick base, until you have a sweater/the look you like.
- When ready, cut the yarn and use the hot glue gun again, to secure the loose end to the back of the popsicle stick base.
- Go ahead and add a snowflake stickers on top of the wrapped yarn to pull the theme together.
- Set aside the decorated popsicle stick shape till later.
- Now grab your bunny head printout {go ahead and download & print it out if you haven’t} and scissors.
- Cut out ONE bunny head from the print out. Set aside the remaining paper for later.
- If desired – decorate the bunny head you just cut out, with markers, crayons, etc.
- Now grab your colored paper scraps.
- Cut out a small winter hat for on top of the bunny’s head.
- When ready, glue ALL the paper pieces to the yarn wrapped popsicle stick shape from earlier.
- Add any other embellishments you see fit.
- Then let it dry completely before displaying proudly!!!
- Repeat the above steps for the remaining head shapes in the printable!
- Don’t forget to snap a few pictures of your finished popsicle stick snow bunny creations to share with us! It’s your time to shine, so don’t be shy! #gluedtomycrafts
RELATED —> Paper Plate Winter Hat
Our website is a BOX OF DELIGHT! We have a great selection of ideas to choose from – several of which have gone viral and have become house-hold favorites!
Just check out our Caravan Ornament, Broccoli Stamped Christmas Tree and Polar Bear Cards craft posts, that hundreds of people have been recreating this winter season!

Popsicle Stick Snow Bunny Craft Idea
It's super unique for winter! We have ALL the supplies and directions you need to know in the full tutorial!
Here’s your checklist of supplies to bring this craft to life:
- School Glue
- 1 Scissors
Prepare your creative haven by laying down a protective cover before the crafting magic begins!
Directions:
- First get the glue gun hot and ready.
- Assemble the base of your snow bunny friend by gluing THREE jumbo popsicle sticks and TWO mini popsicle sticks together to look like a fence door {3 next to each other and the mini popsicle sticks across to secure in place.}
- Allow it to dry completely. Repeat for each bunny friend you want to make today.
- Now grab your white paint crayon.
- Go ahead and paint the front side of your popsicle stick shape completely white.
- Allow a few minutes to pass {to allow it to dry} before you grab your craft yarn and scissors.
- Take one end of your yarn and hot glue it to the back of your white painted popsicle stick bunny body shape.
- Start wrapping the yarn SEVERAL times around the popsicle stick base, until you have a sweater/the look you like.
- When ready, cut the yarn and use the hot glue gun again, to secure the loose end to the back of the popsicle stick base.
- Go ahead and add a snowflake stickers on top of the wrapped yarn to pull the theme together.
- Set aside the decorated popsicle stick shape till later.
- Now grab your bunny head printout {go ahead and download & print it out if you haven't} and scissors.
- Cut out ONE bunny head from the print out. Set aside the remaining paper for later.
- If desired - decorate the bunny head you just cut out, with markers, crayons, etc.
- Now grab your colored paper scraps.
- Cut out a small winter hat for on top of the bunny's head.
- When ready, glue ALL the paper pieces to the yarn wrapped popsicle stick shape from earlier.
- Add any other embellishments you see fit.
- Then let it dry completely before displaying proudly!!!
- Repeat the above steps for the remaining head shapes in the printable!


NEED HELP DOWNLOADING OUR FREE PRINTABLES? PLEASE REFER TO OUR FAQ PAGE
If you've enjoyed our content or have any thoughts to share, we'd love to hear from you! Mention @gluedtomycrafts or tag #gluedtomycrafts on Instagram!