
Get in the spooky spirit this Halloween with this fun and festive Paper Plate Witch Legs craft! Put a smile on your little ones face when they create something unique together.

Paper Plate Halloween Witch Legs Craft For Kids
Halloween is fast approaching and I’m sure you are starting to look for some activities to keep the little ones busy this “spooky” holiday season. Look no further because today’s paper plate witch legs kid craft is as simple as it gets!
Conjure up a wicked good time with our “bewitching” and super easy witch legs made from a paper plate kid craft idea today! It’s just matter of cutting, pasting and assembling!
It’s super simple, really inexpensive and fun for ALL ages! Just cast a spell with the full tutorial below! Then grab your tissue paper, glue and a tiny crafty imagination to bring this spirited design to life in your home!
Happy crafting my friends!!! Please don’t forget to share pictures of your paper plate witch legs craft creations on our Facebook page for us to admire! #gluedtomycrafts
RELATED —> Thumbprint Spider Card


This paper plate witch legs craft is both fun and easy to make – perfect for a spooky afternoon of creativity.
Craft Supplies:
- Large Paper Plate
- Tissue Paper
- Black Cardstock Paper
- Scrapbook Paper
- School Glue
- Scissors
- Stapler
Directions:
- First cut your paper plate in half. Straight up the center to make TWO equal pieces.
- Reserve one for today’s witch craft and save the other for a rainy day {or make two witches!}
- Now take your tissue paper and cut it into small squares {let the kids practice their cutting skills}
- Take your paper plate half and put a good amount of glue all over it.
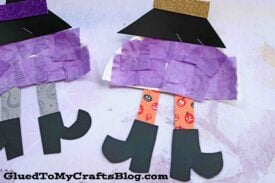
- Have children place the tissue paper on top of the glue, until they are completely covered. This is the witch’s skirt.
- When they are done with that, set aside to let it dry completely, while you trim out a witch hat, some boots and legs from the cardstock/scrapbook paper. Black for the hat and boots, while you make some simple straight legs out of the designed scrapbook paper.
- To finish off the Paper Plate Witch kid craft – simply staple/glue the cardstock pieces in their designated spots.
- For added flair, you can add Halloween stickers and glitter glue to give it a fun look.
- Once done, hang it to display proudly!
- Don’t forget to snap a few pictures to share with us! #gluedtomycrafts
Book Suggestions:
Here are some recommended books that beautifully complement our craft idea. You can conveniently purchase them through our affiliate links on Amazon.
- Room on the Broom by Julia Donaldson
- The Little Witch Who Lost Her Broom! by Elaine Bickell
- The Witch’s Cat and The Broomstick Blunder by Kirstie Watson
- Ten Flying Brooms by Ilanit Oliver
- How to Catch a Witch by Alice Walstead
- There’s a Witch in Your Book by Tom Fletcher
- It’s Raining Bats & Frogs by Rebecca Colby
RELATED —> Paper Plate Witch House

Are you looking for more fun Halloween kid crafts from Glued To My Crafts? Check out these past posts, listed below, for some more spooky craft inspiration!
- Paper Plate Jack O’ Lantern
- Eyeball Frame Decor
- Terra Cotta Pot Pumpkin
- Halloween Black Cat
- Paper Plate Witch Hat
- Paper Plate Owl Witch
- Crafty Leaf Witches
- Paper Plate Witch
- Flying Pumpkin Witch
- Paper Plate Fright Night

Paper Plate Witch Legs Craft Idea
Here’s your checklist of supplies to bring this craft to life:
Prepare your creative haven by laying down a protective cover before the crafting magic begins!
Directions:
- First cut your paper plate in half. Straight up the center to make TWO equal pieces.
- Reserve one for today's witch craft and save the other for a rainy day {or make two witches!}
- Now take your tissue paper and cut it into small squares {let the kids practice their cutting skills}
- Take your paper plate half and put a good amount of glue all over it.
- Have children place the tissue paper on top of the glue, until they are completely covered. This is the witch's skirt.
- When they are done with that, set aside to let it dry completely, while you trim out a witch hat, some boots and legs from the cardstock/scrapbook paper. Black for the hat and boots, while you make some simple straight legs out of the designed scrapbook paper.
- To finish off the Paper Plate Witch kid craft – simply staple/glue the cardstock pieces in their designated spots.
- For added flair, you can add Halloween stickers and glitter glue to give it a fun look.
- Once done, hang it to display proudly!

CLICK HERE TO PRINT THE DIRECTIONS FOR THIS CRAFT