
We make Halloween crafts simple here on Glued To My Crafts! Just check out my latest Paper Plate Witch Hat kid craft tutorial to see what I’m talking about. It only takes a few supplies and THREE steps! That’s it!

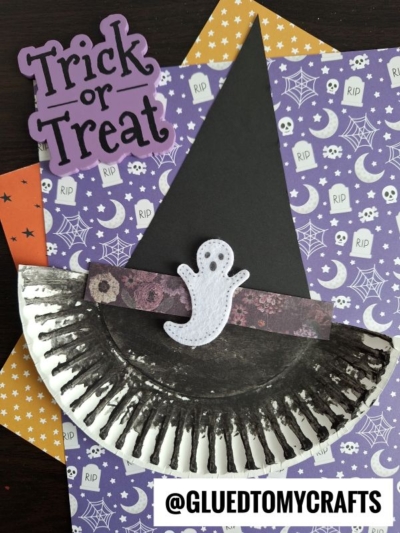
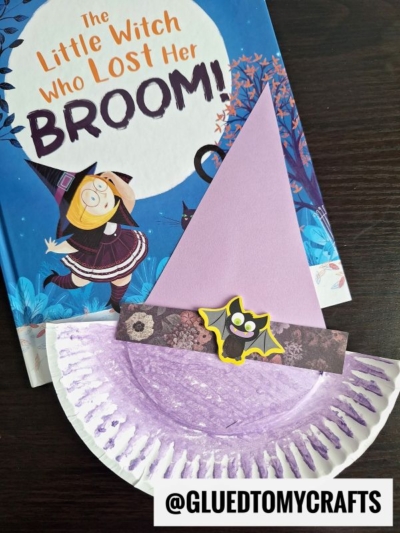
Black Witch Hat Made From A Paper Plate
As a mom, I love celebrating and making every holiday a big deal in our home. Being a craft blogger – this means even more fun for me! I get to share my excitement for each holiday, even more with my lovely readers.
On that note, I absolutely love all the Halloween crafts for kids I’ve been sharing this year, on our website. I think my ideas have been the most creative as of yet! I mean hello? Have you seen our Hedgehog In Pumpkin and Paper Plate Witch House craft tutorials? They are so fun and unique to us!
Anyways, I’m getting off topic… I really need to focus on today’s paper witch hat craft idea! So here goes! Like I mentioned above, it’s super easy to recreate. Even the supplies are simple and you probably don’t even need to leave your home to buy anything. All you need is a large paper plate, black paint and black cardstock paper. That’s it!
From there – you can make your witch hat as elaborate or as simple as you like, when it comes to the embellishments. And if you have been a long time reader of us, you probably have ALL of these supplies in your craft stash already, from previous craft ideas! On that note, don’t you just love when you get good use out of them?! I know I do!
Well – I’m let you get to this strikingly easy Halloween craft tutorial below!
So come one, come all! Let’s make some paper plate witch hat creations to show off this spook-tacular season! Find all the crafty details below! Don’t forget to share pictures of the black pointy hats you design, on our Facebook page! I can’t wait to see how you give it your own witchy craft spin today!! #gluedtomycrafts
RELATED —> Halloween Witch Keepsake

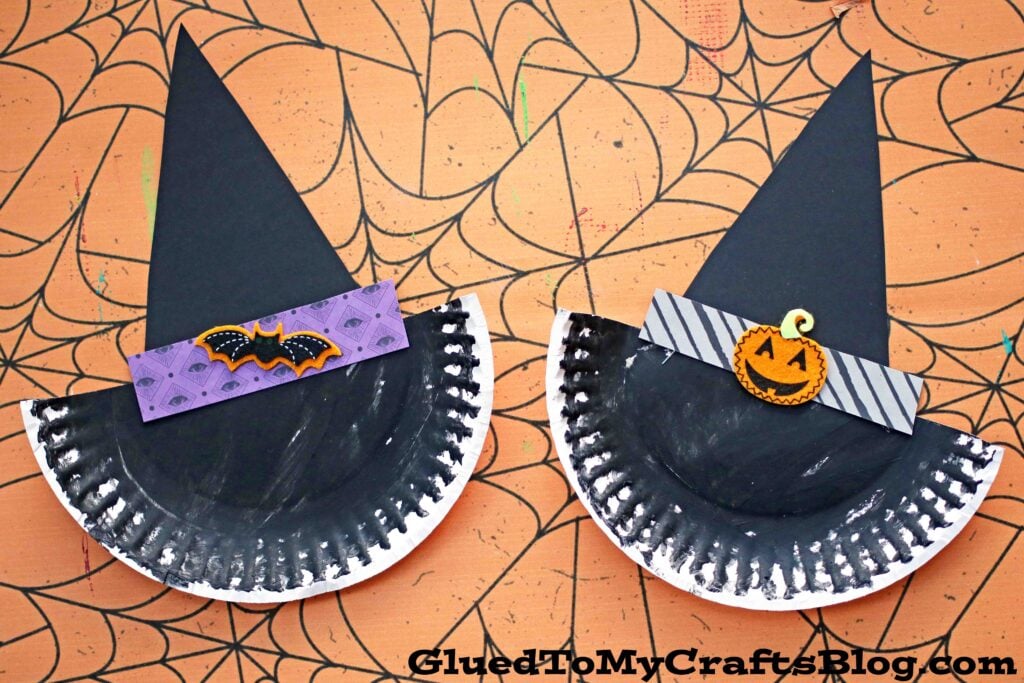
Get creative this Halloween and make your own witch hat with just a few paper plates – perfect for kids of all ages!
Craft Supplies:
- Large Paper Plate – 1 per craft
- Craft Scissors
- Black Craft Paint
- Paint Brush
- Black Cardstock Paper
- Scrapbook Paper
- Stapler
- Halloween Stickers
Directions:
- First things first – take your paper plate and cut it in half. Straight up the center to make TWO equal pieces. You only need one half per craft. Either repeat the craft or save one half for a rainy day.
- Now that you have your paper plate piece, squirt some black paint on it.
- Use the foam paint brush to paint the paper plate completely black.
- Set it aside to allow it to dry completely.
- Now grab your black cardstock paper, scrapbook paper and scissors.
- Cut out a large triangle from the black cardstock.
- Out of the scrapbook paper, cut out a thin rectangle piece to be the “decorative band” of the witch hat.
- When the paper plate piece is dry enough to touch, grab it along with your paper pieces, stapler and embellishments.
- To finish off the Paper Plate Witch Hat craft, simple staple the black triangle piece to the back of the painted paper plate, to create the hat shape.
- Follow that up by stapler on the band and adding any other embellishments you see fit.
- Then display it proudly for ALL to see!
- Don’t forget to share pictures of your paper witch hats with us on your various social media sites! #gluedtomycrafts
Book Suggestions:
Here are some recommended books that beautifully complement our craft idea. You can conveniently purchase them through our affiliate links on Amazon.
- Room on the Broom by Julia Donaldson
- The Little Witch Who Lost Her Broom! by Elaine Bickell
- The Witch’s Cat and The Broomstick Blunder by Kirstie Watson
- Ten Flying Brooms by Ilanit Oliver
- How to Catch a Witch by Alice Walstead
- There’s a Witch in Your Book by Tom Fletcher
- It’s Raining Bats & Frogs by Rebecca Colby
RELATED —> Paper Plate Cauldron

AFFILIATE LINK – PAIR OUR CRAFT IDEA WITH THIS BOOK RECOMMENDATION
It’s Halloween crafting fun on a budget! So before you go, please be sure to check out our Stamped Pumpkin Cards, Halloween Black Cat On Fence and Cat and Candy Corn craft posts for inexpensive ideas, you can recreate with your preschooler or school-aged child today!

Paper Plate Witch Hat Craft
Here’s your checklist of supplies to bring this craft to life:
- 1 Large Paper Plate
- Craft Paint
- Cardstock Paper
- Scrapbook Paper
- Embellishments
Prepare your creative haven by laying down a protective cover before the crafting magic begins!
Directions:
- First things first - take your paper plate and cut it in half. Straight up the center to make TWO equal pieces. You only need one half per craft. Either repeat the craft or save one half for a rainy day.
- Now that you have your paper plate piece, squirt some black paint on it.
- Use the foam paint brush to paint the paper plate completely black.
- Set it aside to allow it to dry completely.
- Now grab your black cardstock paper, scrapbook paper and scissors.
- Cut out a large triangle from the black cardstock.
- Out of the scrapbook paper, cut out a thin rectangle piece to be the "decorative band" of the witch hat.
- When the paper plate piece is dry enough to touch, grab it along with your paper pieces, stapler and embellishments.
- To finish off the Paper Plate Witch Hat craft, simple staple the black triangle piece to the back of the painted paper plate, to create the hat shape.
- Follow that up by stapler on the band and adding any other embellishments you see fit.
- Then display it proudly for ALL to see!


CLICK HERE TO PRINT THE DIRECTIONS FOR THIS CRAFT