
This fun fellow is going to be THE ONE you WANT to invite to your home this fall season. Our Paper Plate Hedgehog In Pumpkin kids craft tutorial is super easy, simply adorable and rather inexpensive to make, as well! You and your child are going to love it – I just know it!

Hedgehog In Paper Plate Pumpkin
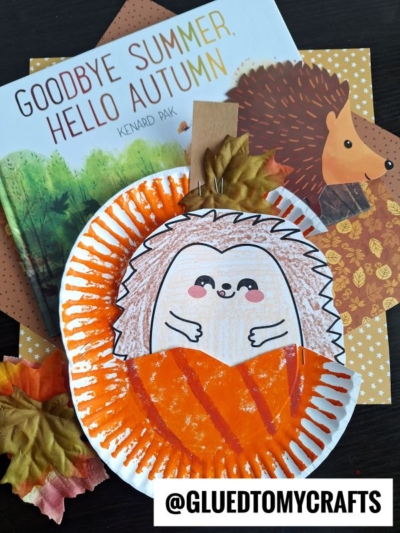
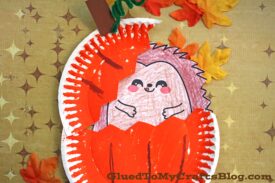
Our paper hedgehog friend is sittin’ pretty in a simple paper plate pumpkin I recently made. Doesn’t his cute face say it all? He sure looks like he’s eating pretty good in there! 🙂
I seriously can’t think of anything that’s more fun for autumn, than today’s hedgehog craft idea. If you have you been on the fence on the types of tutorials we have been sharing so far for the fall season, I’m pretty sure I’m going to change your mind with this latest design from us! I’m seriously so giddy over it!
It’s super unique hedgehog craft idea that I came up with for Glued To My Crafts. I thought long and hard on it & I’m super proud to FINALLY present it to you all. It’s been a labor of love and nobody has an craft idea like this {yet.} So on that note, be sure to bookmark and/or pin our post right away, so you don’t forget where you saw it first!
Today’s fall themed kids craft idea includes a free hedgehog body printable, so young children can recreate it even faster. After parents download and print the provided file below, it will only take a few minutes from start to finish to complete the hedgehog sitting in a pumpkin art project idea. Plus you can customize the paper plate pumpkin or even your new friend, however you like!
Now moms and dads – listen up! This will be your favorite part of all, for the craft. No specialty supplies are needed to make this beauty. All you need is a large paper plate, some paper and some coloring materials. That’s it! Easy peasy, just how we like it around here!
Now are you ready to make this adorable hedgehog craft with your little one today? We have all the details in the full tutorial below, to help you navigate this “hedgehog in pumpkin” craft with ease!
Happy crafting, my friends! Please don’t forget to share pictures of your child’s completed hedgehog in pumpkin creations, on our Facebook page. Since this is a new idea to our website and so unique, it would seriously make my day to see it in action! Make my day and share away! #gluedtomycrafts
RELATED —> “J” is Jack-O-Lantern
By the way – a huge thank you to LisaMarkleSparkles on Etsy for the use of her file in today’s crafty idea! I couldn’t have done it without her help!

What a fun way to celebrate the season with the little ones! Get creative and make this adorable paper plate hedgehog in a pumpkin craft. It’s sure to bring a smile and lots of squeals of delight.
Craft Supplies:
- Large Paper Plate
- Orange Craft Paint
- Brown Craft Paint
- Paint Brushes
- Hedgehog Printable – on our landing page
- White Cardstock Paper
- Crayons, Markers, Coloring Pencils etc.
- Scissors
- Stapler
- Brown Cardstock Paper
- Green Pipe Cleaner
Directions:
- First things first – paint your paper plate completely ORANGE.
- Add some thin lines of brown paint, for some added dimension.
- Once done painting, set it aside to allow it to dry completely.
- If you haven’t already, go ahead and download the free hedgehog file listed above in the supply list.
- Print it out on a single sheet of white cardstock. You only need ONE print per craft.
- Go ahead and color in the hedgehog design however you like with crayons, markers, coloring pencils etc.
- When done coloring, go ahead and cut out the shape from the paper.
- Discard excess paper.
- When the painted paper plate is dry enough, go ahead and grab it, along with your scissors.
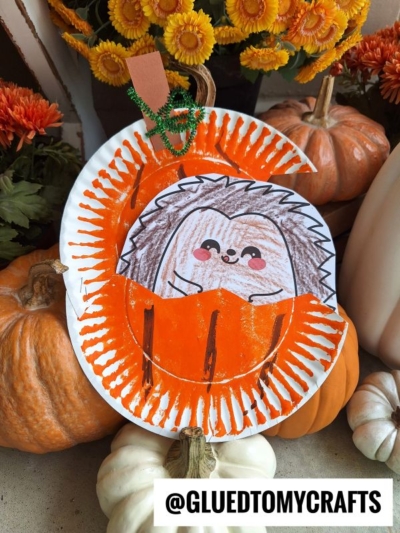
- Cut the painted paper plate in half but not directly in the center. You will want to cut it so you create a small pumpkin “lid” for your hedgehog to peak out of. Use our picture for an example.
- Now grab the stapler.
- Stapler the paper plate pieces back together but in a slight angle so it looks like the pumpkin is opening up.
- Take the hedgehog cut out you made earlier and staple him behind the opening of the pumpkin.
- Next grab the the brown cardstock paper and cut out a small rectangular, pumpkin stem from it.
- Finally – take the green pipe cleaner and curl it with your fingers to look like greenery for the pumpkin.
- Along with the brown cardstock stem, staple those two pieces to the decorated paper plate.
- Add other embellishments you see fit before displaying your hedgehog in pumpkin creation proudly for all to see!
- Don’t forget to snap a few pictures to share with us on Facebook! #gluedtomycrafts
RELATED —> Leaf Hedgehog Puppets
For crafty memories children will treasure long after the season is over – please check out our popular Egg Carton Pumpkin Patch and Raking Leaves craft posts!
Before you go – did you know that we have a private Glued To My Crafts community on Facebook? Everyone is welcomed, so come click the join button!

Paper Plate Hedgehog In Pumpkin Craft Idea
Here’s your checklist of supplies to bring this craft to life:
Prepare your creative haven by laying down a protective cover before the crafting magic begins!
Directions:
- First things first - paint your paper plate completely ORANGE.1 Large Paper Plate, Craft Paint
- Add some thin lines of brown paint, for some added dimension.
- Once done painting, set it aside to allow it to dry completely.
- If you haven't already, go ahead and print out the free provided printable from us.Cardstock Paper
- Go ahead and color in the hedgehog design however you like with crayons, markers, coloring pencils etc.
- When done coloring, go ahead and cut out the shape from the paper.
- Discard excess paper.
- When the painted paper plate is dry enough, go ahead and grab it, along with your scissors.
- Cut the painted paper plate in half but not directly in the center. You will want to cut it so you create a small pumpkin "lid" for your hedgehog to peak out of. Use our picture for an example.
- Now grab the stapler.
- Stapler the paper plate pieces back together but in a slight angle so it looks like the pumpkin is opening up.
- Take the hedgehog cut out you made earlier and staple him behind the opening of the pumpkin.
- Next grab the the brown cardstock paper and cut out a small rectangular, pumpkin stem from it.
- Finally - take the green pipe cleaner and curl it with your fingers to look like greenery for the pumpkin.1 Pipe Cleaner
- Along with the brown cardstock stem, staple those two pieces to the decorated paper plate.
- Add other embellishments you see fit before displaying your hedgehog in pumpkin creation proudly for all to see!


NEED MORE HELP DOWNLOADING OUR FREE PRINTABLES? PLEASE REFER TO OUR FAQ PAGE